Stuff My Kid Eats: Lettuce Wraps

Stuff My Kid Eats

IMG_5268

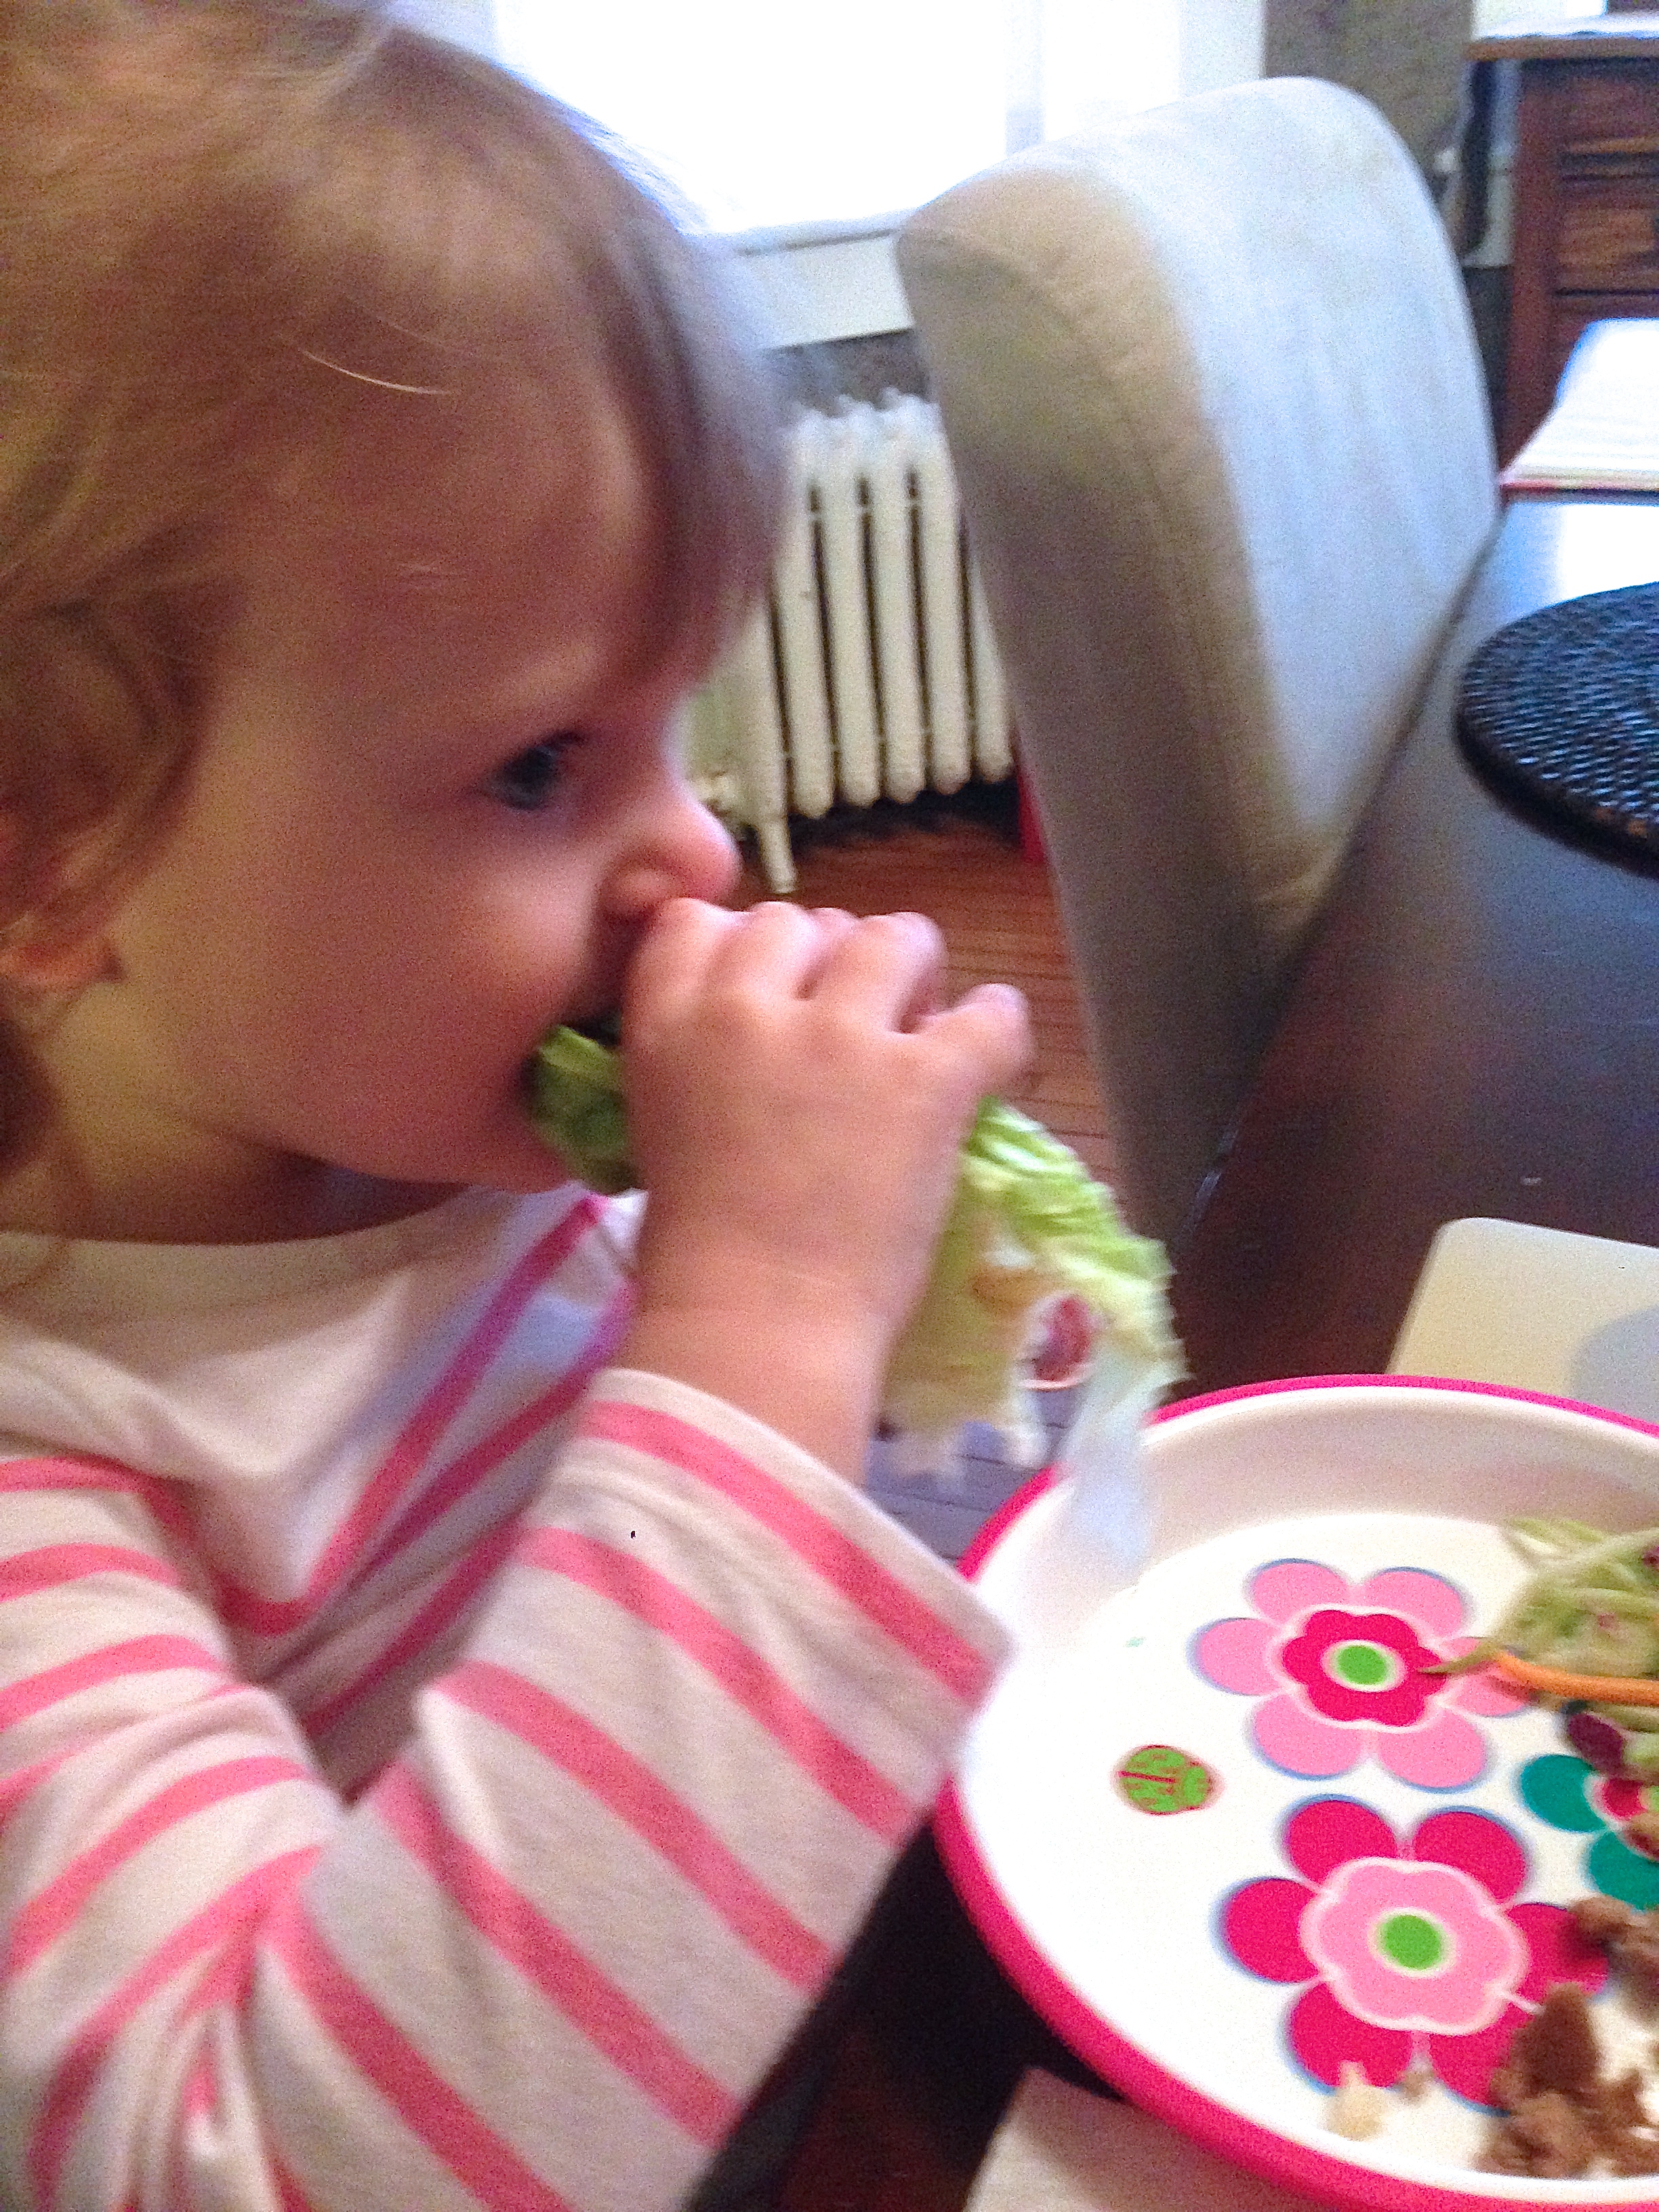
“Lettuce tacos” is what my toddler calls this fun but healthy meal. She loves it when I set up all the serving dishes in the middle of the table, let her pick her own ingredients (with assistance), roll her own wrap (also with assistance), and eat with her hands (no assistance required – except for the sweeping I get to do after she lets everything spill from the open end of her wrap).

Lettuce Wraps

This is probably the healthiest thing I’ve ever made (EVER), yet you’d never know it because it’s packed with tons of flavor, texture, and hands-on fun. I mean who doesn’t love building their own “lettuce taco?” Nobody, that’s who. Another excellent thing about this dish is that it can be served warm or cold. (For cold, prepare all the ingredients, then cover and refrigerate until ready to use.)  

Lettuce Wraps

Serves 4

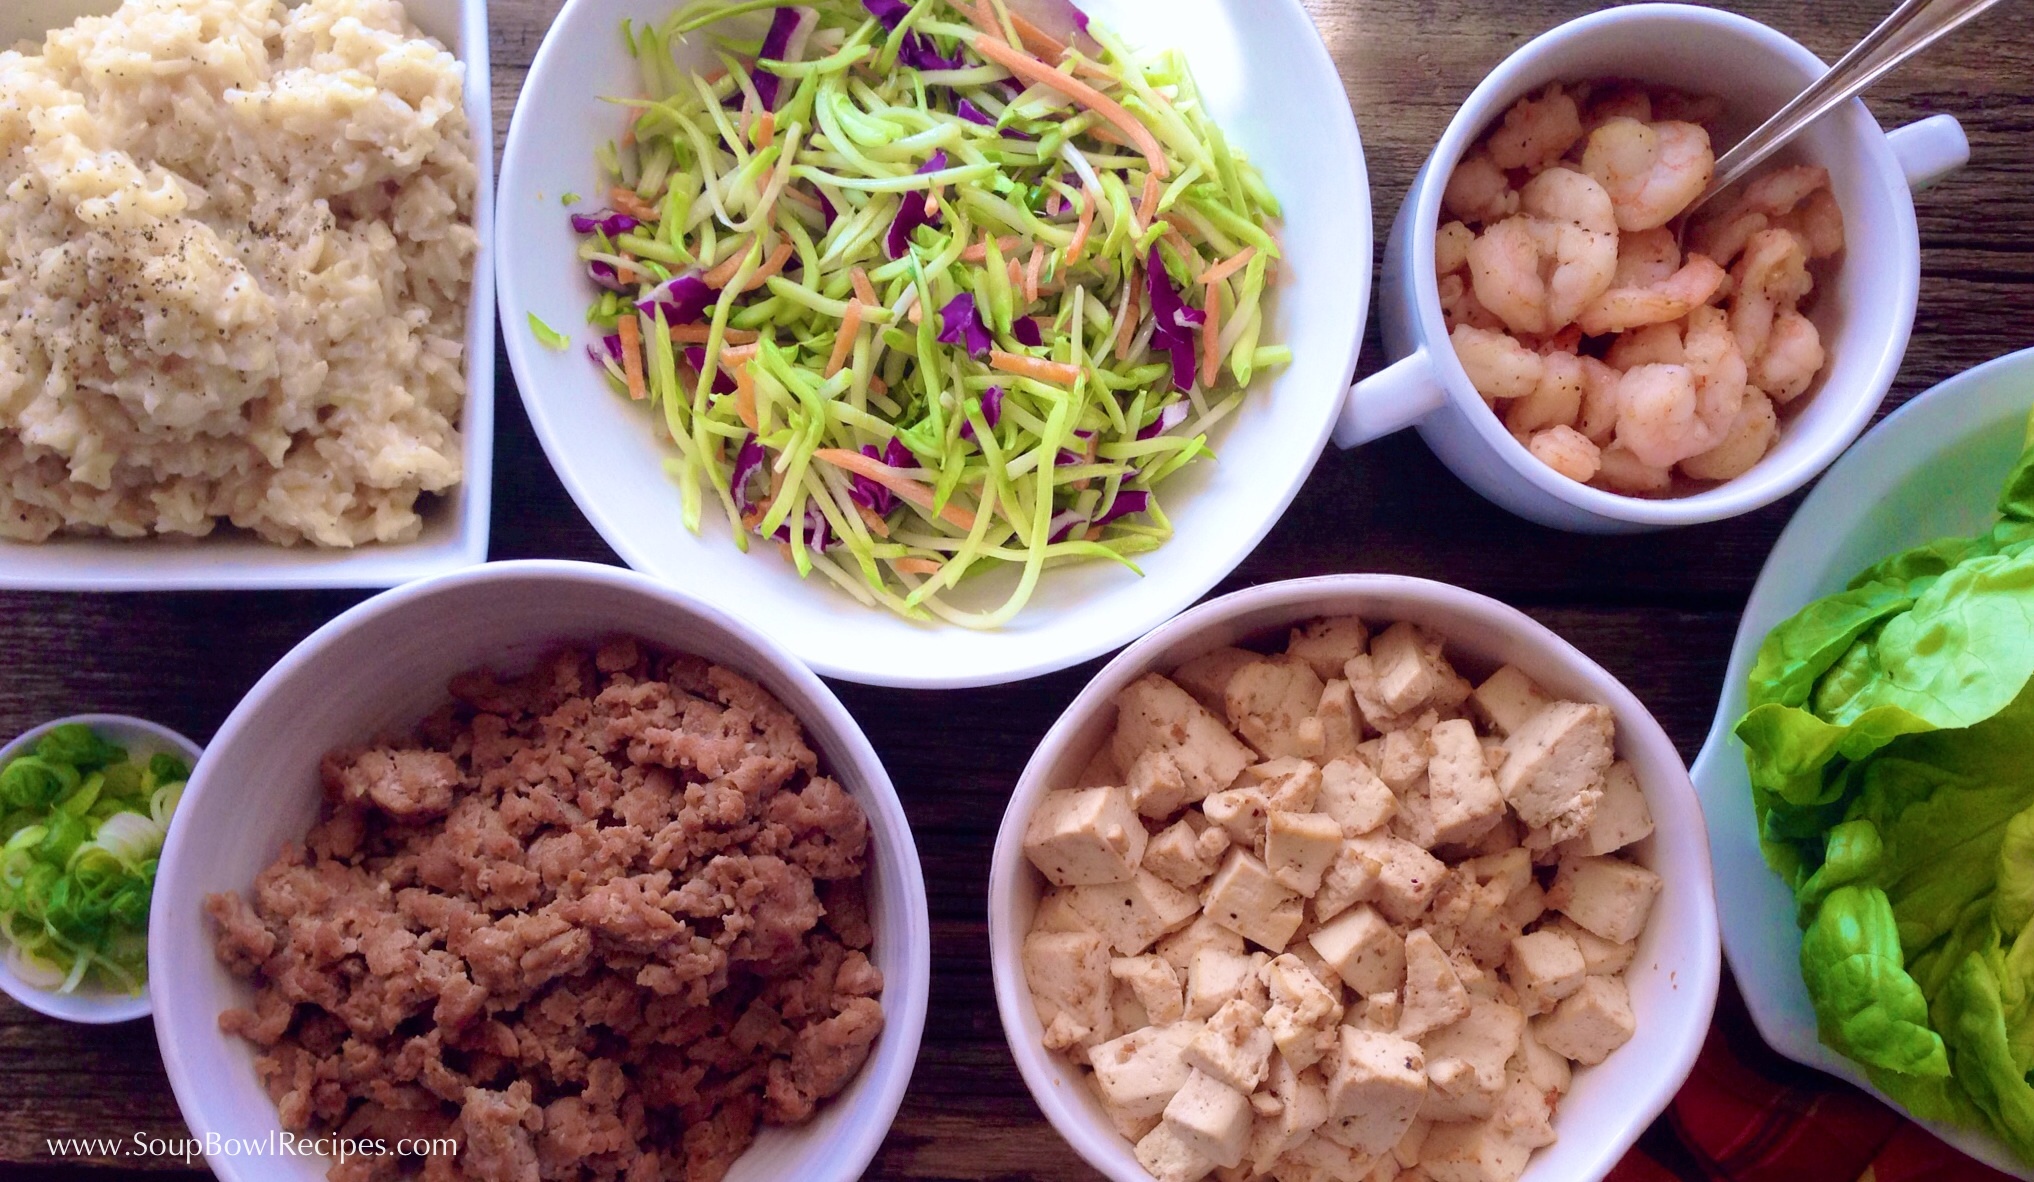
  • 8 outer leaves from about 2 heads of Boston lettuce, separated and washed (reserve small inside leaves for another use)
  • 4 cups prepackaged broccoli slaw
  • 5 Tbsp. coconut oil, divided
  • 4 Tbsp. pineapple juice
  • 4 Tbsp. rice vinegar
  • 2 green onions, thinly sliced
  • 1¾  cups coconut water
  • 1 cup uncooked brown rice
  • 2 Tbsp. dijon mustard
  • 1 Tbsp. oyster sauce (vegetarians use soy sauce)
  • 1 garlic clove, minced
  • Kosher salt to taste
  • Fresh cracked black pepper to taste

Choose one (or a couple) of the following proteins: 

  • 1 lb. ground turkey or chicken
  • 1 lb. uncooked shrimp, (peeled, deveined, and tails removed) coarsely chopped
  • 2 – 14oz. packages of extra firm tofu, cut into very small cubes

Preparation:

Arrange lettuce leaves on a serving platter. Set aside.

Place broccoli slaw in a serving bowl, then whisk together coconut oil, juice, vinegar, and green onions until combined. Season with salt and pepper. Pour dressing over slaw and let sit for at least 10 minutes.

Bring coconut water and a pinch of salt to a boil in a saucepan. Add rice and continue to boil, stirring, for 1 minute. Cover and reduce heat to low, simmer for 35-45 minutes, or until water has absorbed and rice is tender. Once rice has finished cooking, add mustard and stir to combine. Season with pepper. Transfer to a serving bowl and set aside.

Meanwhile, in a large skillet over medium-high heat, add 1 Tbsp. coconut oil, garlic, and protein of your choice and sauté until cooked through. Add oyster sauce and black pepper, and stir until combined. Transfer to a bowl for serving. (Note: if you’ve chosen to use more than one protein, cook separately, wiping out the skillet between batches.)

Place all serving bowls on the table and let everyone assemble their own wraps.

To assemble: 

Fill lettuce leaves with a spoonful of rice, then a spoonful of protein, and top with broccoli slaw. Pick up leaves and eat like you would a taco.

Sidekick: Pair with a glass of Pinot Noir, Merlot, or Rosé.

More from Movie Colony

More from Movie Colony image It’s another beautiful day in Palm Springs! Here are more vacation photos from our little palace located in the luxurious Movie Colony neighborhood (plus a yummy little poolside dish my aunt prepared for us).

{ Welcome to Movie Colony }

image

{ The Toddler and Grandma coordinate their vacation attire }

image


{ Looking down a hallway lined with Persian rugs and fine artwork } image


{ Our feathered friends are even kickin’ it in style with this two-story high ornamental bird house } image


{ A close-up of the mini avian palace } image


{ The view from my office } image


{ Cousins }

image


{ Three peas in a pod }

image


{ Surrounded by luscious succulent plants… } image


{ …and beautiful pottery } image image image image image image image


{ Blogging and jogging, because you can’t drink daquiris all day and expect to still fit into a bikini }

image


{ And last but not least…snacks! } image

Easy Mexicorn Dip

  • 2 cans Mexicorn
  • 2 cups shredded Colby Jack cheese
  • 1 cup shredded Parmesan cheese
  • 2 cups mayo
  • 1 4-oz. can diced jalepeños
  • 2 cups shredded rotisserie chicken (optional)
  • Corn chips (such as Frito scoops) for serving

Preheat oven to 350°F. Combine all ingredients in a large ovenproof baking dish. Bake until bubbly, about 20 minutes. Serve with corn chips and Mexican beer. Kick back and enjoy the rest of the day.

Avgolemeno (Lemon Orzo Soup) with Homemade Hummus

Avgolemeno (Lemon Orzo Soup)

Avgolemeno is a traditional Greek soup made with a few simple ingredients: chicken stock, lemon juice, egg, and orzo (a type of small pasta). The first time I tried it was at a Greek restaurant in Seattle that probably doesn’t exists any longer. It was a cool old place on Capital Hill, the kind of mom-and-pop joint with murals on the walls, surly waiters, and a popular cheese appetizer that they would set on fire and yell “Opa!” In the years that I visited, I don’t think I ever ordered an entrée – I went strictly for the soup and hummus. It was a light dinner that I could count on to fill me up without weighing me down, and just the kind of meal I’ve been craving now that Spring is upon us. Both the soup and the hummus are very easy to make, low in calories, and high in flavor.

Avgolemeno (Lemon Orzo Soup)

Serves 4

  • 6 cups chicken stock
  • ½ cup orzo
  • 3 eggs, beaten
  • ¼ cup fresh squeezed lemon juice, from about 2 lemons (see How To for the best juicing method)
  • 2 cups precooked chicken, shredded (optional)
  • 2 Tbsp. fresh chopped parsley (for serving)

In a large soup pan over medium heat, bring chicken stock to a boil, then immediately reduce heat to low. Add orzo to stock and allow to simmer until soft, about 18 minutes.

In a bowl, whisk together eggs and lemon juice until combined.

Once pasta has cooked, carefully ladle about ½ cup of soup into the egg mixture, while whisking constantly. (This is called tempering. Eggs harden when they cook, so you need to slowly increase the temperature of the egg to keep it from scrambling.) Repeat with a second ½ cup, whisking constantly.

Remove the soup from the heat and slowly pour in the tempered egg mixture, whisking constantly, for about 5 minutes.

If you’re adding chicken, now is the time to do it. Stir until warmed through, about 2-3 minutes.

Ladle into preheated bowls and sprinkle with chopped parsley.

Homemade Hummus

Hummus is an excellent source of protein, and tastes great when spread on sandwiches, mixed into salads, or used as a dip for  veggies and pita bread. Sure, you can buy good hummus at the grocery store, but why would you when it takes 5 minutes and a food processor to whip some up at home?!

Hummus

  • 1 15-oz. can chickpeas, 2 Tbsp. canning liquid reserved
  • ¼ cup tahini (see Notes)
  • 2 Tbsp. fresh squeezed lemon juice (from about ½ a lemon)
  • 2-3 gloves garlic, peeled and coarsely chopped
  • 2 Tbsp. olive oil, plus more for drizzling
  • ¼ tsp. Kosher salt
  • Fresh cracked pepper to taste
  • ¼ tsp. smoked paprika, plus more for serving
  • 1 tsp. fresh chopped parsley (for serving)
  • Assorted cut vegetables, Greek olives, and pita bread for serving

In a food processor, combine all ingredients except parsley. Blend until smooth and creamy and no chunks remain, about 2-3 minutes. Transfer to a bowl, drizzle with olive oil, and sprinkle with paprika and parsley. Serve with cut vegetables, Greek olives, and sliced pita bread.

Notes: Tahini is a sesame seed paste that can be found in most grocery stores, either with the peanut butter, or sometime in the ethnic food section.

How To:

Juice a Lemon

Hand squeezing citrus (lemons, oranges, and especially limes) can be a frustrating ordeal. Up until a few years ago I was cutting the fruit in half, then using a spoon to basically mash the pulp into submission, with varying success. It wasn’t until I attended a cooking demonstration at a wine festival (of all places) that I learned this fool-proof method.

1) Cut one end off of the fruit, about ¼-inch thick:

2) Cut 3 sides off the lemon, creating a triangle:

3) Set a strainer over a small bowl and squeeze lemon, end piece, and 3 side pieces until there is no more juice left in the fruit. Brilliant, right?!

Sidekick: With this light meal a dry white wine would work best, such as a Sauvignon Blanc or a Pinot Grigio.


Blogging from Movie Colony

Blogging from Movie Colony

image

Every year since I was in middle school my family has spent Spring Break in Palm Springs, CA. Even as my sister and I grew older, went off to college, got married and had families of our own, my parents still upheld the tradition of bringing everyone together for a sunny vacation. At first we’d rent a small time-share condo that was close to town so that us girls wouldn’t have to rely on my parents to shuttle us back and forth when we wanted to go shopping or seek out boys our own age. Over the years as our vacation needs evolved (private pool, separate bedrooms for the kids, enough bathrooms for everyone) we graduated to a larger house. Not all have been great (I distinctly remember having to sleep in a room with a creepy clown motif one year), and others have wonderful. This year is spectacular. Beyond spectacular! The house (palace, really) is located in a part of town called “Movie Colony” named because of the high profile neighbors it once boasted. It’s filled with beautiful artwork, Mexican pottery, and unique mementos from famous guests that once visited. It was built in 1929 in the Spanish-Colonial style that was (and is) so popular in the area. It. Is. Beautiful! But it’s not about the house (mostly not), it’s about the fun had within. What once started as a week of excessive tanning and boy-hunting has slowly evolved into a relaxing retreat for loved ones to catch up, swim, and enjoy good food. Below are photos I took around the property this morning. Later this week I’ll be posting more photos and recipes for sunny, light, California inspired dishes. Enjoy – I know I will be!

{ One of the many living rooms }

image


{ A large dining room in case we ever choose to eat indoors }

image


{ The kitchen I will be cooking from this week}

image


{ A pantry full of fun, festive serving platters }

image


{ The office where I’ll be blogging from }

image


{ The Toddler enjoying an alfresco lunch }

image


{ The Mexican Courtyard  }

image


{ The back gate, but why would you ever want to leave? }

image


{ My too-cute-for-words nephews up before dawn patiently waiting for the adults to take them swimming }

image


{ The house is full of tiny doors and hidden rooms, perfect for a game of hide-and-seek! }

image


{ And finally the pool! }

image

More to come tomorrow!


Trail Mix Cookies

I’ve been making these cookies for years, but I never really had a name for them. When I decided to post them on my blog, I knew I needed to call them something, so I stood back and looked at the ingredients – chocolate chips, nuts, raisins, coconut – and they reminded me of trail mix. Ah-ha! Trail Mix Cookies, perfect! The batter has an oatmeal base, and the add-ins are really adaptable; if you don’t like one of the ingredients, just replace it with another trail mix-y alternative like bits of dried pineapple, M&M’s, pistachios, etc. Just make sure you roll the dough thick before sliding them into the oven so that they come out big and chunky and delicious, like a handful of trail mix!

Trail Mix Cookies

Makes 2-3 dozen

  • ½ cup almond or peanut butter
  • ¼ cup unsalted butter, softened
  • ¾ cup brown sugar
  • ½ cup granulated sugar
  • 2 eggs
  • 1 tsp. vanilla
  • 1 ½ cups flour
  • 1 tsp. baking powder
  • 1 tsp. cinnamon
  • ½ tsp. Kosher salt
  • 2 cups quick cooking oats
  • 1 cup shredded sweetened coconut
  • 1 cup semi-sweet chocolate chunks (or chips)
  • 1 cup raisins (or other dried fruit)
  • 1 cup chopped nuts (optional)
  • flaky sea salt (such as Maldon) for sprinkling over hot cookies

*Nut allergy note: Omit nut butter and increase amount of unsalted butter to ¾ cup.

Preheat oven to 350°F.

In a large bowl or stand mixer bowl, cream almond butter, butter, and sugars until thoroughly combined. Add eggs and vanilla and beat until smooth.

In a separate bowl, whisk together flour, baking powder, cinnamon, and salt.

Working in two batches, add flour mixture to butter mixture and beat until smooth. Fold in oats, chocolate, raisins, coconut, and nuts (if using), and stir until incorporated.

Roll a large spoonful of batter (about 2-3 Tbsp.) between your palms to create a ball. Place on a cookie sheet and bake for 8-12 minutes, or until golden on top. Immediately sprinkle hot cookies with flaky sea salt.

Let cookies rest on baking sheet for 1 minute before transferring to a wire rack to cool. Serve with a cold glass of milk. Yum!

Stuff My Kid Eats: Pork Medallions with Chickpeas and Cabbage

Warning: Vegetarians turn back now; this post is about pigs. Lots and lots of delicious pigs! 

IMG_0758

{ My toddler at the Pork & Pickle }

My toddler loves pigs. Absolutely loves them! I’m not talking about the cute, little pink guys that appear in most of her story books (although she loves those, too), I’m talking about the kind you eat. Bacon, ham, pork, you name it, the child will gobble it up, no questions asked. During our most recent travels, we ended up with a couple hours to kill in the Kansas City International Airport, and found a real gem of an eatery, Pork & Pickle, which serves, you guessed it…pork and pickles (among other things). It’s located on the second floor of the Southwest terminal, and once you emerge from the wood paneled elevator, you almost forget that you’re eating in an airport. Almost. The menu had a nice variety of pork that spanned from BBQ to brats…and it got me thinking: I need to cook more pork! It’s a healthy alternative to red meat, it’s more fun than chicken, and it gets my toddler to come to the dinner table without complaint. And then, almost as if it were meant to be, the Fine Cooking magazine I brought with me to read on the plane had a great looking pork recipe. I love it when things work out like that, don’t you? Anyway, I tried it out as soon as we got home, and it turned out to be one of the best pork dishes I’ve had in a long time. And my toddler loved it, which makes it a win-win for me!

IMG_0759

Pork & Pickle in the Kansas City International Airport }

Pork Medallions with Chickpeas and Cabbage

Chickpeas (a.k.a. garbanzo beans) can be a bit bland on their own, but when baked under tenderloins of sizzling, salty pork, they just explode with flavor. This dish is not only delicious and easy to make, but it’s elegant looking as well, which means you can prepare it for your family one night after work, or save it for the next time you have company. Either way, you’ll look like a rockstar in the kitchen! The original recipe called for using dry chickpeas, soaking them overnight, then cooking them on the stovetop for an hour prior to making the rest of the meal. That method sounded delicious, but, really?! It’s more time than I want to spend on a weeknight dinner (also, my local grocery store doesn’t carry dry chickpeas), so I altered the recipe to use canned chickpeas instead. With that being said, anyone who would like to try the long version gets extra credit – and you can find the recipe here. (Recipe slightly adapted from Fine Cooking.)

Pork Medallions with Chickpeas and Cabbage

Serves 6

  • 2 15-oz. cans of chickpeas, with canning liquid
  • 2 bay leaves
  • 2 sprigs fresh thyme
  • 2 cloves garlic, peeled and crushed
  • 2 1-lb. pork tenderloins
  • Kosher salt and fresh cracked black pepper
  • 2 Tbsp. unsalted butter
  • 1 Tbsp. olive oil
  • 1 medium yellow onion, halved lengthwise and thinly sliced crosswise
  • ½ small head Savoy cabbage, thinly sliced (6 to 7 cups)
  • 6 thin slices prosciutto di Parma (3½ oz.)
  • 6 oz. coarsely grated Italian fontina cheese (about 2 cups)

Position rack in the center of the oven and heat the oven to 425°F.

In a saucepan over medium heat, add chicpeas (with canning liquid) along with the bay leaves, thyme, and garlic. Heat until just starting to bubble, then reduce temperature to low and simmer for 20-40 minutes, or however long it takes you to prepare the rest of the dish. Drain, reserving ½ cup cooking liquid and garlic, discard herbs. Smash the garlic (it should be very soft, almost paste-like when smashed), chop, and set aside.

Meanwhile, trim and slice each tenderloin on the diagonal into 3 thick medallions (for a total of 6 medallions). Place each medallion on a cut side, and using your hands, gently press on each to flatten slightly. Season on both sides with salt and pepper.

Heat the butter and oil in a 12-inch oven proof skillet over medium-high heat until shimmering. Working in two batches, cook the pork, flipping once, until golden-brown, 2 to 3 minutes per side. Transfer to a plate and set aside.

Turn the heat down to medium and add the onion and ¼ tsp. salt. Cook, stirring often, until lightly browned, 5 to 6 minutes. Add the cabbage, ¼ tsp. salt, and ½ cup water. Stir, cover, turn the heat down to medium low, and cook, stirring occasionally, until the cabbage is tender, 15 to 20 minutes.

Stir in the chickpeas, reserved cooking liquid, and garlic and season to taste with salt and pepper. Arrange the pork (and any cooking juices that have accumulated on the plate) over the cabbage and chickpeas and top with each piece with a slice of prosciutto and a mound of grated fontina. Transfer the skillet to the oven and cook until the pork reaches 145°F on an instant-read meat thermometer, about 15-17 minutes. Let rest for 5 minutes before serving. Spoon chickpeas onto plate, then top with pork tenderloin.

Sidekick: Pair with a glass of Pinot Noir, Barolo, Syrah, or Chardonnay.

Google’s Handy Nutritional Feature!

image

Have you ever been at the butcher and wonder which cut of meat is the leanest, or standing in the produce department trying to decide whether kale is healthier than chard? Well contemplate no more! Google has built a nutritional feature into it’s search engine. All you have to do is start by typing “compare kale to chard” or “compare rib eye steak to filet mignon” into the search bar and hit enter. Google will pop up a side-by-side comparison of any two food items. Don’t believe me? Try comparing white bread to whole wheat bread before making your next sandwich! This can be done from any device (home computers, tablets, or smartphones) that has a web browser.

Thanks to NPR.org for the tip!


Pesto Pastina Soup with Sourdough Grilled Cheese

I was watching the Weather Channel the other day (because that’s what plays in the locker room at my gym), and I noticed how divided the country is in terms of temperatures this month. The East Coast is still getting slammed with snow, yet the South is enjoying digits in the mid-80’s. The rest of us are somewhere in between; warm, sunny days immediately followed by cold, sleety days. So how, then, does a food blogger go about preparing a soup to satisfy our bipolar March climate? Well, it has to be versatile, that’s how. It needs to be a soup that’s substantial enough to take the chill off the brave souls on the Eastern Seaboard, yet one light enough for those of you already squeezing into bikinis (darn you!). I started rummaging through my dusty mental card catalogue of soup recipes, when suddenly it hit me: Ah ha! Pesto Pastina! Pastina, (literally meaning “tiny dough”) is any variation of small pasta. Pretty much any shape will work in this recipe, and I found some fun ones while perusing the pasta aisle at the grocery store (stars, the alphabet, little squiggly guys). The pastina adds a little bit of starch without making the soup too heavy, and the pesto adds a low-calorie punch of flavor. (Also, this soup can also be adapted for vegetarians, see VEGETARIAN MODIFICATIONS at the end of the recipe.) { Arancini di pepe pastina, or “little peppercorns” } Pesto Pastina Soup Serves 4-6

  • 2 Tbsp. olive oil
  • 3-4 celery stalks, diced
  • 2-3 carrots, peeled and diced
  • 1 yellow onion, diced
  • 2 garlic cloves, minced
  • 6 cups chicken stock (see recipe in Homemade Stocks)
  • ⅓ cup dry pastina, any shape
  • 2 cups pre-cooked chicken (either reserved from chicken stock recipe or store bought)
  • 3 Tbsp. pesto (see recipe below or use store bought)
  • Fresh grated Parmesan for serving
  • 4-6 lemon wedges for serving

Heat oil in a large soup pot over medium-high heat. Add celery, carrots, and onion and sauté until soft and onion starts to become translucent, about 5-8 minutes. Add garlic and cook until fragrant, about 1 minute. Add stock and bring to a boil, then immediately reduce heat to low. Add pastina, partially cover, then continue to simmer for 20 minutes, stirring occasionally. Uncover, add chicken and pesto and cook for 5 minutes, stirring occasionally. Ladle soup into pre-heated bowls and sprinkle with grated Parmesan cheese. Serve with a wedge of lemon for squeezing. VEGETARIAN MODIFICATIONS:

  • Replace chicken stock with vegetable broth (see recipe in Homemade Stocks)
  • Replace chicken with a 15-oz. can of cannellini beans, drained

Pesto Homemade pesto is delicious and easy to make. This recipe yields a little more than you need for the soup, but that’s okay, because you can use the extra to add flavor to other dishes: spoon a tablespoon or two into cooked pasta, or smother some on chicken for a quick and tasty meal.

  • 2 cloves garlic, peeled and roughly chopped
  • 2 cups fresh basil leaves, torn
  • 2 Tbsp. pine nuts
  • 3 Tbsp. grated Parmesan cheese
  • ½ tsp. Kosher salt
  • 3 Tbsp. fresh squeezed lemon juice
  • 2 Tbsp. olive oil, divided
  • Fresh cracked black pepper to taste

Add garlic, basil, pine nuts, Parmesan, salt, lemon juice, and 1 Tbsp. oil to a food processor. Process until just beginning to come together, then while the machine is still running, slowly drizzle in remaining oil and continue to blend until smooth and paste-like. Season with pepper.  *Tip: To freeze, line individual compartments of an ice cube tray with small pieces of plastic wrap  (allow a little extra to hang out the top). Fill compartments with 1 Tbsp. of pesto, and place in the freezer until solid. To release, pull on the ends of the plastic wrap, and peel it from the pesto cube. Place cubes in a freezer bag and freeze for 3-5 months. When ready to use, drop 1-2 pesto cubes into hot pasta and stir until dissolved, or thaw and spread over grilled meat or bread.

Sourdough Grilled Cheese Grilled cheese is an awesome partner to soup, but why settle for the plain old white-bread-American-cheese version when you can easily prepare something more interesting. Switch up the bread to sourdough, and use a few different cheeses. Follow the directions below for ooey-gooey greatness! 

Sourdough Grilled Cheese

Serves 4

  • 8 slices sourdough bread
  • 4 slices Colby Jack cheese, divided
  • 4 slices Gouda cheese, divided
  • 4 slices Swiss cheese, divided
  • 4 slices Provolone cheese, divided
  • 4-6 Tbsp. unsalted butter, softened

Heat a large skillet or grill pan over medium heat. Butter both sides of each piece of bread. Working in 2-3 batches, place bread on hot pan, and grill until golden brown. Flip one piece of bread and place a slice of each kind of cheese on top. Take a second piece of bread and place it grilled side down on the cheese, creating a sandwich. Repeat with other pieces of bread. Grill until golden brown, then flip and grill the second side of the sandwich until golden brown and the cheese has melted. Repeat with all sandwiches. Sidekick: Pair with a glass of Sauvignon Blanc, Pinot Grigio, or a Gewürztraminer.

Book Club – March 2014

Book Club – March 2014

COOKBOOKS

Good Fish by Becky Selengut

IMG_0349

Selengut, a Pacific Northwesterner, has showcased her talent for cooking, witty writing, and sustainable seafood practices in this one-of-a-kind cookbook. Bring the Gin-and-Tonic Cured Albacore to the next party you attend and you’ll be guaranteed an invite back.

Recipes to try:
Steamers (Clams) with Beer
Dungeness Crab Mac-and-Cheese
Scallops, Grits, and Greens
Gin-and-Tonic Cured Albacore

FOODIE BOOKS:

Not cookbooks, per say, but other books (memoirs, novels, short essays) centered around the joys of cooking and eating.

French Kids Eat Everything by Karen Le Billon
and
Bringing up Bébé by Pamela Druckerman

IMG_0356

These two books would make an excellent gift for any soon-to-be-parent (or any parent, for that matter). Both are written by American women living in France, trying to raise their children to be well behaved and adventurous eaters, as most French children are. I read both of these around the time our toddler started on solid foods, and it has shaped the way we approach mealtimes, snacks, and good table manners. This is also a great book for parents who want to reform a picky eater!

Stuff My Kid Eats: Broccoli and Basil Panang Curry

Stuff My Kid Eats

IMG_0737

“Ew, that’s so yucky!” is my toddler’s new favorite phrase. This has been her mantra of late and she uses it in response to pretty much anything she’s offered, be it food, clothes, or a new activity. She turned 2½ a couple weeks ago and has developed an opinion about everything. EVERYTHING! So it was no surprise to me that she turned up her nose at this dinner. “But it’s made with peanut butter,” I told her. She looked at me sideways, calculating her next move. “Peanut butter? Hmm…” She ate a bite, and then another, and another. “It’s very yucky, Mommy,” she said quietly and with much less conviction, then she slurped the last piece of meat out of her bowl and reached across the table to snag more off my husband’s plate.

Broccoli and Basil Panang Curry

IMG_0128

This delicious, easy-to-make Thai dish can be adapted to fit any eater and is sure to become a new family favorite! I usually prepare it with beef (pictured above) and serve it over rice noodles, but it can also be made with chicken, shrimp, or tofu and spooned over long-grain white rice or brown rice. 

Broccoli and Basil Panang Curry

Serves 4

For the Panang

  • 1 13.5-oz. can unsweetened coconut milk (do not stir)
  • 2 Tbsp. Panang or red curry paste
  • 2 Tbsp. almond butter or extra-crunchy peanut butter
  • 5 tsp. fish sauce
  • 4 tsp. dark brown sugar
  • 1 tsp. ground ginger
  • 1 tsp. turmeric
  • 1 medium red bell pepper, sliced lengthwise very thinly
  • 1 medium yellow onion, sliced lengthwise very thinly
  • 1 bunch broccolini, cut into 2-inch long pieces, stems included (regular broccoli would work, too, just cut each floret into quarters)
  • 3 garlic cloves, peeled and minced
  • ¼ cup water
  • 1 cup loosely packed basil leaves, cut into a chiffonade (*see How To)
  • 2 Tbsp. fresh lime juice (from about 1 medium lime)
  • Kosher salt and fresh cracked pepper to taste
  • Optional: 1 tsp. hot chili paste, such as sambal or oelek (omit if you don’t like heat)

Choose one of the following proteins:

  • 1 lb. ribeye steak (*see Note)
  • 1 lb. boneless, skinless chicken breasts (*see Note)
  • 1 lb. uncooked shrimp, peeled, deveined, and tails removed
  • 2 14-oz. packages firm tofu, drained and cut into 1-inch cubes

*Note: Place the steak or chicken in the freezer for 15 minutes to make it easier to cut. With a very sharp knife, slice meat against the grain, no thicker than ⅛-inch.

Choose one of the following for serving:

  • 1 cup uncooked long-grain white (such as Basmati or Jasmine), cooked per package instructions
  • 1 cup uncooked brown rice, cooked per package instructions
  • 8 oz. dry rice noodles, cooked per package instructions

Cook rice/rice noodles per package instructions.

While rice/rice noodles are cooking, heat a large, straight-sided skillet over medium heat. Spoon the thick coconut cream from the top of the can into the skillet. Add the curry paste and cook, stirring until fragrant and beginning to dry, about 2-3 minutes.

Stir in the remaining coconut milk, almond/peanut butter, fish sauce, brown sugar, ginger, and water and bring to a simmer. Stir in the red pepper, onion, garlic, and broccolini, cover and cook until the vegetables are crisp-tender, about 3 minutes.

Add the protein of your choice and half of the basil, cook uncovered, stirring often until the protein is cooked through, about 3-5 minutes. Stir in the lime juice and season with salt and pepper.

Divide cooked rice/rice noodles among 4 separate plates. Spoon Panang over rice/rice noodles, dividing evenly, and sprinkle with remaining basil chiffonade.

*How To:

Chiffonade Basil

IMG_5395

Stack 4-5 leaves on top of each other.

IMG_5394

Tightly roll the stack lengthwise (another selfie of my thumb).

photo

With a sharp knife, cut the roll perpendicularly into very thin ribbons.

IMG_5393

Repeat with remaining basil leaves.

Sidekick:

  • If you choose to add heat (hot chili paste) to this dish, then you’ll want a nice cold beer, either an Ale, Pilsner, Singha, or Weiss; or a glass of Riesling, either an off-dry or Spätlese.
  • If you prefer the safer, less spicy version of this dish, add a non-oaky Chardonnay to the beverage list above.