Book Club: February 2014

Book Club – February 2014

COOKBOOKS:

Barefoot in Paris and How Easy is That? by Ina Garten                                            www.barefootcontessa.com

IMG_0348

You can’t go wrong with anything in the Barefoot Contessa collection; delicious recipes, beautiful photos, and informative chapter introductions, Ina Garten has nailed the formula for an exceptional, easy to use cookbook. I have everything she’s written, but these two are my favorites.

Recipes to try:
Gougères (Cheese Puffs) – Barefoot in Paris
Herbed-Baked Eggs – Barefoot in Paris
Chicken with Forty Cloves of Garlic – Barefoot in Paris
Vegetable Tian – Barefoot in Paris
Foie Gras with Roasted Apples – How Easy is That?
Baked Fontina – Barefoot in Paris

FOODIE BOOKS:

Not cookbooks, per say, but other books (memoirs, novels, short essays) centered around the joys of cooking and eating.

School of Essential Ingredients by Erica Bauermeister

IMG_0354

This lighthearted piece of non-fiction is a fun vacation read that allows you to turn off your brain for a few hours and disappear into a world of food and romance. Although not a literary masterpiece, it has moments of humor and heart-break, and a chapter that gave me the courage to finally kill my first crustacean! (See my Lobster Bisque post.) 

Stuff My Kid Eats: Sweet & Sour Molasses Chicken and Rice

Stuff My Kid Eats

IMG_0121IMG_0122

Being natives of the Pacific Northwest, my husband and I both love Asian food, and have been taking our toddler to Japanese and Thai restaurants since she was three weeks old. Meal after meal she’s observed us (with an equal amount of curiosity and amusement) as we use chopsticks to shovel rice and sashimi into our faces. Other than chicken katsu, she hasn’t very adventurous in what she was willing to try. It wasn’t until we took her to her first Chinese restaurant a while back that she really began to show an interest in Asian cuisine. Throughout dinner, she assumed the usual routine: request a peanut butter sandwich, settle for pork fried rice, beg for chopsticks, accidentally poke herself with them, resume fork usage, spill rice over the table and floor. But then, after the meal was over, the waitress brought us our check…and a fortune cookie. This crunchy, individually wrapped treat with a secret message inside was just the thing she needed to turn her into a believer. Now, whenever I set the table with chopsticks, her enthusiasm for dinner increases tenfold. It doesn’t matter what I serve (and we don’t even have to give her a fortune cookie at the end of the meal, either), we just have to be willing to talk about her trip to the Chinese restaurant for the rest of the evening: “Do you remember the restaurant with the fish tank, and the cookie with the paper inside, and the chopsticks, and the tiny glasses, and Mommy’s spicy soup, and the pretty flowers on the table, and Daddy’s funny broccoli, and the, and the, and the…?”

Sweet and Sour Molasses Chicken and Rice

IMG_0078

This is a very loose (and healthy) adaptation of Chinese sweet & sour chicken. My family has been making it for years, and I’m not sure where the recipe came from anymore. I have a second generation photocopy that has some ingredients scribbled out and others written in, there are soy sauce drips across the top, and an entire corner is torn away. I’d love to credit the original author, but without forensic assistance, I don’t believe that would be possible. 

Sweet & Sour Molasses Chicken and Rice

Serves 4

For chicken:

  • 2 Tbsp. low-sodium soy sauce
  • 2 Tbsp. molasses
  • 2 Tbsp. sesame oil
  • 4 chicken breasts

For rice:

  • 1 cup dry basmati, jasmine, or other long-grain rice (or brown rice, if you prefer)
  • 1¾ cup water
  • 3 Tbsp. coconut or peanut oil
  • ½ cup unseasoned rice vinegar
  • 2 Tbsp. molasses
  • 1 clove garlic, minced
  • ½ inch fresh ginger root, peeled and minced
  • 4 Tbsp. jalapeños, diced (or mild green chiles, diced)
  • 2 scallions, including green tops, thinly sliced
  • Kosher salt and fresh cracked black pepper to taste

Preheat oven to 425°F. Lightly mist a baking dish with cooking oil.

In a medium saucepan, bring water to a boil. Add rice and stir for one minute. Reduce temperature to low and simmer, covered for 20 minutes, or until rice is cooked.

With a meat mallet, pound chicken breasts to a ½-inch thickness and prick all over with a fork. Season with salt and pepper, and place in baking dish. In a small bowl, whisk together soy sauce, molasses, and sesame oil until combined. Pour molasses sauce into baking dish with chicken, turning chicken so that it’s fully covered. Bake for 15 minutes, turning chicken half way through. Remove baking dish from oven and carefully pour molasses sauce into a small bowl. Return chicken to oven and increase temperature to broil. Broil for 2-3 minutes or until chicken becomes brown and crispy at the edges. Remove baking dish from oven and let rest 10 minutes before slicing.

Meanwhile, whisk together oil, vinegar, molasses, garlic, ginger, and jalapeños (or chiles) until combined. Once rice has finished cooking, pour vinaigrette into the rice pot and stir until combined. Season with salt and pepper.

Divide rice among 4 plates. Lay 1 breast of sliced chicken on top of rice, and spoon 1-2 Tbsp. molasses sauce over chicken. Garnish with sliced green onions.

Sidekicks: 

  • A plate of steamed broccoli would serve as a quick, easy side dish, and an excellent sponge for the delicious molasses sauce you don’t want to go to waste.
  • Serve with sake; either Junami (rich, medium-bodied), or a sweeter variety.

New Orleans Red Beans & Rice

New Orleans Red Beans & Rice

IMG_0082

Guess what, folks? Fat Tuesday is just a week away (which means Spring is fast upon us), and what better way to close out the winter season of gluttonous eating than with a big bowl of red beans & rice (even if it is the healthy version)! In New Orleans, red beans & rice was traditionally served on Mondays, because that’s when the women of the house would do the weekly washing — a chore that would take all day. Before scrubbing the clothes, they would take the left over ham hock from Sunday night’s dinner, add it to a pot of beans, then set it atop the stove to simmer. Nowadays, we don’t typically wash our clothes by hand, or serve a large ham for dinner on Sunday night, but that doesn’t mean we can’t honor this Southern tradition, especially at the kickoff of Mardi Gras. And not to get too modern on you, but this recipe calls for a crockpot. Gasp! “Laissez les bons temps rouler!” as they say in New Orleans, or “Let the good times roll!” (To adapt this dish for vegetarians, see Vegetarian Modification at the end of the recipe.)

New Orleans Red Beans & Rice

Serves 6

  • 4 cups chicken stock
  • 2 cups dried red kidney beans
  • 1 yellow onion, chopped
  • 1 green bell pepper, chopped
  • 1 red bell pepper, chopped
  • 3 celery ribs, chopped
  • 5 garlic cloves, minced
  • 1 jalapeno pepper, seeds & ribs removed, diced (optional)
  • 1 tsp. dried thyme
  • 1 tsp. dried oregano
  • 1 tsp. dried sage leaves
  • 1 tsp. smoked paprika
  • ¾ tsp. fresh ground black pepper
  • ½ tsp. turmeric
  • ½ tsp. onion powder
  • ½ tsp. garlic powder
  • ½ tsp. cayenne pepper (see Tips)
  • ¼ tsp. red-pepper flakes (see Tips)
  • 2 bay leaves
  • 2 (14 oz.) packages Andouille sausage, sliced into ½-inch coins
  • 1 (7-8 oz.) ham steak, diced
  • 1 ham hock (see Tips)
  • ½ tsp. Kosher salt
  • 3 cups cooked long-grain rice
  • ¼ cup green onions, thinly sliced, for serving

In a crockpot, combine all ingredients up to the ham hock. Stir well, then nestle ham hock into the middle of mixture. Cover and cook on LOW heat for 8 hours or HIGH heat for 4-6 hours.

Find bay leaves and discard. Gently remove ham hock and set aside. Once cool, cut meat away from bone, dice, and mix into beans. Season with salt and pepper, then spoon over top a bowl of cooked long-grain rice. Top with sliced green onions.

Sidekicks:

  • I like my red beans & rice SPICY! so I always have a bottle of Louisiana Hot Sauce on the table, that way I can add as much heat as I want.
  • Because of the aforementioned spice, I need something cool to extinguish the fire, and beer does just the trick. Try something crisp and light like a Pale Ale or Lager.
  • If you prefer wine over beer, uncork a bottle of Beaujolais, Shiraz, or Gewürztraminer instead.

Tips:

  • I wait to add the cayenne pepper and red-pepper flakes until after I dish my toddler’s serving. If you don’t like too much heat, omit one or both. Also, in that case, the spicy Andouille sausage can be replaced with a mild smoked sausage.
  • Fresh ham hocks can be purchased at your local butcher, or prepackaged ones can be found in the meat section of most grocery stores with the spiral cut hams.

Vegetarian Modification:

  • Omit the sausage and ham hock
  • Add 1 vegetable bouillon cube to the crockpot
  • Substitute smoked paprika for regular paprika

I ♥ Cooking Gloves

Soup’er Finds

IMG_0591

I  Cooking Gloves

The first time I saw a pair of these brightly colored gloves in action (outside of a medical office) was in my mom’s kitchen. She was standing over a cutting board, chopping onions, and telling me about the latest guest on Ellen. “What ARE you wearing?” I asked her in total dismay. “Gloves,” she answered as if it were the most natural thing in the world, “I hate the way onions make my hands smell.” Huh! As much as I love to cook, it had never dawned on me that there was an alternative to having hands that perpetually reeked of onions and garlic. That evening, I left with a pair of nitrile* gloves tucked in my purse, and now I’m never without at least one box stored in my kitchen.

In the years that I’ve been donning this ridiculous-looking kitchen attire, I’ve found many other helpful uses than that of odor control. When I’m peeling roasted beets, I wear them to keep my hands from being stained red. I also wear them when I’m kneading dough so that I don’t have to spend 20 minutes scrubbing my fingernails and rings. Nitrile gloves are also great for handling hot foods; I use them when I’m making homemade stock and I need to strip the meat from the bone, or when I’m rolling hot tortillas into enchiladas. Now that I have a toddler, I wear gloves when I’m handling chicken, fish, and other raw meats. This way, when she takes a header off the couch (which happens on a weekly basis), I’m able to strip them off and attend to her tears without having to worry about scrubbing down or spreading any food-borne bacteria. And ladies, when you’re sporting a fresh manicure, these handy gloves prolong the life of your polish — and that alone is worth the price of the package!

Nitrile gloves can be found online at Amazon.com.

*Note: Nitrile is a synthetic rubber material used in place of latex. Latex allergies have been on the rise in recent years† and cause symptoms as mild as a skin rash, runny nose, and sneezing to as serious as anaphylactic shock. Many people don’t even realize that they are allergic to latex if they aren’t exposed to it on a regular basis. Even if you’re certain that you’re not allergic to latex, it’s best to play it safe and keep it out of your kitchen. Most latex gloves are powdered for easy application, and that powder can become airborne, irritating the lungs.

New York State Department of Health

Stuff My Kid Eats: Seafood and Asparagus Risotto

Stuff My Kid Eats

IMG_0004

“Risotto! Risotto! Risotto!” my toddler squeals with delight as she jumps about the kitchen clapping her hands. This is not a typical response to many of the dishes I serve for dinner. Dinner, in fact, is her least favorite meal, as it usually doesn’t arrive in the form of a sandwich or a waffle. But risotto is different; especially seafood risotto. She thinks she’s getting away with something when I serve it, “You mean I get to eat a whole plate of rice and nobody’s gonna stop me? Yes, please!” The only static this meal causes is when she runs out of shrimp and gets bent that my husband and I won’t fork over ours. Not a bad argument to have with a toddler, as far as I’m concerned!

Seafood and Asparagus Risotto

IMG_0037

Risotto is a traditional Italian meal made with a short-grain rice called Arborio. The higher starch content in the rice adds creaminess to the dish, without actually adding cream to the dish — so it’s a win-win for those calorie counters! This recipe takes a bit more hands-on attention, as it needs to be stirred continually for about 30 minutes, but it’s worth every bit of elbow grease — consider it part of your daily workout!

Serves 4

1 cup uncooked Arborio rice
2 Tbsp. olive oil
2 Tbsp. unsalted butter
1 shallot, minced
2 cloves garlic, minced
3 cups fish stock, or chicken or vegetable stock (see recipe in Homemade Stocks)
1 cup dry white wine, such as Pinot Gris or Sauvignon Blanc (see Note*)
½ bunch of asparagus, tender parts only, cut into 1-inch pieces
24 uncooked bay scallops
12-18 uncooked medium shrimp, deveined and peeled with tails removed
Kosher salt and fresh cracked black pepper to taste

*Note: All of the alcohol in the wine burns off as it cooks, so it’s safe to serve to children, however, if you prefer, replace wine with an extra cup of stock.

In a saucepan, bring stock and wine to a low simmer. Meanwhile, over medium-low heat, melt butter and oil in a large straight-sided skillet until bubbly. Add shallots and cook until tender, about 3-4 minutes. Add risotto and garlic and cook for 1 minute.

Using a large soup ladle, pour 1 ladle-full (about ½ cup) of stock into risotto and stir until liquid is absorbed. Gradually stir in remaining broth 1 ladle-full at a time, cooking and stirring until liquid is absorbed before adding the next ladle. Continue this process until all but 1 ladle-full of stock has been used, approximately 25-30 minutes. Add the last ladle of stock with seafood and asparagus, and reduce heat to low. Cover and cook for 5 minutes or until shrimp and scallops are fully cooked and asparagus turns bright green. Uncover and stir until all remaining liquid has evaporated, about 2-3 minutes. Season with salt and pepper.

IMG_3913

Sidekick: Serve with a chilled glass of Sauvignon Blanc or a non-oaky Chardonnay.

Shortcuts:

  • Replace homemade stock with store bought stock
  • Replace wine with an extra cup of stock
  • Use precooked seafood and toss it in at the end of the cooking process after the asparagus have been steamed. Stir until seafood is heated through.

Where’s the Beef? A Review of Store-Bought Beef Stock

Where’s the Beef?

IMG_0057

A Review of Store-Bought Beef Stock

A months has passed since my last review of store-bought stocks, so I figured it was time to summons up the courage to ask my husband to be my taste-test assistant once again. This is not easy, you guys. Stock tastes delicious in soup, when mixed with herbs and vegetables, but is much less appetizing sipped straight out of a coffee mug, one stock right after the other. Don’t believe me? Try it. (Or don’t, since we did the dirty work for you!)

Just like before, we based our review on taste, smell, nutritional value, availability, and price. With our chicken stock review we also took into consideration the color, but as you can see from the photo above, all five varieties are brown. So brown, in fact, that we chose not to comment any further.

Throughout our sampling, we discovered that store-bought beef stock often tastes like the vessel it’s packaged in. With the exception of two brands, we weren’t impressed. Below I’ve detailed our two “Recommended Stocks,” then lumped the other three into a “Meh, Not so Much!” category.

Recommended Stocks:

College Inn (top middle): This brand is very easy to find, affordable ($0.79 for a 14.5 oz.), and is the tastiest of the five stocks we sampled. It had a nice smell of roast beef, and although a bit salty, could almost stand on it’s own, much like an au jus. Sadly, the sodium count was higher than I like (990 mg per serving), but if you’re not worried about that, than College Inn is the stock for you.

Kitchen Basics (bottom right): Also a very easy brand to find, but a bit pricier ($2.69/32 oz.). This stock was somewhat bland, with little to no aroma, which after tasting the other three, is just fine. When added to a dish with aromatics and veggies, this stock could provide a simple base in which to build upon. With only 430 mg sodium/serving, it’s a much healthier pick than College Inn.

Meh, Not So Much:
I won’t go into too much detail about the remaining three stocks, other than to say they all had an unpleasant smell and taste – very much like licking the inside of a beef-flavored can. But for the sake of consistency, I’ll give you a rundown of their stats…

Swanson (top right): Price: $1.50/32 oz. Sodium: 400 mg/serving

Emeril’s (top left): Price: $2.62/32 oz. Sodium: 630 mg/serving

Rachael Ray (bottom left): Price: $1.98/32 oz. Sodium: 480 mg/serving

Next up…Vegetable broth and seafood stock.

Beef Phở

Beef Phở

IMG_0084

Beef phở (pronounced fuh) is a traditional Vietnamese soup (typically made with beef although chicken and vegetable versions are also available), wide rice noodles, and served with a variety of garnishes. To me, there is nothing more comforting on a blustery winter day than sitting down to a steaming bowl of phở, slurping noodles off a pair of chopsticks, and feeling its warming effects spread to the ends of my fingers and the tips of my toes. The broth, steeped with spices and charred onions, is slightly sweet, highly flavorful, and wonderfully aromatic, which sets this soup apart from other “noodley” soups, as my toddler likes to call them. (If you don’t have time to make this somewhat labor intensive stock by hand, see the Shortcut at the end of the recipe for tips on how to quickly enhance store-bought stock.) Oh, and I promise next week’s soup will be an easy one. No really — chop a few ingredients, throw everything into a crockpot, then put your feet up and wait for the payoff! 

IMG_0427

(Sugar and spice and everything nice, that’s what phở is made of.)

Serves 6

 For the Stock:

  • 2 white or yellow onions
  • 1 hand of ginger root, about 6-inches long
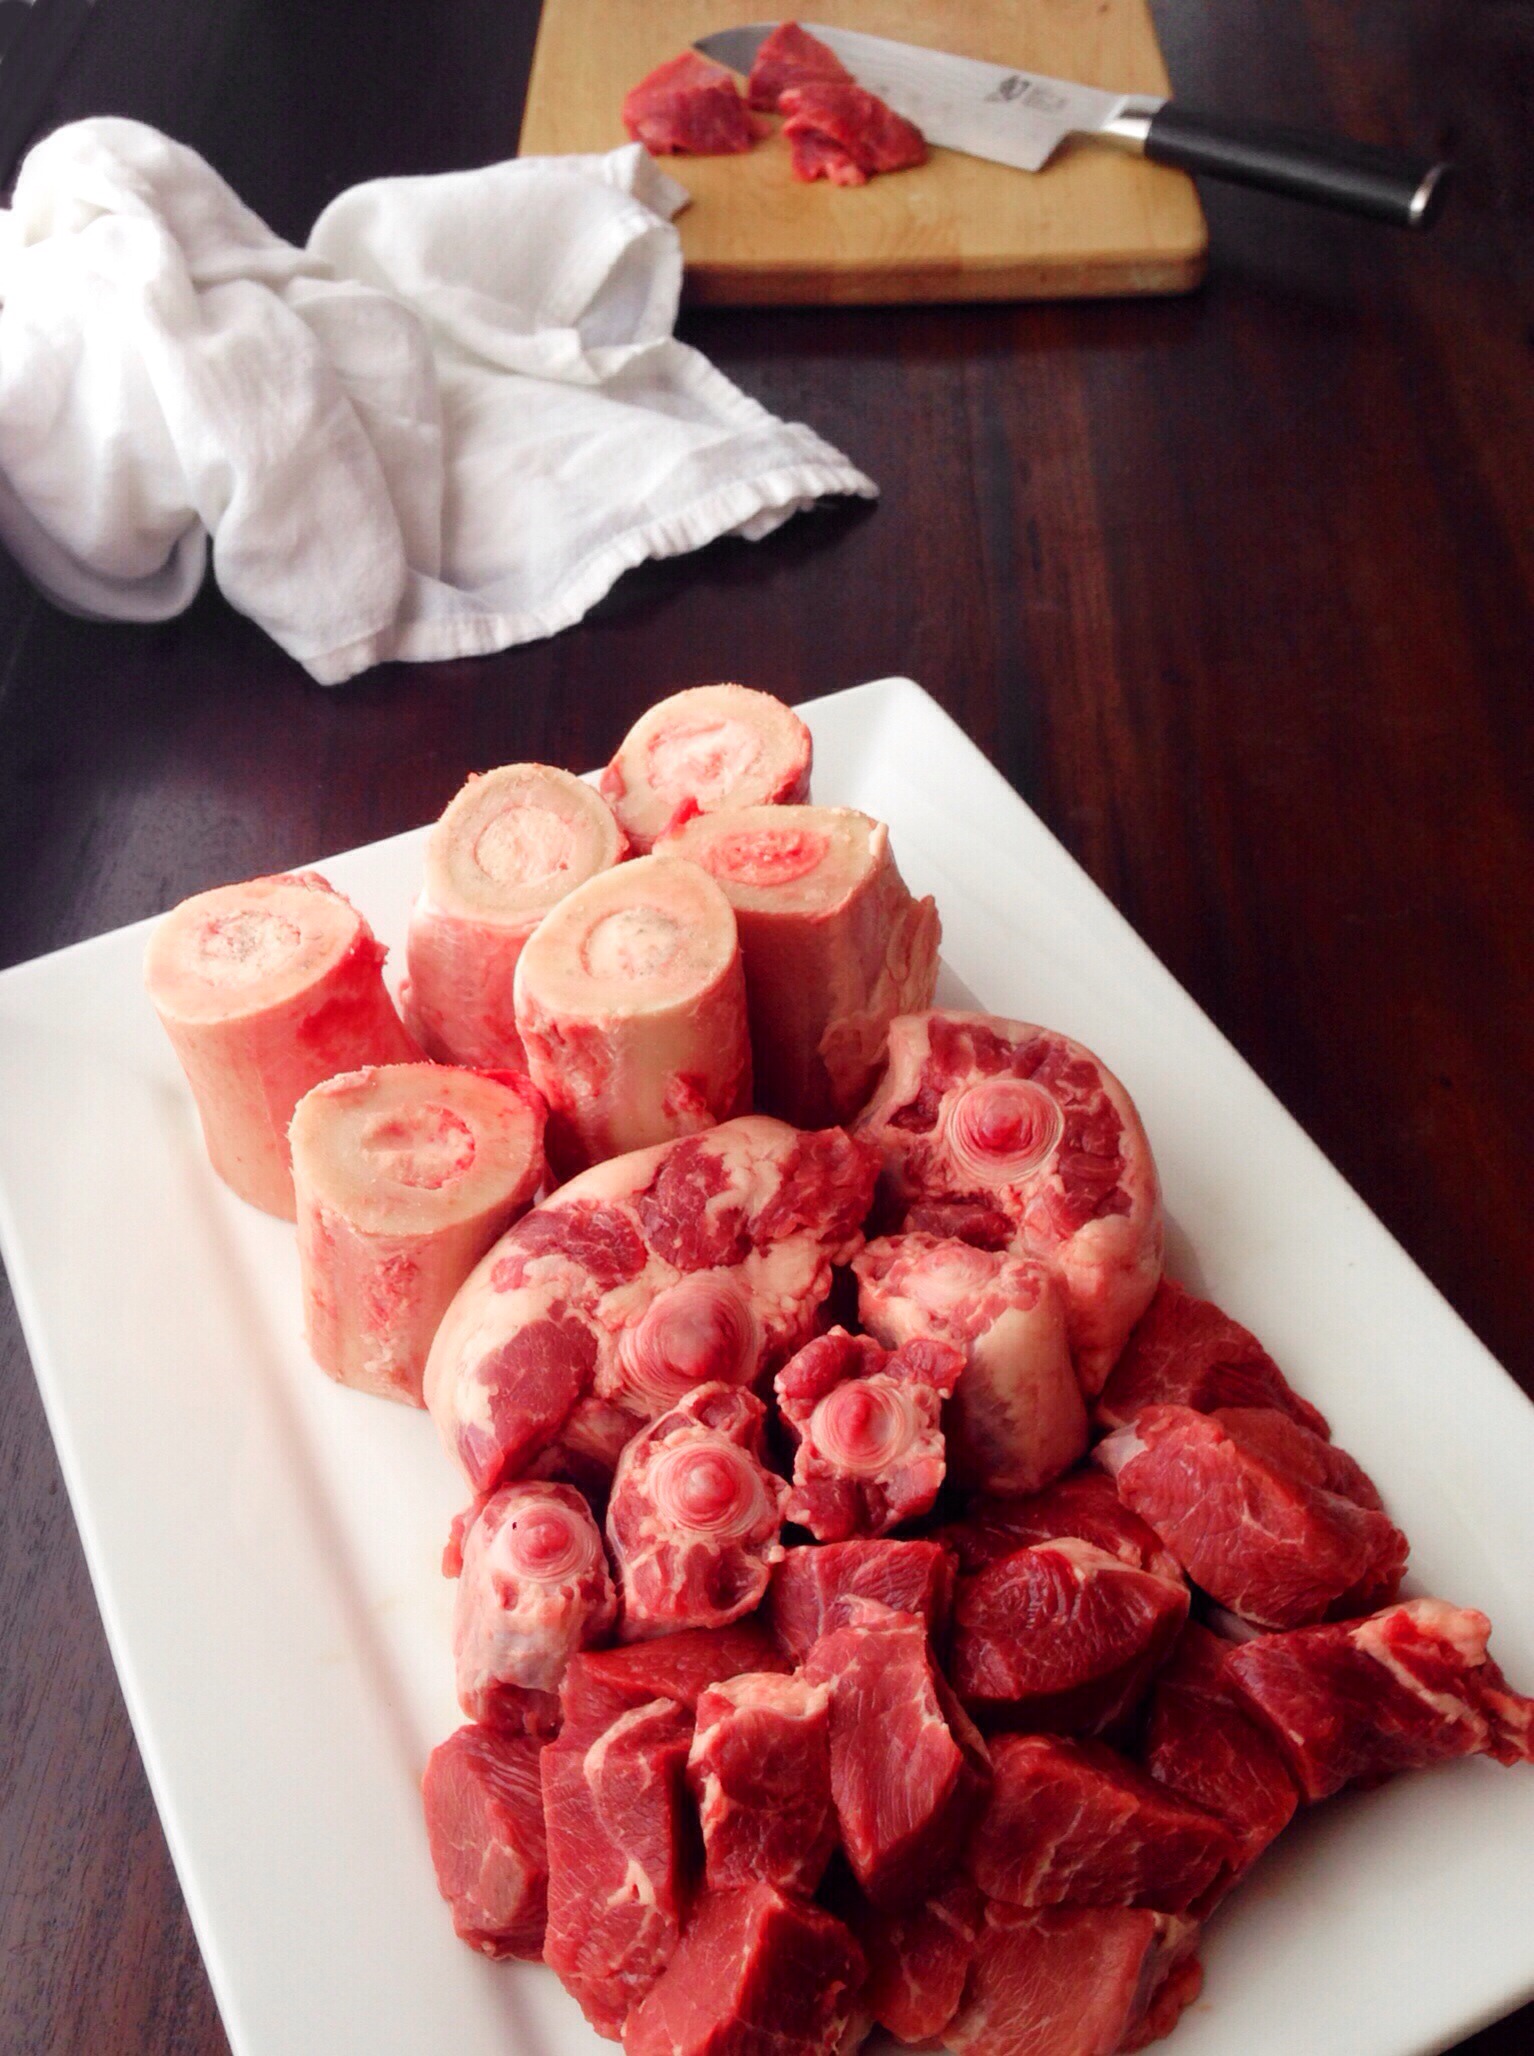
  • 3 lbs. marrow bones
  • 2 lbs. oxtail
  • 1 lb. chuck roast, cut into 2-inch pieces
  • 1 lb. beef brisket
  • 2 cinnamon sticks
  • 5 whole star of anise
  • 6 whole cloves
  • 1 tsp. fennel seeds
  • 1 tsp. coriander seeds
  • 1 oz. yellow rock sugar (see Notes) or 2 Tbsp. Sugar in the Raw (or granulated sugar)
  • ¼ – ½ cup fish sauce, depending upon taste
  • Kosher salt
  • Fresh cracked black pepper

IMG_0712 

(Pictured from top: beef bones, oxtail, chuck roast)

 For the Soup:

  • 1 lb. rib eye, skirt, or flank steak, thinly sliced, seasoned with salt and pepper
  • 2 cups oyster mushrooms
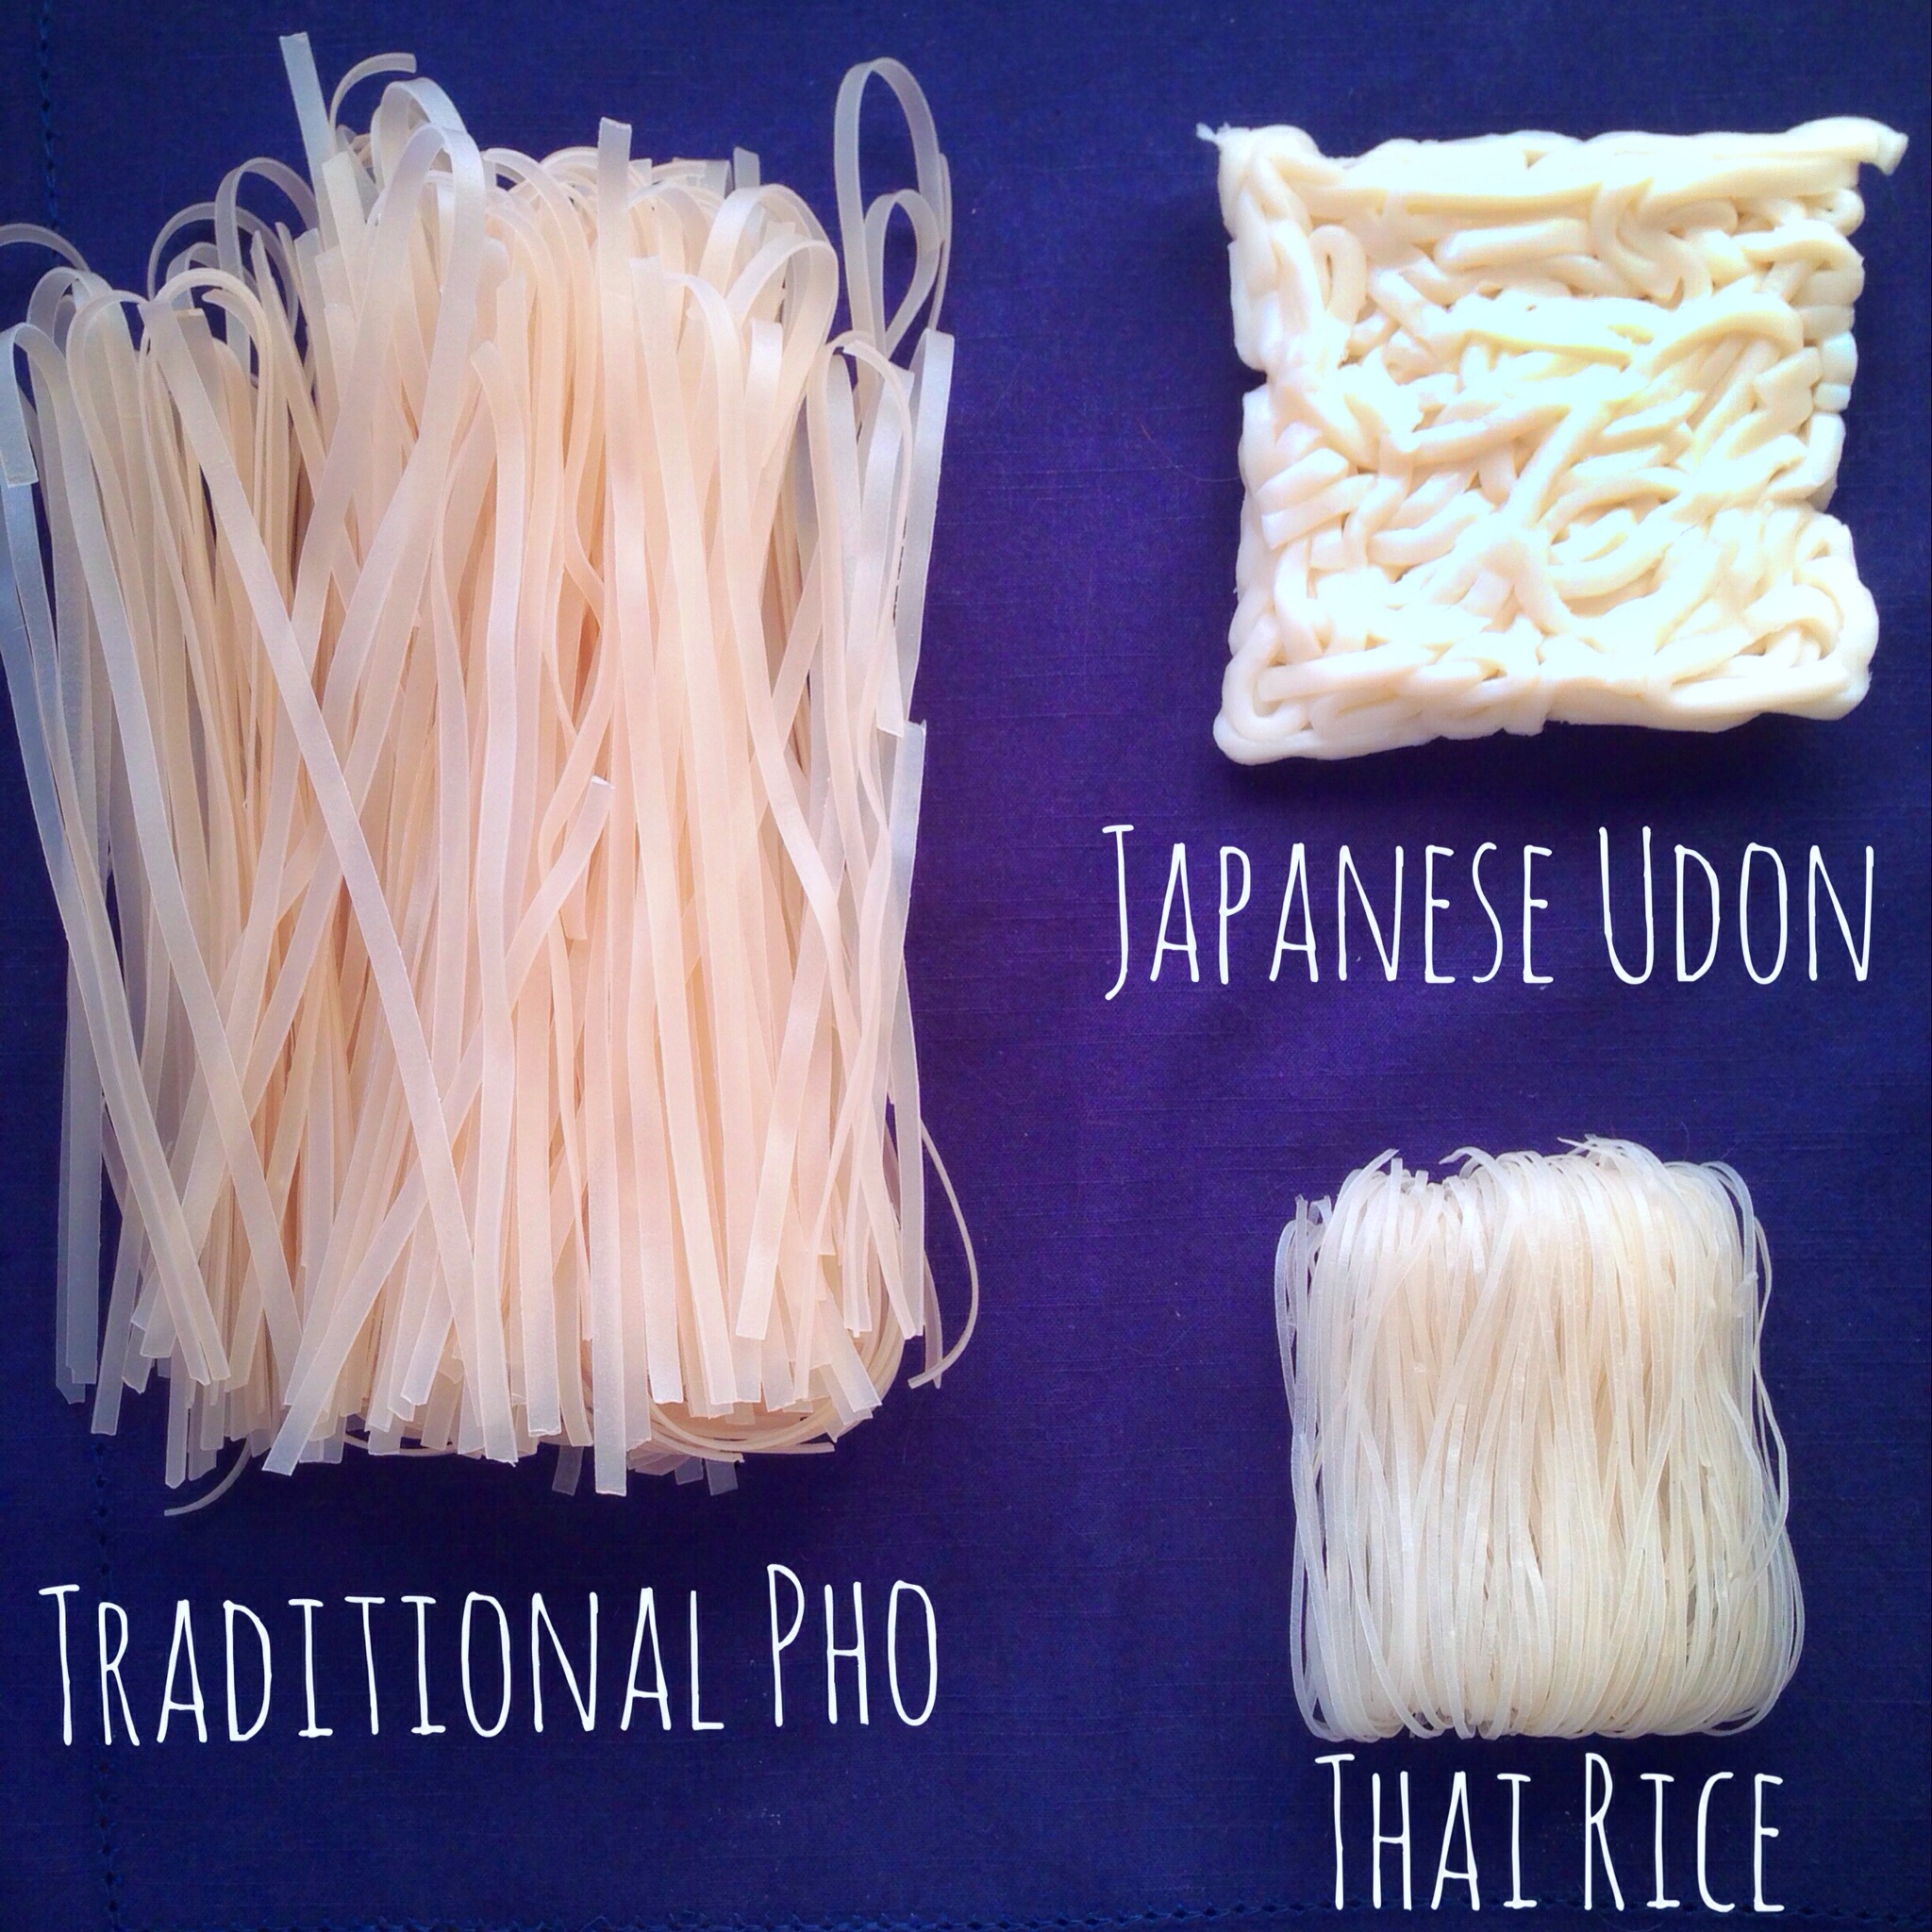
  • 1 lb. Phở noodles (see Notes)

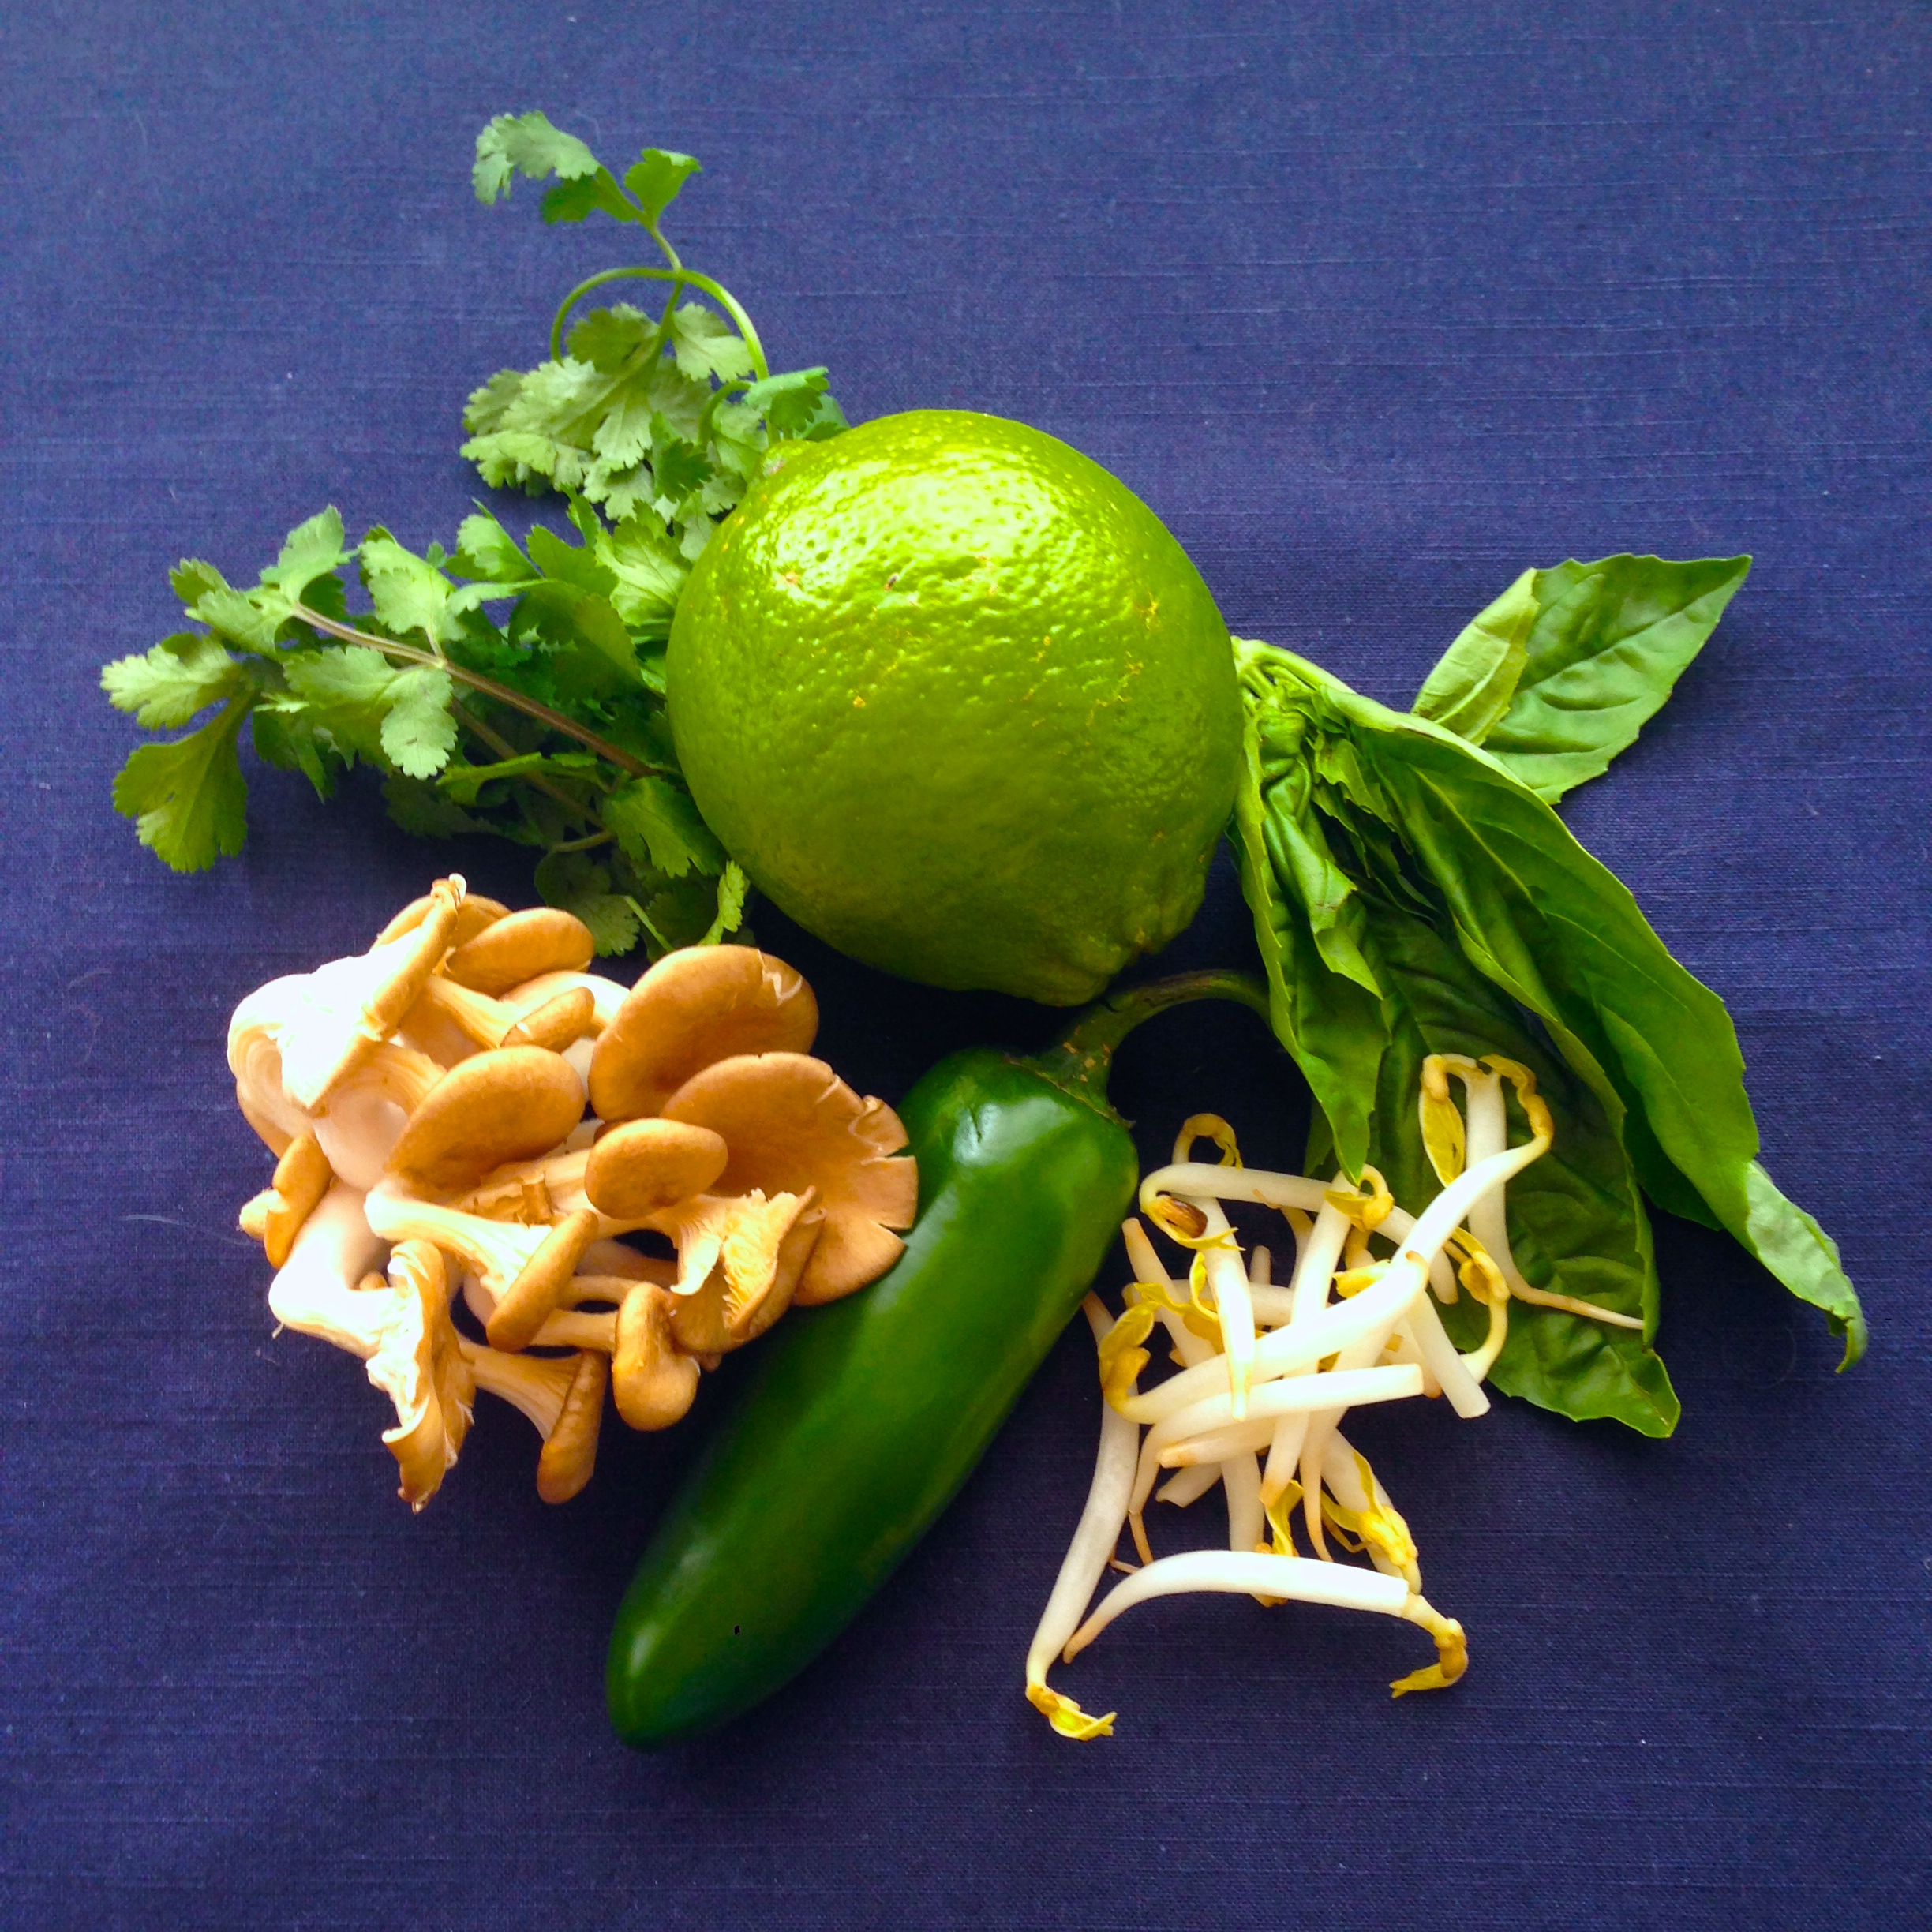
Garnishes for Serving:

  • 2 limes, cut into wedges
  • 3 cups bean sprouts
  • 1-2 cups fresh basil
  • 1-2 cups fresh cilantro
  • 4 green onions, thinly sliced
  • 2 Thai chilies (Very HOT!), serrano peppers (HOT!), or Jalapeños (kinda hot), thinly sliced
  • Chili sauce, such as Sriracha
  • Fish sauce and/or hosin sauce

IMG_4300

(A few phở garnishes.)

Directions:

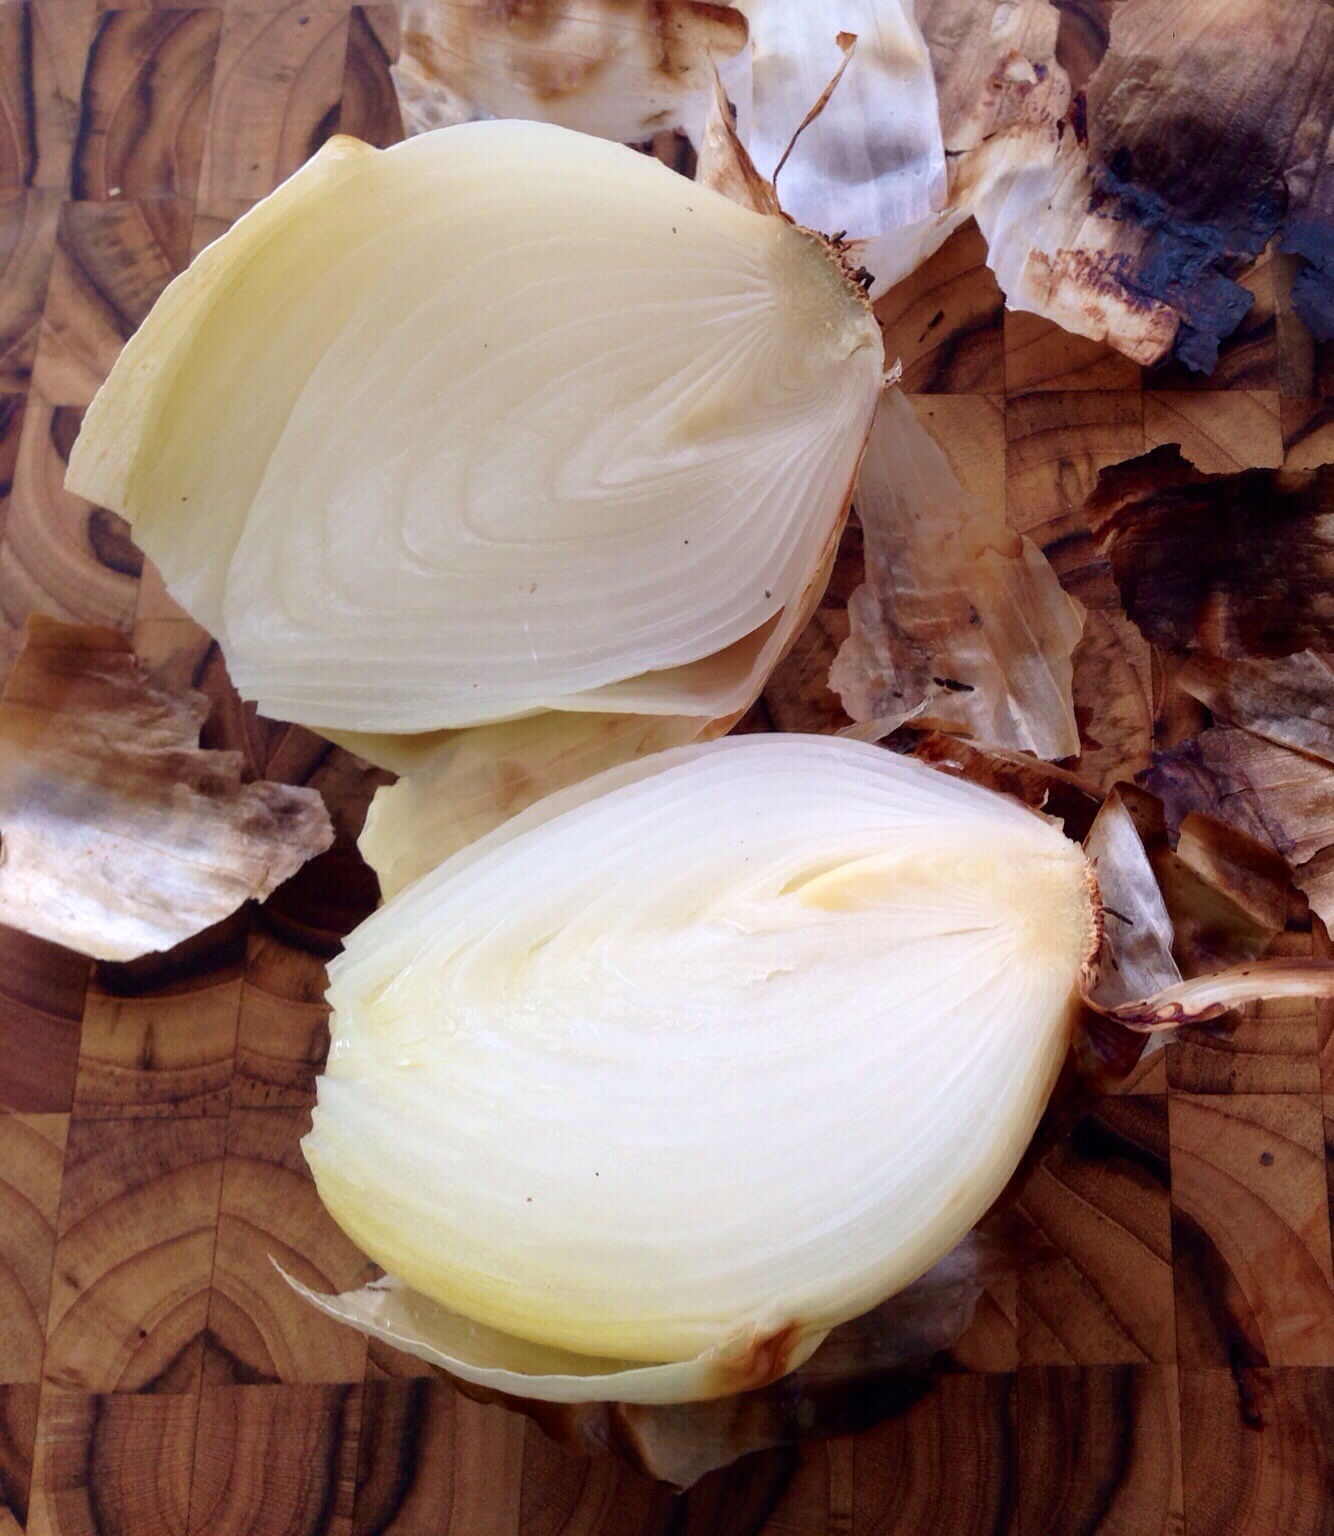
Char Onions and Ginger

Charring the skins of the onions and ginger gives the broth an appealingly smoky quality that’s quintessential to phở. Follow one of these three charring methods:

  1. On an outdoor grill: Place onions and ginger over direct heat on high. Allow the skins to become black, then turn, continuing to char on all sides, 5-8 minutes.
  2. Over an indoor gas burner: Turn on exhaust fan. With a pair of kitchen tongs and working one at a time, hold onions and ginger over open flame until skins have blackened, then turn, continuing to char on all sides, 5-8 minutes. (If your kitchen tongs are metal, you may want to wear an oven mitt — trust me!)
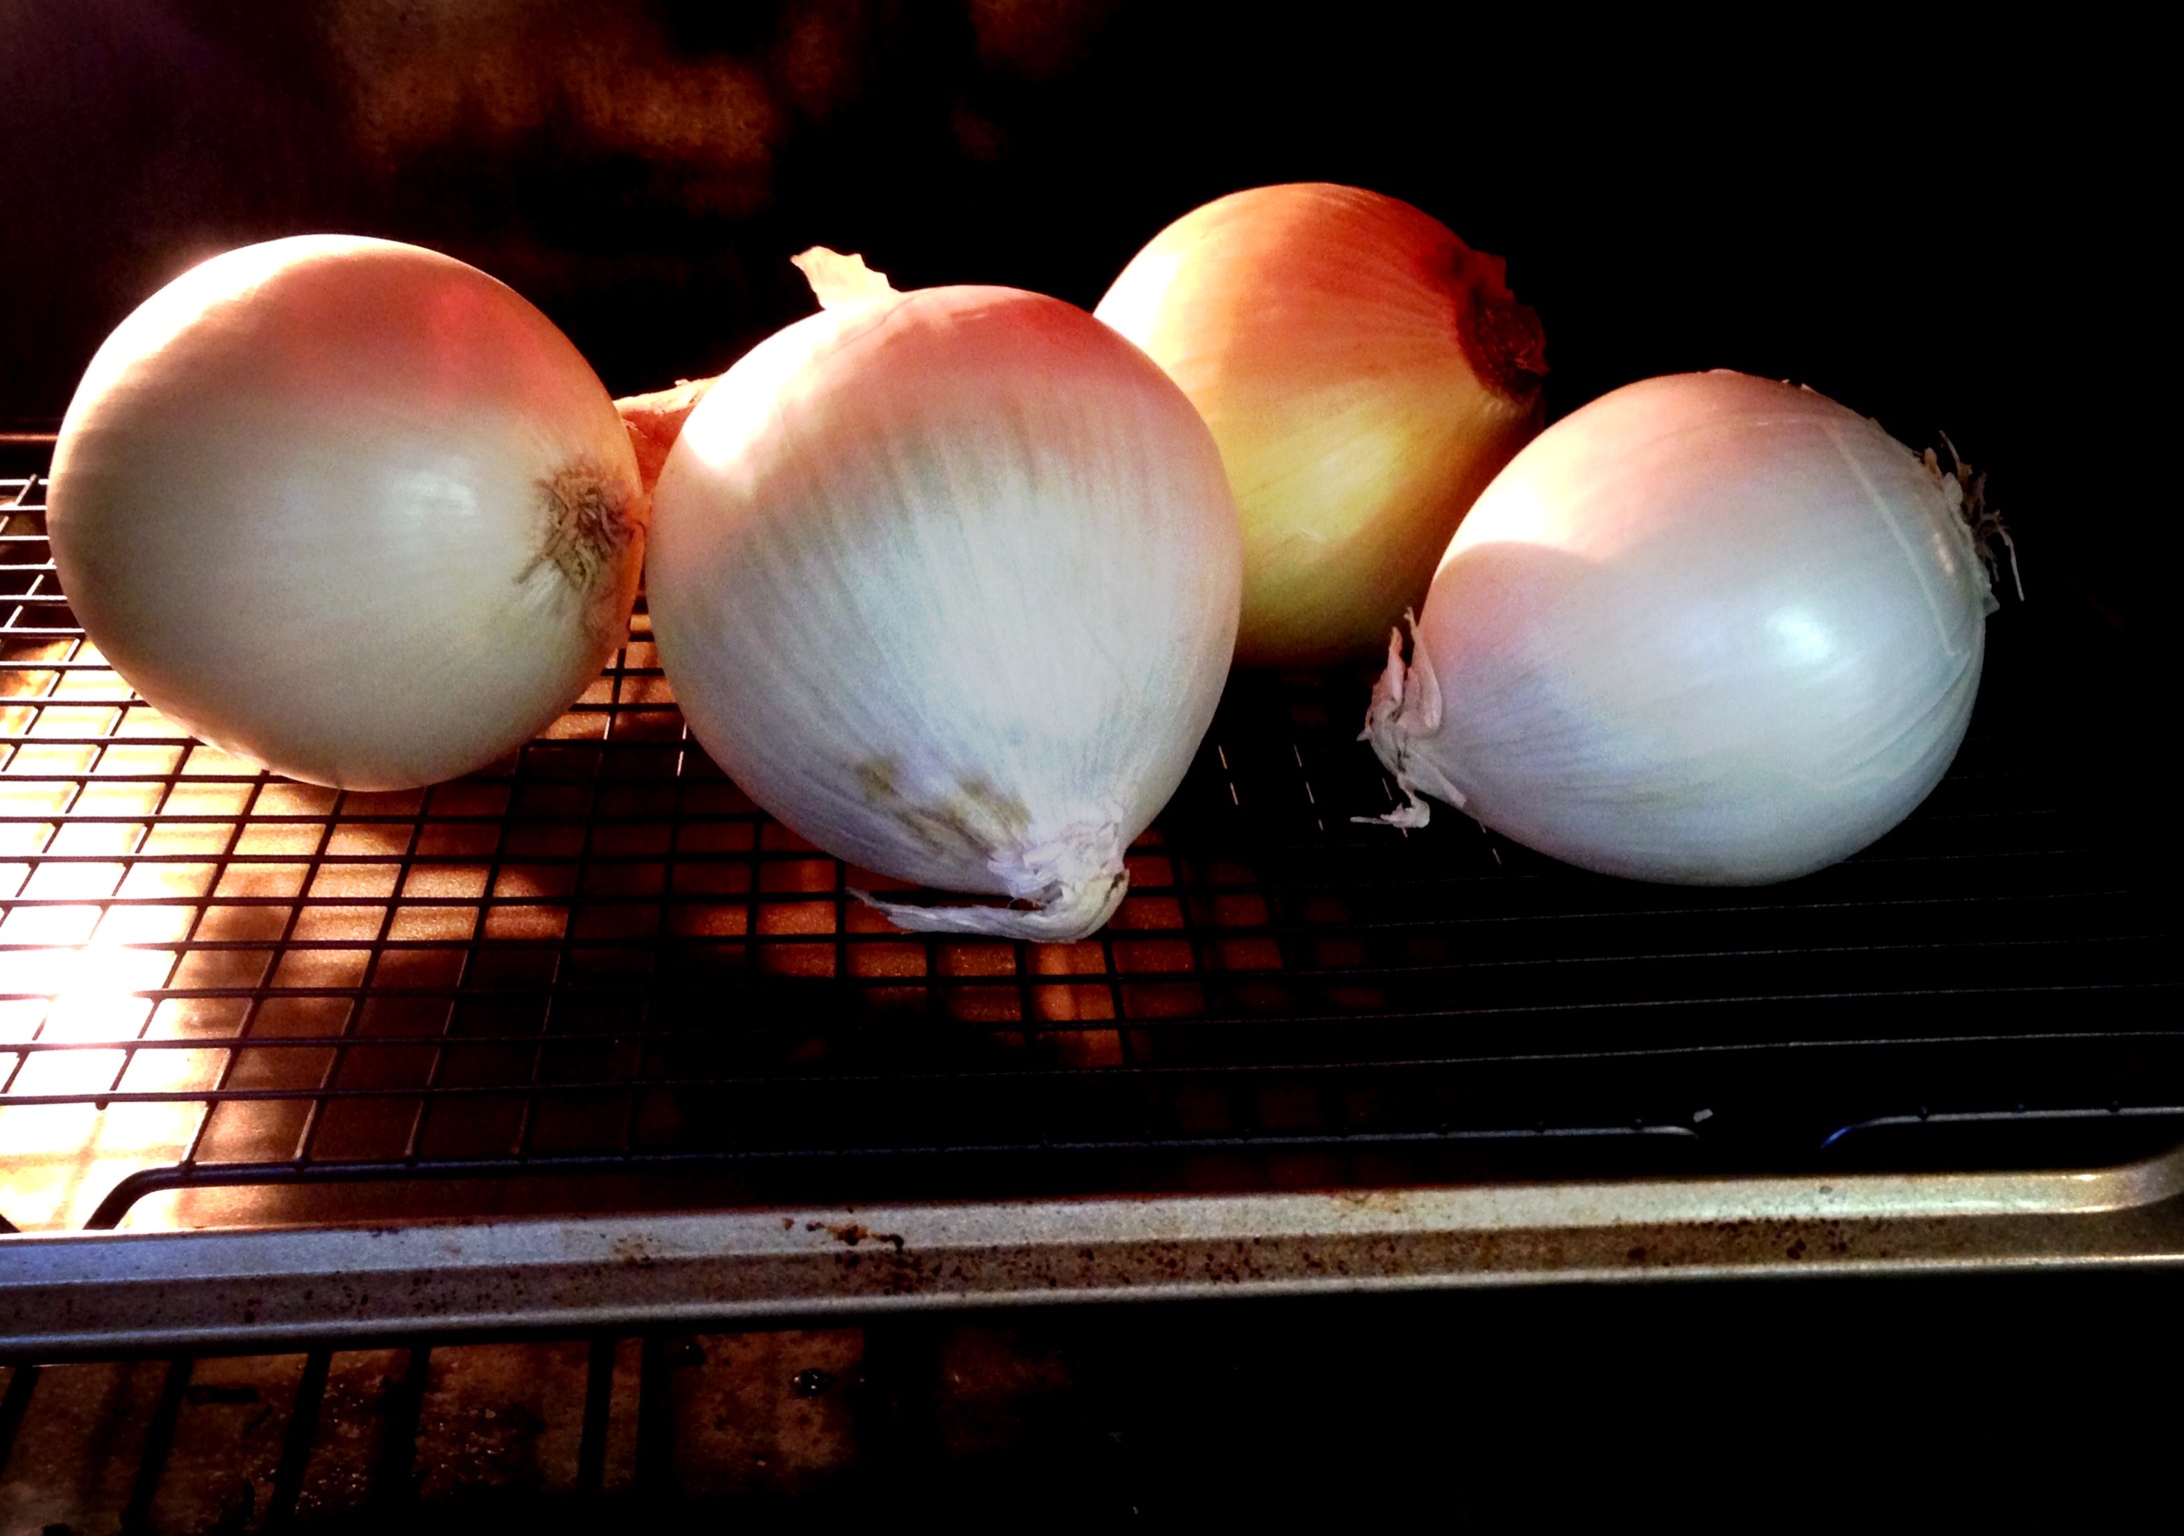
  3. In an electric oven (pictured below): Turn oven on to broil. Place onions and ginger on a foil-lined roasting pan and place on an oven rack set 3-4 inches below the broiler element. Allow the skins to become black, then turn, continuing to char on all sides, about 20-25 minutes.

IMG_0068

The onions and ginger should be very dark and burned on the outside, yet soft and slightly cooked on the inside. (I swear the photo below isn’t one of my kitchen catastrophes – I meant to do this!)

IMG_0098

Peel onions and ginger, rinsing off any blackened bits. Cut into quarters and set aside.

IMG_0018

Make Stock

Add beef and bones to a large stock pot. Cover with water by 2-inches. Bring to a boil and continue to boil for 15 minutes. Dump water, beef, and bones into a colander set in the sink, allow to cool slightly. Rinse stockpot clean of any residue. Run cold water over beef & bones, and gently scrub any scum from the surface. This will eliminate cloudiness, leaving you with a crystal-clear broth. Beautiful!

IMG_0099

Return beef & bones to stockpot and cover with 5-6 quarts water (20-24 cups). Add onions, ginger, spices, sugar, ¼ cup fish sauce, and 1 Tbsp. salt and bring to a simmer. Continue to simmer for at least 5 hours, and up to all day, skimming any fat that rises to the surface. (Do not allow to boil otherwise your stock may become bitter.)

Once stock is done simmering, remove onions, ginger, and spices and discard. Gently scoop beef & bones from stock and set aside. Pour stock through a fine-mesh sieve set over a large storage container. Refrigerate, uncovered, overnight.

Carefully remove any meat and connective tissue from the bones and oxtail and place in a storage container, cover. Slice brisket and place in a separate storage container, cover. In a third storage container, add the beef chuck. Cover, and refrigerate all three. Discard bones.

After the stock has cooled overnight, use a slotted spoon to gently remove the layer of fat that has risen to the top, discard.

IMG_0091

You may end up with more stock and beef than you need for 6 servings. Both stock and beef can be refrigerated separately for up to three days, or frozen for 4-5 months (see tips on freezing stock in Homemade Stocks).

Make the Soup

Evenly divide garnishes (bean sprouts, lime wedges, fresh herbs, green onions, and chiles) among 6 small plates.

Microwave reserved beef until warm, and place in three separate serving bowls.

In a large stock pot, bring stock to a simmer. Test for seasoning and add more fish sauce and salt & pepper if needed.

Add mushrooms to stock and continue to simmer until soft, about 5-6 minutes. Add thinly sliced beef (rib eye, skirt, or flank steak) to stock and cook for 1 minute, until rare.

Cook phở noodles per package instructions, strain and divide among 6 bowls.

Ladle stock, thinly sliced beef, and mushrooms into bowls over top of phở noodles.

IMG_4406

Place serving bowls of reserved beef on the table, allowing guest to add what they like. Serve with Sriracha, fish and/or hosin sauce, and a plate of garnish for each guest.

IMG_0087

Notes:

  • Yellow rock sugar can be found in many Asian markets or online, however, you can always substitute Sugar in the Raw or regular granulated sugar.
  • Phở noodles can also be found in many Asian markets, however, if they’re unavailable in your area, look for another style of Asian noodle (see examples pictured below). And if you’re really in a pinch, you can always use instant ramen noodles.

IMG_0089

Shortcut: In leu of making your own stock, add 12-16 cups of store-bought stock (about 2 cups per person) to a large stockpot. Add 1 cinnamon stick, 3 whole star anise, 2-inches peeled and sliced ginger root, 6 whole cloves, 2 tsp. coriander seeds, 1 tsp. fennel seeds, 1-2 tsp. sugar, 2-3 Tbsp. fish sauce (plus more for seasoning later) and bring to a simmer. Continue to simmer for 15-20 minutes. Scoop out spices and discard. Continue with directions: Make the Soup.

Sidekick: The choice beverage selection with this slightly sweet, somewhat spicy dish is a Vietnamese beer (which can be hard to find), so try looking for other more commonly found Asian beers such as Sapporo. For wine drinkers, a chilled glass of Gewürztraminer or Riesling would also pair well.

Your best bet for finding a Vietnamese beer is at a local Asian Market or World Market.

Truffle Love

Happy Valentine’s Day, everybody! With love on the mind today, I thought I’d post an essay I wrote for a wedding blog back in 2010. I had just relocated from Manhattan to Washington DC, and moved into my then fiancé’s apartment. Almost four years later, this is a battle still being waged in our home.

Truffle Love February 2010

IMG_0657

I am sure that in a past life I must have been a truffle-sniffing pig. I love everything about truffles; their strong woody flavor, their dark, knobby appearance, and the fact that they hail from France. During my culinary explorations throughout the United States and abroad, I’ve collected every truffle related item that I can find. I have truffle salts and truffle oils, I’ve purchased fresh truffles by the ounce to shave over risotto, and if there were a truffle perfume, I’d buy that, too. Last July when I moved from Manhattan to DC, I even cleared a special cupboard in my fiancé’s kitchen for all of my truffle paraphernalia.

So, it goes without saying that the first time we grilled steaks together as a couple, I reached into my special cupboard and pulled out a small jar of truffle salt. As I began seasoning the first cut, he stopped me to inquire what I was doing. I explained to him the delicacy of the truffle, and held the jar up for him to smell. “I hope you’re not putting that on my steak!” he said, then reached into his not-so-special cupboard and pulled out a clear plastic container that read “McCormick’s Montreal Grill-Mates Steak Seasoning.” Hmmm. He shook the contents over his steak, turning it the color of red brick, and smiled his wicked little smile. “You don’t even want to try my salt?!” I asked with exasperation. “No, I do not!” he replied. I let the issue drop. You see, although I may have complete rein over the kitchen, he’s made it perfectly clear that grilling is his territory. The only assistance I’m allowed to offer up is letting him know when my steak has stopped mooing so that he can remove it from the flame. And so it went; he seasoned his steaks with McCormick’s, and I seasoned mine with truffle salt.

As summer turned to fall, and our grill was put away for the season, we had to resort to cooking our steaks by stovetop. Soon after, fall turned to winter, and both of us noticed the extra padding around our middle that an indoor lifestyle will inevitably create; and so our steaks became steak salad. Now, my fiancé’s not one for health food, but he loves steak salad. He asks for it on a weekly basis. One evening when he was out of town, I got a single text message from him that read: I’m craving your steak salad. Not I miss you, or I love you, or even I can’t wait to see you tomorrow, just I’m craving your steak salad. Every time I serve it, he tells me it’s the best one yet, even though he knows that I don’t change a single ingredient from week to week. It’s always the same; bitter greens, sautéed mushrooms, roasted red peppers, caramelized onions, pomegranate vinaigrette, and thinly sliced filet mignon, but to him, it just keeps getting better. After setting his meal in front of him, I wait for him take that initial bite, I watch for his reaction, and then I smile with satisfaction when he tells me again that it is the best one yet.

For months I’ve been patient, biding my time, waiting for him to notice, and then last week it happened. As he took his first bite, he sighed and said, “This really is the best one yet. The steak is so flavorful, what do you season it with?” My moment had arrived; he had finally asked the question I had been longing to hear. I wanted to savor it for all eternity. I put my fork down, looked into his eyes and said, “Truffle salt.” He stared at me for what seemed like an hour, silently nodded his head in defeat, and continued eating. And he was right, it really was the best one yet, because even more delicious than the truffle salt, is victory!

Stuff My Kid Eats: One-Pan Pasta

Stuff My Kid Eats

IMG_3859

What kid doesn’t love pasta? For that matter, what adult doesn’t love pasta? Much like soup, pasta has become a staple in our home. It’s simple, it’s delicious, and it’s the energy-booster my toddler needs to continue terrorizing our cat* on a daily basis. With as much pasta as we eat, I’m always searching for new recipes to liven up the routine. I found this one in Martha Stewart Living a while back, and regularly change up the ingredients depending on what I have in my fridge. See VARIATIONS at the end of this post for ideas on how you can alter this dish and make it your own. (Recipe adapted from Martha Stewart Living)

One-Pan Pasta

IMG_0044

I have to admit, as much as I trust Martha Stewart and her very accomplished staff (not that I’m biased or anything), I was a bit skeptical when this recipe called for throwing all the ingredients into a pan and cooking them together, rather than separately. Pasta in one pot, sauce in the other, that’s how I was raised — but WOW! this is so much better. And at the end of the meal, you only have one pan to clean. Brilliant!

Serves 4

  • 12 oz. linguine
  • 12 oz. cherry or grape tomatoes, halved or quartered if large
  • ½ onion, chopped
  • 4 cloves garlic, thinly sliced
  • 2 cups mushrooms, sliced
  • ½ tsp. red-pepper flakes
  • 2 sprigs basil, plus torn leaves for garnish
  • 2 Tbsp. olive oil, plus more for serving
  • Kosher salt and fresh ground black pepper
  • 4½ cups water
  • Freshly grated Parmesan cheese for serving

IMG_0071

Combine pasta, tomatoes, onion, garlic, red-pepper flakes, basil, oil, 2 tsp. salt, ¼ tsp. pepper, and water in a large straight-sided skillet. Bring to a boil over high heat. Boil mixture, stirring and turning pasta frequently with tongs, until pasta is al dente and water has nearly evaporated, about 9 minutes.

IMG_0046

Season to taste with salt and pepper, divide among 4 bowls, and garnish with basil. Serve with oil and Parmesan.

IMG_0054

Sidekick: The simplicity of this pasta pairs well with a Pinot Gris or a Sauvignon Blanc.

VARIATIONS:

Silky Carbonara

Omit:
Basil
Mushrooms

Add:
2 egg yolks
1 tsp. water
1 Tbsp. unsalted butter
1 cup cooked bacon, chopped

Beat egg yolks with water until smooth. After pasta has finished cooking, remove from heat, add egg mixture, butter, and bacon and stir until creamy. Season with salt and pepper and serve with grated Parmesan.

Spring Greens

Omit:
Tomatoes
Basil
Mushrooms
Red-pepper flakes
Parmesan cheese

Add:
1 bunch of asparagus, tender part only, cut into 1-inch pieces
1 lemon
1 cup spring peas, fresh or frozen
2 Tbsp. Italian parsley, finely chopped

Add asparagus at the beginning with dry pasta. Meanwhile, juice and zest lemon. Once pasta has cooked for about 7 minutes, add lemon juice and peas. Stir and continue to cook for 2 minutes or until pasta is al dente. Season with salt and pepper. Divide into 4 bowls and garnish with parsley and lemon zest.

Italian Chicken and Peppers

Add:
1 red bell pepper, thinly sliced
2 precooked chicken breasts, diced
2 Tbsp. fresh oregano, finely chopped

Add bell peppers at the beginning with dry pasta. Once pasta has finished cooking, add diced chicken and oregano. Stir to combine. Season with salt and pepper and serve with Parmesan.

Photo: The Toddler Terrorizing The Cat.

IMG_0074