Baked Coconut French Toast for Mother’s Day

IMG_7287

My husband is great at a lot of things, but surprising me for Mother’s Day isn’t one of them. I get flowers, of course, and a card, but after a few years experience I’ve given up the hope that he’ll make me Poached Salmon Eggs Benedict, or have the foresight to call ahead for 11am brunch reservations at my favorite restaurant (sorry, honey). That’s why this year I decided to take matters into my own hands and come up with a French toast recipe that I can make the night before then pop in the oven the next morning. So this Mother’s Day when my husband wakes up at the annoying hour of 6am (which he does every morning), I will roll over and lovingly whisper in his ear, “350° for 20 minutes,” and know that when I get out of bed, my perfectly crafted French toast will be hot and ready.

Baked Coconut French Toast

Serves 6

  • 12 thick slices of French bread
  • 1 can coconut milk
  • 3 eggs
  • ¼ cup sugar
  • 2 cups shredded, sweetened coconut

Butter the bottom and sides of a 13×9-inch baking dish. Line bottom of dish with bread, overlapping pieces slightly so that bread fits to the edges of the dish.

In a medium bowl, whisk together coconut milk, eggs, and sugar. Pour egg mixture over bread and use a spoon to help distribute the liquid pressing down on the bread so that it fully absorbs liquid. Allow to set for 15 minutes or up to 12 hours, covered in the refrigerator. (If refrigerating overnight, bring dish out and set on the counter for an hour before baking to allow to come to room  temperature.) Sprinkle the shredded coconut over the bread and press down slightly with your hand so that it sticks to the top.

Bake at 350°F for 20-25 minutes or until egg mixture has set and coconut is golden brown (the bottom of the dish will be custardy). Allow to rest for 5 minutes before cutting and serving.

IMG_7296

Stuff My Kid Eats: Beer Can Chicken with Grilled Asparagus & Avocado

IMG_9181Now here’s a chicken that has `Merica written all over it: cajun spices, a grill, and beer – not to mention the crude jokes that will inevitably follow once you shove the beer can up it’s…well, can, for lack of a better term.  But cooking the chicken this way provides more than just a good laugh, it keeps the meat moist and raises the bird up off the fire allowing the skin to get nice and crispy it without burning or sticking to the grate.

IMG_9182This is me last summer with my first attempt at beer can chicken, and since then I’ve cooked close to two dozen of these tasty hens. It took me a few tries to fine tune the spice rub and perfect the cooking method, and in doing so I had to eat pounds and pounds of delicious meat. It’s a dirty job, but someone’s got to do it. You’re welcome. And an unforseen bonus to my family’s repetitive poultry consumption is that this chicken quickly became my toddler’s favorite meal. When I pull the bird out of the fridge in the morning to start brining it, she’ll do her little happy dance (a combination of clapping and jumping) and sing, “It’s the yummy chicken! We’re having the yummy chicken!” (As opposed to all the other non-yummy chickens I make her eat.) And even better is when I put the can inside the chicken and she asks, “Why are you putting soda in his tushy, Mommy?”

Beer Can Chicken

Serves 4-6

  • 1 5-6 lb. whole chicken, neck and gizzards removed
  • 1 12oz. can of beer, a lager or amber works best (and if you’re able to get your hands on a local brew, even better!)
  • ½ cup Kosher salt
  • ⅓ cup brown sugar
  • ¼ cup sweet paprika
  • 2 Tbsp. cayenne pepper (And don’t skimp on the cayenne, I swear it doesn’t make the chicken too spicy)
  • 1 tsp. cinnamon
  • ½ tsp. garlic powder
  • 4 cloves garlic, crushed
  • 13×9-inch disposable tin baking dish
  • 1 gallon resealable plastic bag

To make the brine and spice rub, combine salt, sugar, and all spices (but not garlic cloves) in a large bowl and mix with a fork.IMG_6803

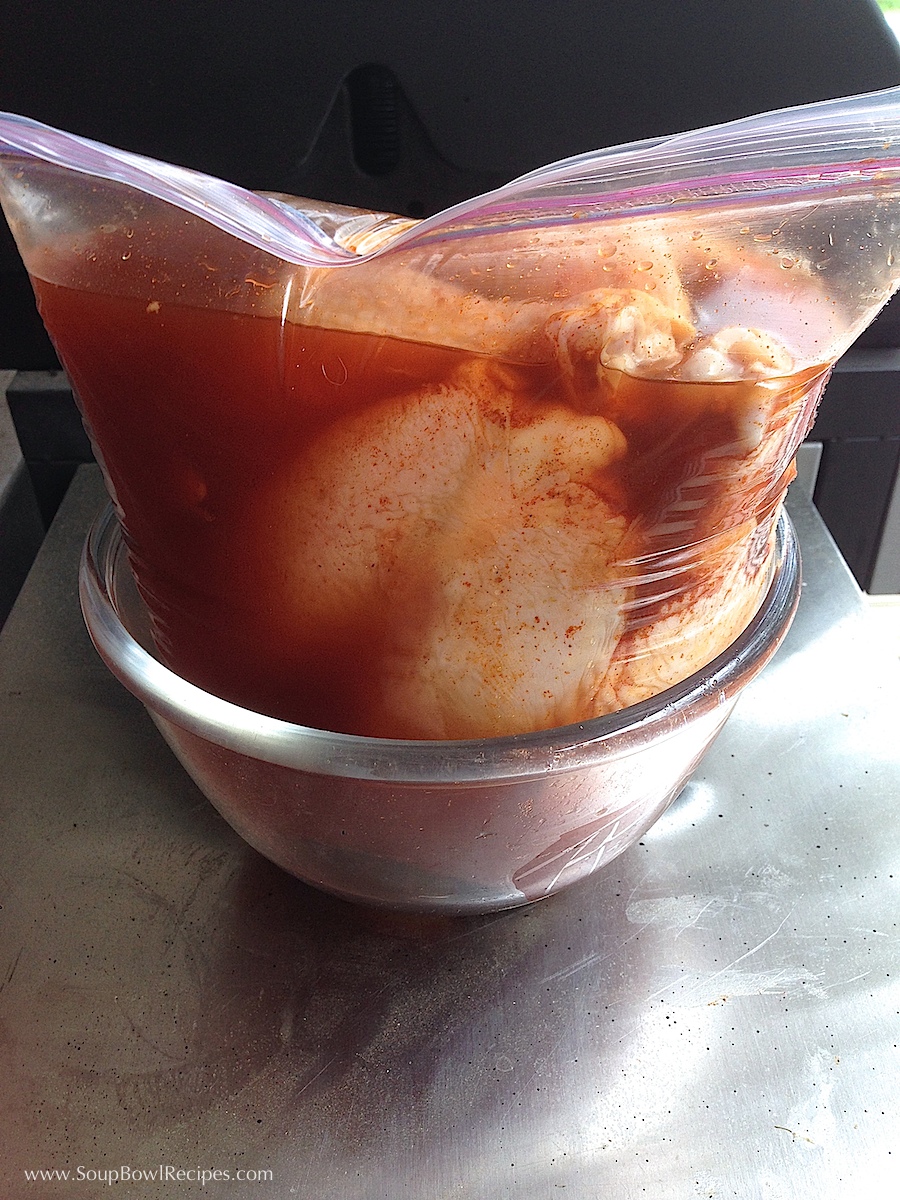
Place chicken in a plastic bag set inside a bowl big enough to hold it. Set aside. (Folding over the edges of the bag makes it easier to pour in the brine.)

In a medium sauce pan, bring 4 cups of water to a boil. Reduce heat to low and add garlic cloves and ½ of spice mixture, about ¾ cup (reserve remaining spice mixture to rub on chicken before grilling). Simmer, stirring occasionally, until salt and sugar have dissolved, about 5 minutes.IMG_6808

Remove from heat and add 2 cups of ice. Let sit until liquid has come to room temperature, it’s okay if the ice hasn’t melted all the way.IMG_6809

Using a large measuring cup, carefully pour brining liquid and garlic cloves into plastic bag with chicken until liquid almost reaches the top of the bag. Fold the edge of the bag back over and seal the zip lock. Place the bag and bowl in the refrigerator for 8-12 hours. (Brining the chicken is a key step in helping preserve its moisture and flavor under the high heat, so don’t skip this step, people! Seriously, it only takes about 5-10 minutes of prep time in the morning.)IMG_6812

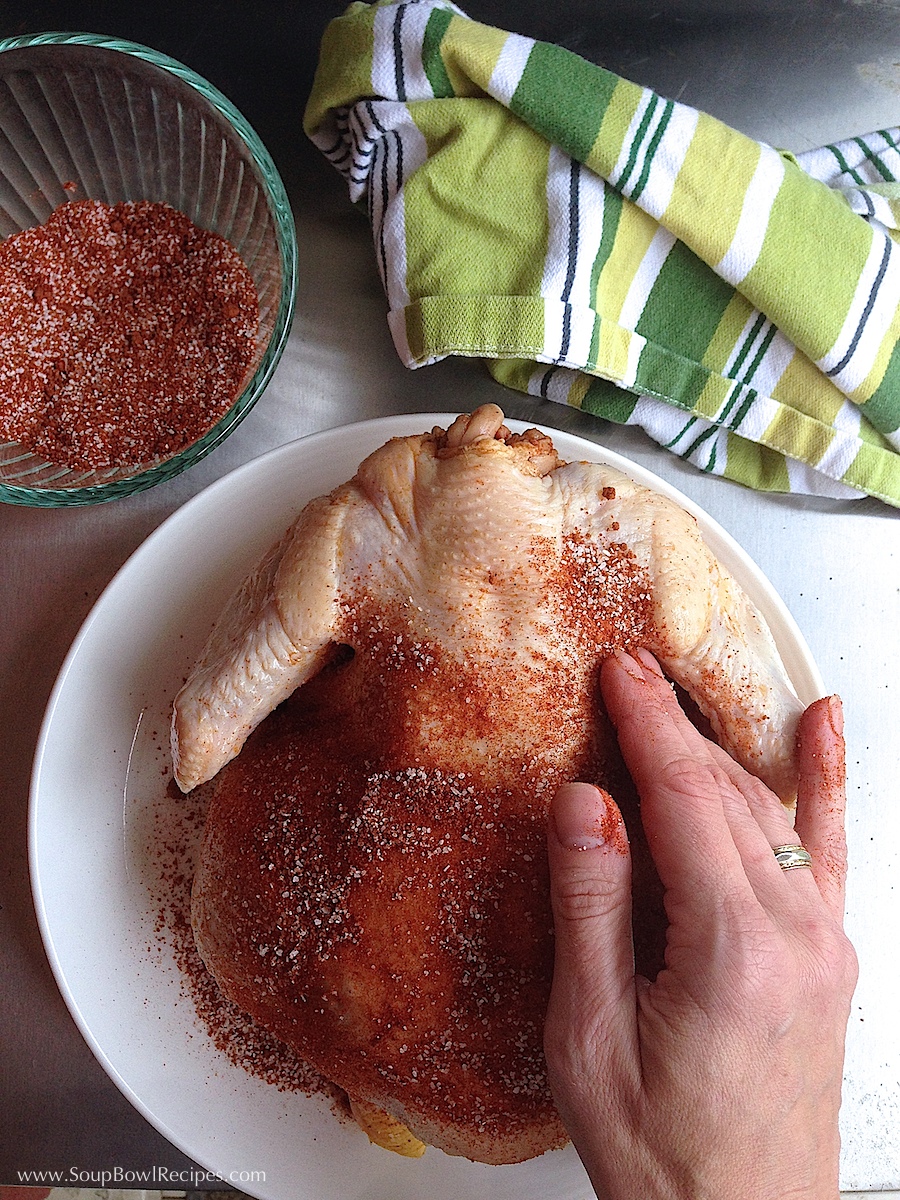
Once chicken has finished brining, remove from liquid and pat dry with a paper towel.IMG_6846

Rub the remaining spice mixture all over chicken, making sure to completely cover both sides, under wings, and in all the other cracks and crevices.IMG_6851

Prepare grill for high, indirect heat:

For a gas grill, lift the grate and place the disposable tin baking pan to one side of the grill, then fill the pan half-way with water (this will keep the drippings from starting a grease fire in your grill). Turn on all but 1 burner (the one under the baking pan). Replace grate. Close the lid and allow the internal temperature to reach 350-400°F before cooking chicken.

For a charcoal grill, lift the grate and push the coals to one side of the grill, baking up the side, and place a disposable tin baking pan on the other side. Fill the pan half-way full of water, then light coals and replace grate. Close lid and allow the internal temperature to reach 350-400°F before cooking chicken.

IMG_7251{Note: If you have a top warming rack like is pictured here, you’ll want to remove it otherwise it will knock the chicken over when you try to shut the lid. Which is a big mess. Just trust me on this one.}

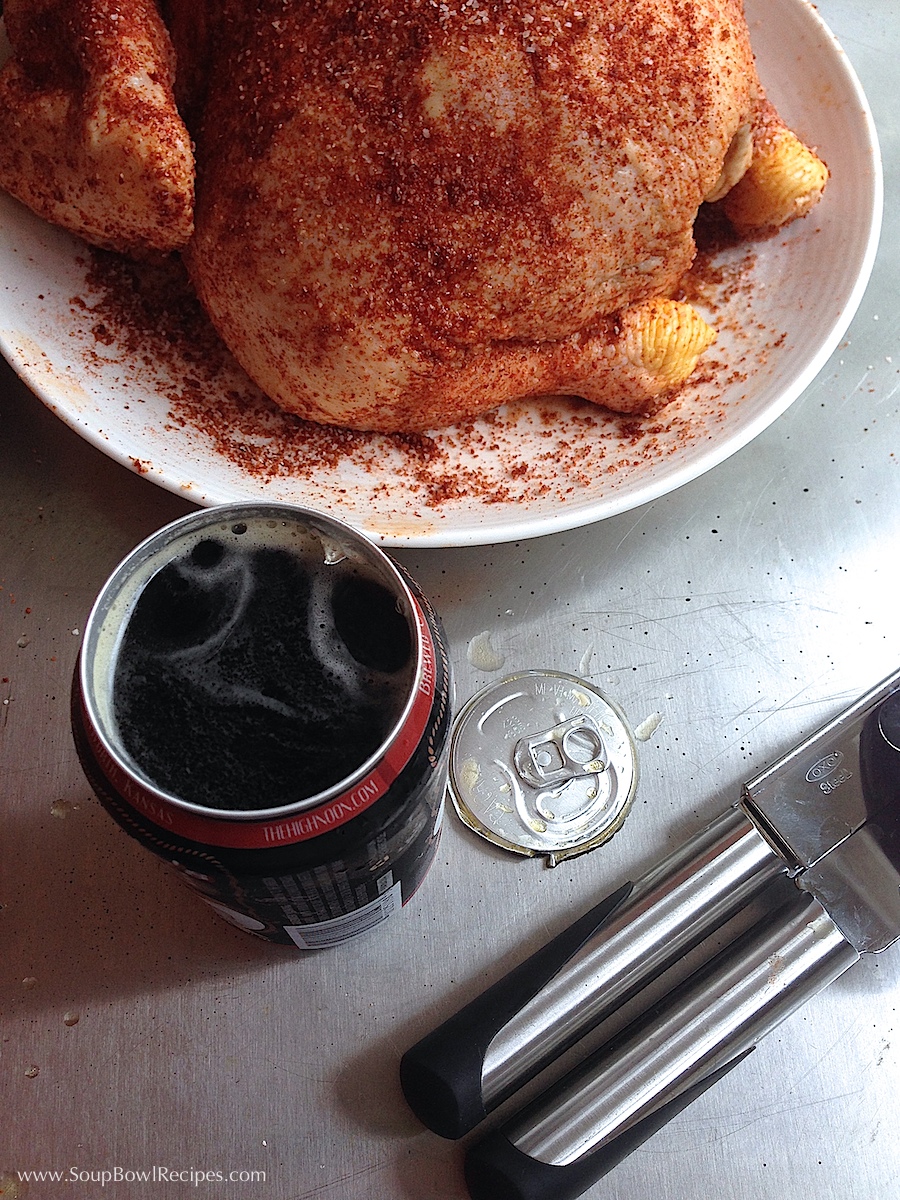
Meanwhile, use a can opener to remove the top of beer can and pour out ½ of the beer into a glass. (I strongly advise drinking the extra beer before proceeding.)IMG_6854{In case you were wondering, I didn’t suddenly grow hair on my knuckles, these are my husband’s incredibly masculine hands.}

IMG_6855

Slide the ½-full beer can into the cavity of the chicken, legs pointing down (now here’s where the jokes start).IMG_6868

Carefully place chicken and can on the indirect portion of the grill over the drip pan. You may need to position the legs like a tripod to stabilize chicken. Close the lid and cook.IMG_6881

Okay, so every chicken recipe I’ve ever run across says, “Cook chicken until an instant-read meat thermometer inserted into the thickest part of the thigh reads 165F.”IMG_6886

That’s fine, however, I’ve found that the chicken isn’t always cooked through when I rely on this method, so in addition to inserting a thermometer into the thigh, I also insert one in the top of the breast, like so…IMG_6885If the temperature here also reads 165°F, then you’re good to go. With a 5-6 lb. chicken, cooking at 350-400°F, and a train leaving Station A at 6 o’clock, this will take about 45-65 minutes. (If using charcoal, you may need to add more to maintain heat.)

Transfer chicken to a plate and allow to rest for 10 minutes before carefully removing the beer can and carving. (Don’t dump the beer just yet, because if you slice into the chicken and it’s not quite done, you’ll want to pop it back on the can and put the whole shebang back on the grill a little while longer until cooked through.)IMG_6889

Sidekicks: Serve with beer, of course, and a couple of these grilled sides. While the chicken is resting, throw these veggies onto your hot grill and everything will be ready at the same time. Brilliant!

Lemony-Garlic AsparagusIMG_6887The acidity of the lemon and the sweetness of the asparagus are an excellent counter to the slightly salty, slightly spicy chicken. And the garlic? Well, I added that just because I love garlic.

Lemony-Garlic Asparagus

Serves 4

  • 1 bunch of asparagus, tender parts only
  • 3 Tbsp. unsalted butter, melted
  • 1 clove garlic, minced
  • juice of 1 lemon
  • Kosher salt and fresh cracked pepper to taste

In a small bowl, combine butter, garlic, and lemon juice. Whisk until combined. Line a grill tray with a piece of tin foil (you don’t want all those delicious juices to be lost to the fire), and place asparagus on foil in a single layer. Drizzle with butter mixture and season with salt & pepper.

Place basket on grill set to high heat, close lid and cook for 2-3 minutes or until crisp-tender and the tips start to brown. Transfer to a plate and serve immediately.

Grilled Avocados with Salt and LimeIMG_9334Now I like guacamole as much as the next gal, but this is hands down my favorite way to eat an avocado — and it’s probably the easiest side dish in the history side dishes. (Recipe slightly adapted from Bon Appétit) 

Grilled Avocados with Salt and Lime

Serves 4-6

  • 2-3 ripe avocados, halved with pit removed
  • 1-2 Tbsp. olive oil
  • 4-6 lime wedges
  • Kosher salt to taste

Brush each avocado half with oil, and mist the grill grate with high heat cooking spray. Place avocados flesh-side down on a grill set to high heat. Cover and cook for 3-5 minutes or until avocado easily lifts from grate and has sear marks. Serve with a squeeze of lime and a sprinkle of salt.

Happy Cinco de Mayo!

IMG_6361

Everyone here at SoupBowlRecipes (including my two adorable nephews) would like to wish you a Happy Cinco de Mayo! Whether you’re at your favorite Mexican restaurant enjoying a fruity drink and some spicy salsa…IMG_6388 (1)

…or at home with friends cooking up street tacos and sopapillasIMG_0882

IMG_7165

…we hope you have a safe and fun holiday!IMG_6370 (1)

 ¡Adiós Amigos!

Super Easy Sopapillas

IMG_7177

Sopapillas are a traditional Mexican dessert consisting of fried dough that’s been sprinkled with cinnamon and sugar then drizzled with honey. Ohmygod my mouth started watering just typing that sentence. Okay, now you’ve all had elephant ears at the fair, right? Yeah, well these are so much better. I don’t know why, but they are. Maybe it’s the honey. Maybe it’s the Mexican flare. Or maybe it’s just me. But this dessert is the single most thing I look forward to whenever we go out for Mexican food. Forget the chips and salsa, I’m all about the sopapillas.

Now normally I like to do things the right way. I’m about making the dough by hand, letting it rise, rolling it out, and frying it in small batches. When time permits. But when you have a house full of hungry guests who have been drinking daiquiris and noshing on street tacos, there’s no way you’re gonna to want to pull yourself away from the party to cook up a labor-intensive dessert. At least I wouldn’t. So why not opt for something simpler. Let’s all just agree to skip the kneading and rolling this Cinco de Mayo and throw a bunch of tortillas into the fryer instead!

Super Easy Sopapillas

  • vegetable oil, roughly ¼-½ cup
  • 4-6 small flour tortillas (fajita size works well)
  • ¼ cup granulated sugar
  • 1 Tbsp. cinnamon
  • honey

IMG_7149

Cut each tortilla into 4 wedges, set aside. In a small bowl, mix cinnamon and sugar.

Pour oil into a straight-sided skillet until it’s ¼-inch deep. Set heat between medium-high and high. Allow oil to get hot (you’ll know it’s ready when a couple drops of water pop when they hit the oil).

With kitchen tongs, carefully place 4-5 tortilla wedges into the oil and cook, occasionally pressing down on the tortillas, until they brown on one side, then flip and cook on the other side, approximately 1 minute per side.

Transfer to a paper towel lined plate and immediately sprinkle with cinnamon/sugar mixture. Repeat with remaining tortilla wedges.

IMG_7156

Either drizzle with honey and serve immediately, or allow to cool, then store at room temperature in a resealable plastic bag for up to 1 day. Drizzle with honey just before serving.

IMG_7165

Side note: In case you were wondering what happens to all this delicious food after I’m done with my photo shoots, I can tell you that everything goes directly to my Quality Assurance department (a.k.a. my stomach). So yeah, I ate this entire plate of sopapillas as soon as I put down my camera. And no, I didn’t save any for my toddler who was napping at the time. Don’t judge me.


Last-Minute Cinco de Mayo Party at Home: Smoky Beef Brisket Street Tacos

IMG_0882

With Cinco de Mayo only cinco days away, it’s time you started thinking about your party plans. You know, and I know, and all the other sane people on the planet know that every Mexican restaurant from here to Jupiter is going to be jammed packed with people fighting for a table. Even if you were forward-thinking enough to make a reservation, you’re still gonna wait a long time to be seated. Sure it’s fun to go out and celebrate with tequila-guzzling, sombrero-wearing, chips-and-salsa-munching party animals, but doesn’t it sound more fun to have a few friends over for a casual party where you can enjoy good food, good conversation, and still make it to work the next day (btw, Cinco de Mayo falls on a Monday this year, yeesh!)? Below is a quick and easy Cinco de Mayo menu that you can prep the day before, then throw into the crockpot to cook while you bide your time at work waiting for the festivities to begin.

Smoky Beef Brisket Street Tacos

Also known as carne deshebrads, these super easy, super tasty tacos take a couple minutes to prepare, and even less time to vanish. Seriously, beware because they are highly addictive and will be requested by family and friends for every occasion from here on out. Consider yourself warned!  Just don’t forget to marinate the brisket overnight so that it can reach its full flavor potential. (Recipe slightly adapted from Muy Bueno cookbook, by way of my aunt, by way of her daughter-in-law)

Serves 4-8

Tacos

  • 2-4 lbs. beef brisket, fat trimmed (½ lb. per person)
  • 2 oz. brisket marinade, (preferably Claude’s Brisket Marinade Sauce), or 2 tsp. liquid smoke per pound of brisket
  • 2 bay leaves
  • 12 oz. beer (preferably Blue Moon)
  • Kosher salt to taste
  • Fresh cracked black pepper to taste
  • 8-16 corn tortilla, warmed (about 2 per person)

Toppings (choose any combination of the following or add your own)

  • 1-2 cups crumbled or shredded Mexican cheese, such as cotija or queso blanco, or another cheese
  • 1 cup Crema Mexicana or sour cream
  • 1 cup fresh cilantro leaves, torn
  • 1-2 cup white onions, diced
  • 1-2 cups fresh tomatoes, diced
  • 2-4 avocados, sliced
  • 3-4 cups shredded cabbage or lettuce
  • 2-3 limes, cut into wedges
  • Lots of pico de gallo/salsa

The night before:

Place all of the taco ingredients (except tortillas) into the baking dish of crockpot or slow cooker, then cover and refrigerate overnight to allow the brisket to marinate.

Chop and prepare all the taco toppings (except for the avocado which will turn brown), cover and refrigerate.

The day of:

Place baking dish in the crockpot and set to cook on LOW for 8-10 hours or HIGH for 4-6 hours.

About 30-mintues before the brisket has finished cooking, slice the avocado and remove the other toppings from the refrigerator. Also, warm the tortillas by stacking 5 of them on top of each other, then wrap in tin foil and place in an oven preheated to 350° for 15-20 minutes (you can warm multiple packets of 5 tortillas at the same.)

Remove the brisket from the crockpot and place on a large serving platter. With two forks, shred the meat and drizzle a couple tablespoons of cooking liquid over top.

Set out toppings and allow guests to build their own tacos.

Sidekicks:

IMG_7033

  • Serve tacos alongside Mexican rice, and guacamole with chips.
  • With this meal you have plenty of wonderful thirst-quenching companions. Serve with Mexican beer such as Pacifico, Modelo, Sol, Dos Equis, Victoria, or Carta Blanca, to name half-a-dozen, and/or a pitcher (or three) of homemade strawberry-watermelon daiquiris.

Guacamole

IMG_7017

Guacamole

  • 3 ripe avocados
  • ½ tomato, seeds removed, diced
  • ¼ white onion, diced
  • 1 small jalapeño, seeds removed, minced
  • the juice of 1 lime
  • 4 sprigs fresh cilantro, finely chopped
  • Kosher salt and fresh cracked black pepper to taste
  • 2-3 dashes hot sauce (optional)

Cut the avocados in half and remove pit. Scoop out avocado from the peel, put in a medium bowl. Mash avocado with a fork until slightly smooth with some chunks of avocado left.

Add tomato, onion, jalapeño, and lime juice. Stir until combined, then season with salt & pepper, and a few dashes of hot sauce if you’d like. Serve with tortilla chips.

*If you have a small food processor, you can use it to chop the ½ tomato, ¼ white onion, jalapeño, and lime juice until chunky, then add it to the mashed avocado. Or, for a super quick version, add ½ cup jarred salsa to mashed avocado and mix until combined.

IMG_7013

Guacamole is best served fresh, but if you do refrigerate it, place a piece of plastic wrap directly on top of guacamole, the cover the entire bowl with an additional piece of plastic wrap.

IMG_7021

Mexican Rice

IMG_7036

Mexican Rice

Serves 6-8

  • 2 Tbsp. olive or vegetable oil
  • 1 onion, finely diced
  • 1 green pepper, finely diced
  • 2 garlic cloves, peeled and minced
  • 2 cups dry long-grain white rice
  • 1½ cups spicy tomato juice (2 – 5.5oz cans of V8)
  • 2 cups chicken stock (see recipe in Homemade Stocks)
  • 1 cup fresh or frozen (thawed) peas
  • 1 cup diced tomatoes, seeds removed
  • Kosher salt and fresh cracked black pepper to taste
  • chili powder (optional)
  • 4-5 sprigs fresh cilantro, finely chopped

In a large, straight-sided skillet, heat oil until shimmering. Add onion and pepper and sauté until soft and onion begins to become translucent, about 5-8 minutes. Add garlic and cook until just fragrant, about 1 minute. Add rice and cook until it begins to toast, about 1-2 minutes.

Add tomato juice and chicken stock and bring to a boil, stirring occasionally. Once liquid begins to boil, immediately reduce heat to low and simmer, covered, for 20 minutes, or until rice is soft but not mushy.

Add peas and tomatoes and cook, stirring, for 1-2 minutes. Season with salt & pepper and chili powder, if you like it extra spicy.

Transfer to a large serving bowl and sprinkle with cilantro. Serve hot.

*Rice can be made the day before, refrigerated, then quickly reheated in the microwave the day of the party.

Strawberry-Watermelon Daiquiris

IMG_6229

The thing I always hate about making frozen drinks at home is that unless you own a Vitamix (which I desperately want but feel bad about dipping into the Toddler’s college fund to buy), I always end up with huge chunks of unblended ice that clog up my straw. By pre-freezing the watermelon for a few minutes and using frozen strawberries, I’ve found that I can bypass those pesky ice cubes altogether and still get the creamy, frosty effect that you’d get from your favorite Mexican restaurant.

Strawberry-Watermelon Daiquiris

Serves 4

  • 2 cups peeled, seeded, and cubed watermelon
  • 2 cups frozen strawberries
  • ½ cup light rum
  • ¼ cup fresh lime juice
  • ¼ cup triple sec
  • ¼ simple syrup *

IMG_6576

Place watermelon in a bowl and pour rum over top, then freeze for 40-60 minutes. In a blender, add watermelon and remaining ingredients and blend on high until smooth.

Pour into glasses and garnish with a wedge of watermelon.

*To make simple syrup, add 1 cup white sugar and 1 cup water in a sauce pan. Bring water to a boil and stir until sugar has dissolved. Allow to cool. Simple syrup can be stored in a covered container in the refrigerator for up to 3 months.

CHECK BACK FRIDAY FOR A QUICK AND EASY MEXICAN DESSERT YOU CAN SERVE WITH THIS MEAL!

More Ice Cream Muffins

IMG_6906

This weekend I changed up the ice cream muffins that I posted last week by trying a new flavor – and they were even better than the first. Check it out!

Ice Cream Muffins

Makes 12-14

  • 2 pints ice cream, softened* (I used Häagen-Dazs Pineapple Coconut for these muffins, but any flavor will do)
  • 3 cups self rising flour (not to be confused with all-purpose flour which won’t work in this recipe at all!)

Preheat oven to 375°F. Lightly mist muffin tins with cooking spray, then wipe away residue with a clean paper towel, or, alternatively, line tins with paper muffin cups.

In a medium bowl, beat ice cream and flour until combined. Using a spoon, drop muffin batter into cups, dividing evenly. Top each muffin with with a sprinkle of sweetened shredded coconut and a banana chip, or just Sugar In The Raw.

IMG_6901

Chocolate Covered Pretzel Cookies

IMG_6645

The other day when I was jogging (which almost never happens), I was trying to decide how I would reward myself for my sudden burst of exercise — you see, that’s how I work, I run so that I can eat. Maybe I’ll stop for a doughnut, I thought, as I passed our local doughnut shop, Or I could get a bag of chips, I contemplated as I turned the corner by the mini-mart. Hmm, what do I crave, savory or sweet? And then around mile 2 I realized that I didn’t have any money on me, so I started rummaging through my mental inventory of snacks in my pantry. What could I do with the pittance I have in my cupboard? Let’s see, I have chocolate chips, pretzels, stuff to make cookies…wait, hang on a sec! At that moment I turned around and sprinted home to make my new favorite cookies, and they were exactly what I needed to satisfy every craving I’ve had since birth. Seriously, that’s how good they are. But I’ll warn you, don’t (DO NOT!) make these cookies unless you have a fresh gallon of milk in the fridge, because you will need it! These rich and salty beauties deserve a big, cold, creamy glass of milk to properly wash them down.

Chocolate Covered Pretzel Cookies

Makes 2-3 dozen

  • 1¼ cups unsalted butter, softened
  • ¾ cup white sugar
  • ¾ brown sugar
  • 2 eggs
  • 1 tsp. vanilla
  • 2 cups all-purpose flour
  • ¾ cup coco powder
  • 1 tsp. baking soda
  • ¼ tsp. Kosher salt
  • 2 cups semi-sweet chocolate chips
  • 1½ cups crushed pretzel sticks (preferably Snyder’s of Hanover Old Fashioned Dipping Sticks), plus 1-2 dozen pretzel sticks snapped into thirds for topping

IMG_6648

Preheat oven to 375°F.

In a large bowl, cream butter and sugars until light and fluffy, about 2 minutes. Add eggs and vanilla and beat until combined.

In a separate bowl, sift together flour, coco powder, baking soda, and salt. Working in two batches, add the flour mixture to egg mixture, mixing until just combined after each incorporation.

Fold in chocolate chips and pretzels. Using a spoon, scoop out 2 Tbsp. of cookie batter and roll into thick balls, place on a cookie sheet. Take a piece of pretzel and press into the top of each cookie, slightly flattening out the ball, like this…

IMG_6604

See, this way you’re guaranteed a crunchy, salty pretzel in every chocolatey bite — and it just looks cool.

Bake for 9-11 minutes, until just cooked through (I recommend cooking for 9 minutes, then letting sit on the hot cookie sheet for another 1-2 minutes before transferring to a cooling rack). Serve with milk. Lots and lots of milk.

IMG_6784


Split Pea Soup with Ham and Salad with Honey Mustard Vinaigrette

IMG_6764

One of the many things I love about Easter, aside from the candy and the colorful eggs, is the juicy spiral-cut ham that we serve up for dinner – and keep serving day, after day, after day, until the never-ending leftovers have been used up. Sick of ham sandwiches yet? Me, too! Here’s a quick way to finish off your ham without stuffing it into yet another stale dinner roll!

Split Pea Soup with Ham

Serves 6-8

  • 2 Tbsp. olive oil, plus more for drizzling
  • 1 white or yellow onion, diced
  • 6 medium-sized carrots, peeled and diced
  • 6 celery stalks, diced
  • 2 cloves garlic, peeled and minced
  • 4 sprigs of fresh thyme, finely chopped
  • 6 cups chicken stock (see recipe in Homemade Stocks)
  • 1 lb. dried split peas
  • 8 Yukon gold potatoes, cut into ½-inch cubes
  • ½ tsp. smoked paprika, plus more for sprinkling
  • 1 bay leaf
  • 1 ham bone
  • 1-2 cups diced ham, reserve a few Tbsp. for garnish
  • Kosher salt and fresh cracked black pepper to taste

In a large soup pot, heat oil until shimmering. Add onions, carrots, and celery and cook until vegetables have softened and onion starts to become transparent, about 5-8 minutes. Add garlic and thyme and cook until just fragrant, about 1 minute.

Add stock, peas, potatoes, paprika, and bay leaf and stir to combine. Nestle ham bone in the middle of soup then bring to a boil. Immediately reduce heat to low and simmer, partially covered, until peas and vegetables are soft, about 40-45 minutes.

Remove bay leaf and ham bone from, discarding both. Ladle half of soup into a separate bowl, set aside. With a hand-held immersion blender, purée soup in pot until smooth, then return reserved soup to pot and stir until combined. Or alternatively, ladle half of soup into a blender and purée until smooth, the return puréed portion to pot and stir until combined. Season with salt and pepper as needed.

Add diced ham and heat until ham is warmed through. Ladle soup into preheated bowls and garnish with a drizzle with olive oil, some chopped ham, and a sprinkle of smoked paprika. Serve immediately or refrigerate covered for 3-5 days.

Mixed Green Salad with Honey Mustard Vinaigrette

20140423-091754.jpg

Serves 6

FOR THE SALAD:

  • 6-8 cups mixed salad greens
  • 3 hardboiled eggs, sliced
  • 1 cup cherry or grape tomatoes, halved
  • 1 cup sugar snap peas, cut into thirds
  • 2 green onions, white and light green parts only, thinly sliced
  • 1 carrot, shaved

FOR THE VINAIGRETTE:

  • 1 Tbsp. Dijon mustard
  • 1 Tbsp. whole grain mustard
  • 2 Tbsp. olive oil
  • ¼ cup white wine vinegar
  • 2 Tbsp. honey
  • Kosher salt and fresh cracked pepper to taste

Toss all salad ingredients in a large bowl.

Whisk all vinaigrette ingredients in a liquid measuring cup until ingredients have emulsified.

Pour a little dressing over salad, toss, then repeat as needed.


Deviled Easter Eggs

IMG_6540

Since the time I was young, I have always had a hard time letting go of holidays. The anticipation leading up to Christmas, or Easter, or my birthday was so great, that once the date had come and gone, I would go into what my family called a “post-party depression.” I was the kid that would stand in the front yard weeping as my dad hauled our dried-up Christmas tree out to the curb, and the one who would leave Valentine’s Day cards taped to my wall well into summer, and the one that wouldn’t eat my carefully dyed Easter eggs, instead hiding them in my room until they began to smell. Now that I’m older (and only slightly wiser), I’ve gotten better at boxing up our holidays and storing them away until the next year, but I can see that my daughter has inherited my sentimentality. Our Christmas tree (which we never got around to disposing of – oops) is stashed in a corner of our backyard behind the tool shed. Every so often when she’s playing outside, my toddler will wander over to “visit” the tree and offer some encouraging words about its possible return to the living room where it once stood proud. So as Easter approaches, it dawned on me that I may have some difficulty getting her to relinquish the eggs she so happily dyed and decorated last week. Being 2½, she has absolutely no reason. There’s not a snowball’s chance that I’ll be able to explain the concept of “rotting eggs” in a way that she will either a) understand, or b) give a crap about. Again, she’s 2½. So that’s when I put my thinking cap on. How could I preserve her eggs a little longer without sacrificing a dozen perfectly good hardboiled-beauties and still keep my sanity? The answer was so obvious it almost smacked me in the face; deviled eggs! But not just any deviled eggs, dyed deviled eggs. And so yesterday morning when my toddler woke up, she found that not only did the Easter Bunny leave her a fun basket of gifts, he magically transformed her Easter eggs into a colorful lunchtime treat! (I’m hoping this trick works for a couple more years, but probably not!) Anyway, here’s how I did it…

Deviled Easter Eggs

Makes 12

  • 6 eggs
  • ¼ cup mayonnaise
  • 1 teaspoon white vinegar
  • 1 teaspoon yellow mustard
  • 1/8 teaspoon salt
  • food coloring (red, blue, green)


In a medium saucepan set over high heat, place eggs in a single layer and cover with 2 inches of water. Once water begins to boil, set a timer for 10 minutes. After 10 minutes, remove saucepan from heat and place in the sink. Run cold water over the eggs for 1-2 minutes.

Crack egg shells and carefully peel under cool running water. Gently dry with paper towels. Slice the eggs in half lengthwise, removing yolks and placing in a medium bowl. Place the whites on a serving platter. Mash the yolks into a fine crumble using a fork. Add mayonnaise, vinegar, mustard, salt, and mix well. If the mixture is lumpy, use a hand blender to beat the chunks out.

Divide mixture into 5 separate bowls. To the first bowl add 1 drop of red food coloring and mix well, this will be your pink filling. To the second bowl add 2 drops of blue food coloring, and to the third bowl add 1 drop of green food coloring (these will be your blue and green fillings, obviously). The fourth bowl is a little trickier because purple is a hard color to make when you’re starting with a yellow base. I recommend using 1 drop of blue and 1 drop of red, mixing, then adding more of whichever color you need to make it look purple (which will inevitably look grayish, but oh well). Don’t do anything to the fifth bowl because that will be your yellow filling.

Evenly divide the five fillings into egg whites, alternating colors. An easy way to do this is to fill a small sandwich bag with a couple spoonfuls of filling, then cut the tip off one corner of the bag and squeeze the filling into the whites – kind of like you would icing from a pastry bag.

Bonus: thess deviled eggs are so colorful that they don’t need a garnish! Serve eggs immediately, or refrigerate (covered) for up to 1 day.

IMG_6562

Happy Easter!

20140420-104323.jpg

Happy Easter from the SoupBowlRecipes team! *Just a note to save your Easter eggs and ham scraps (bone and all) because this weeks’ recipes will be using them! We hope you enjoy the day!