Leek and Potato Soup

Leek and Potato Soup

image

Here it is, folks, the last of the last of the St. Patty’s Day meals. Although I’ve enjoyed the Irish recipes that we’ve dished up this month, I’m ready to retire my potato peeler for a while – and so is my waistline. This soup is a lighter version of the standard “potato leek” but it’s heavier on the leek than it is the potato, offering more flavor for less calories – and no cream added! If you like your soup super creamy (is that homophone getting old yet?) you can blend it to be smooth (like in the photo above), or leave bits of potato, leek, and celery. Regardless of how you dish it up, I think you’ll enjoy this tasty Irish soup. Happy St. Patrick’s Day! ♣

Leek and Potato Soup

Serves 4

  • 2 Tbsp. oil, such as grapeseed or vegetable
  • 1 Tbsp. unsalted butter
  • 3 leeks, white and light green parts only, thinly sliced
  • 2-3 medium sized russet potatoes, cut into ½-inch cubes
  • 3 celery stalks, with leaves included, roughly diced
  • 2 cloves garlic, peeled, crushed and roughly chopped
  • 1 bay leaf, crumbled
  • 3-4 cups chicken or vegetable stock (see recipe in Homemade Stocks), depending on preference of thickness
  • ½ tsp. onion powder
  • Kosher salt to taste
  • Fresh cracked pepper to taste
  • 3 Tbsp. sour cream thinned with milk for serving (optional)
  • 2 Tbsp. fresh chives, chopped, for serving (optional)

IMG_5401

(I decided to add the garlic and bay leaf at the last minute so they didn’t make the family photo, sorry.)

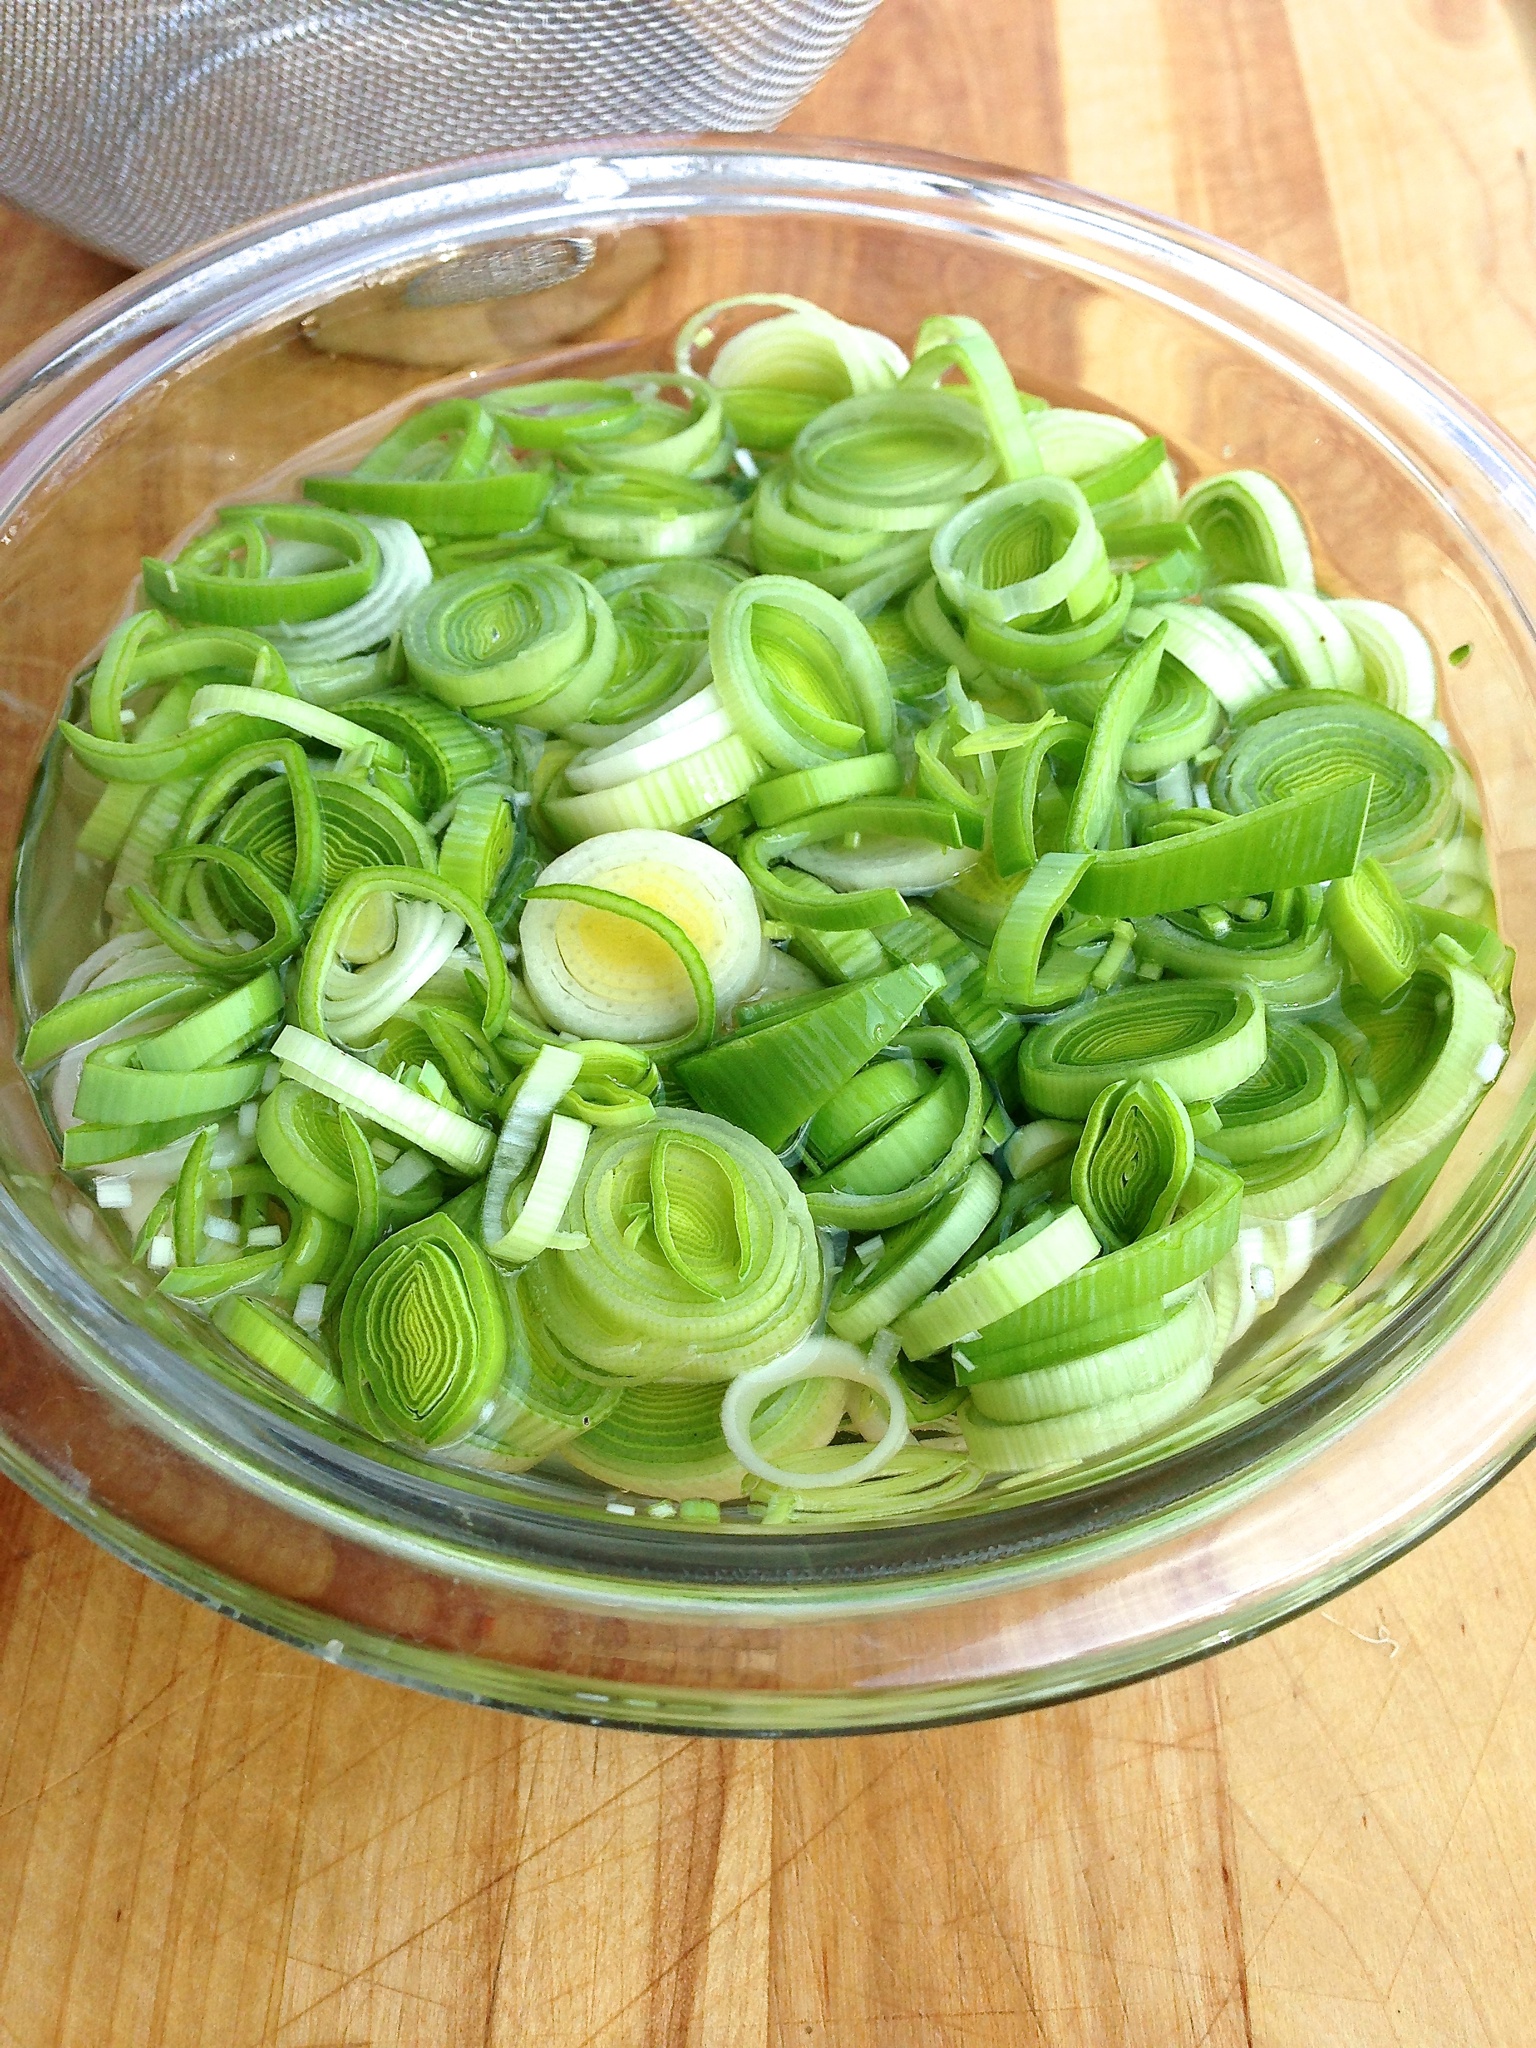
Leeks: I always leave a hint (just a hint) of dark green parts on my leeks because it makes the soup greener (is that right?) Greener? More green? Anyway, you should use about this much leek…

IMG_5405

Leeks can hide dirt in their super thin layers, so after you slice them, it’s a good idea to swish them around in water to release any grim hanging on, like so…

IMG_5406

Celery: Nothing special about these guys, just chop them and include the leaves.

IMG_5410 

Potatoes: Peel them, then cut them into ¼-inch slices. Cut the slices again into ¼-inch sticks, and finally cut the sticks into cubes. (I do the potatoes last so that they don’t turn that weird pinkish color as the sugars oxidize.) The progression of the potato…

IMG_5412

And the gang’s all here!

IMG_5423

Add butter and oil to a large soup pot set over medium-high heat, and cook until butter has melted. Add the vegetables and the crushed bay leaf, and sauté until soft, but not brown, about 8-10 minutes. Season with salt and pepper.

Add 3 cups of the stock, bring to a boil, then immediately reduce to a simmer. Partially cover and simmer for 20 minutes, or until potatoes are easily pierced by a fork.

Purée soup with an immersion hand-blender right in the pot; or in two batches, purée soup in a food processor or blender until you’ve reached the desired consistency, either smooth or chunky. This is chunky…

IMG_5432

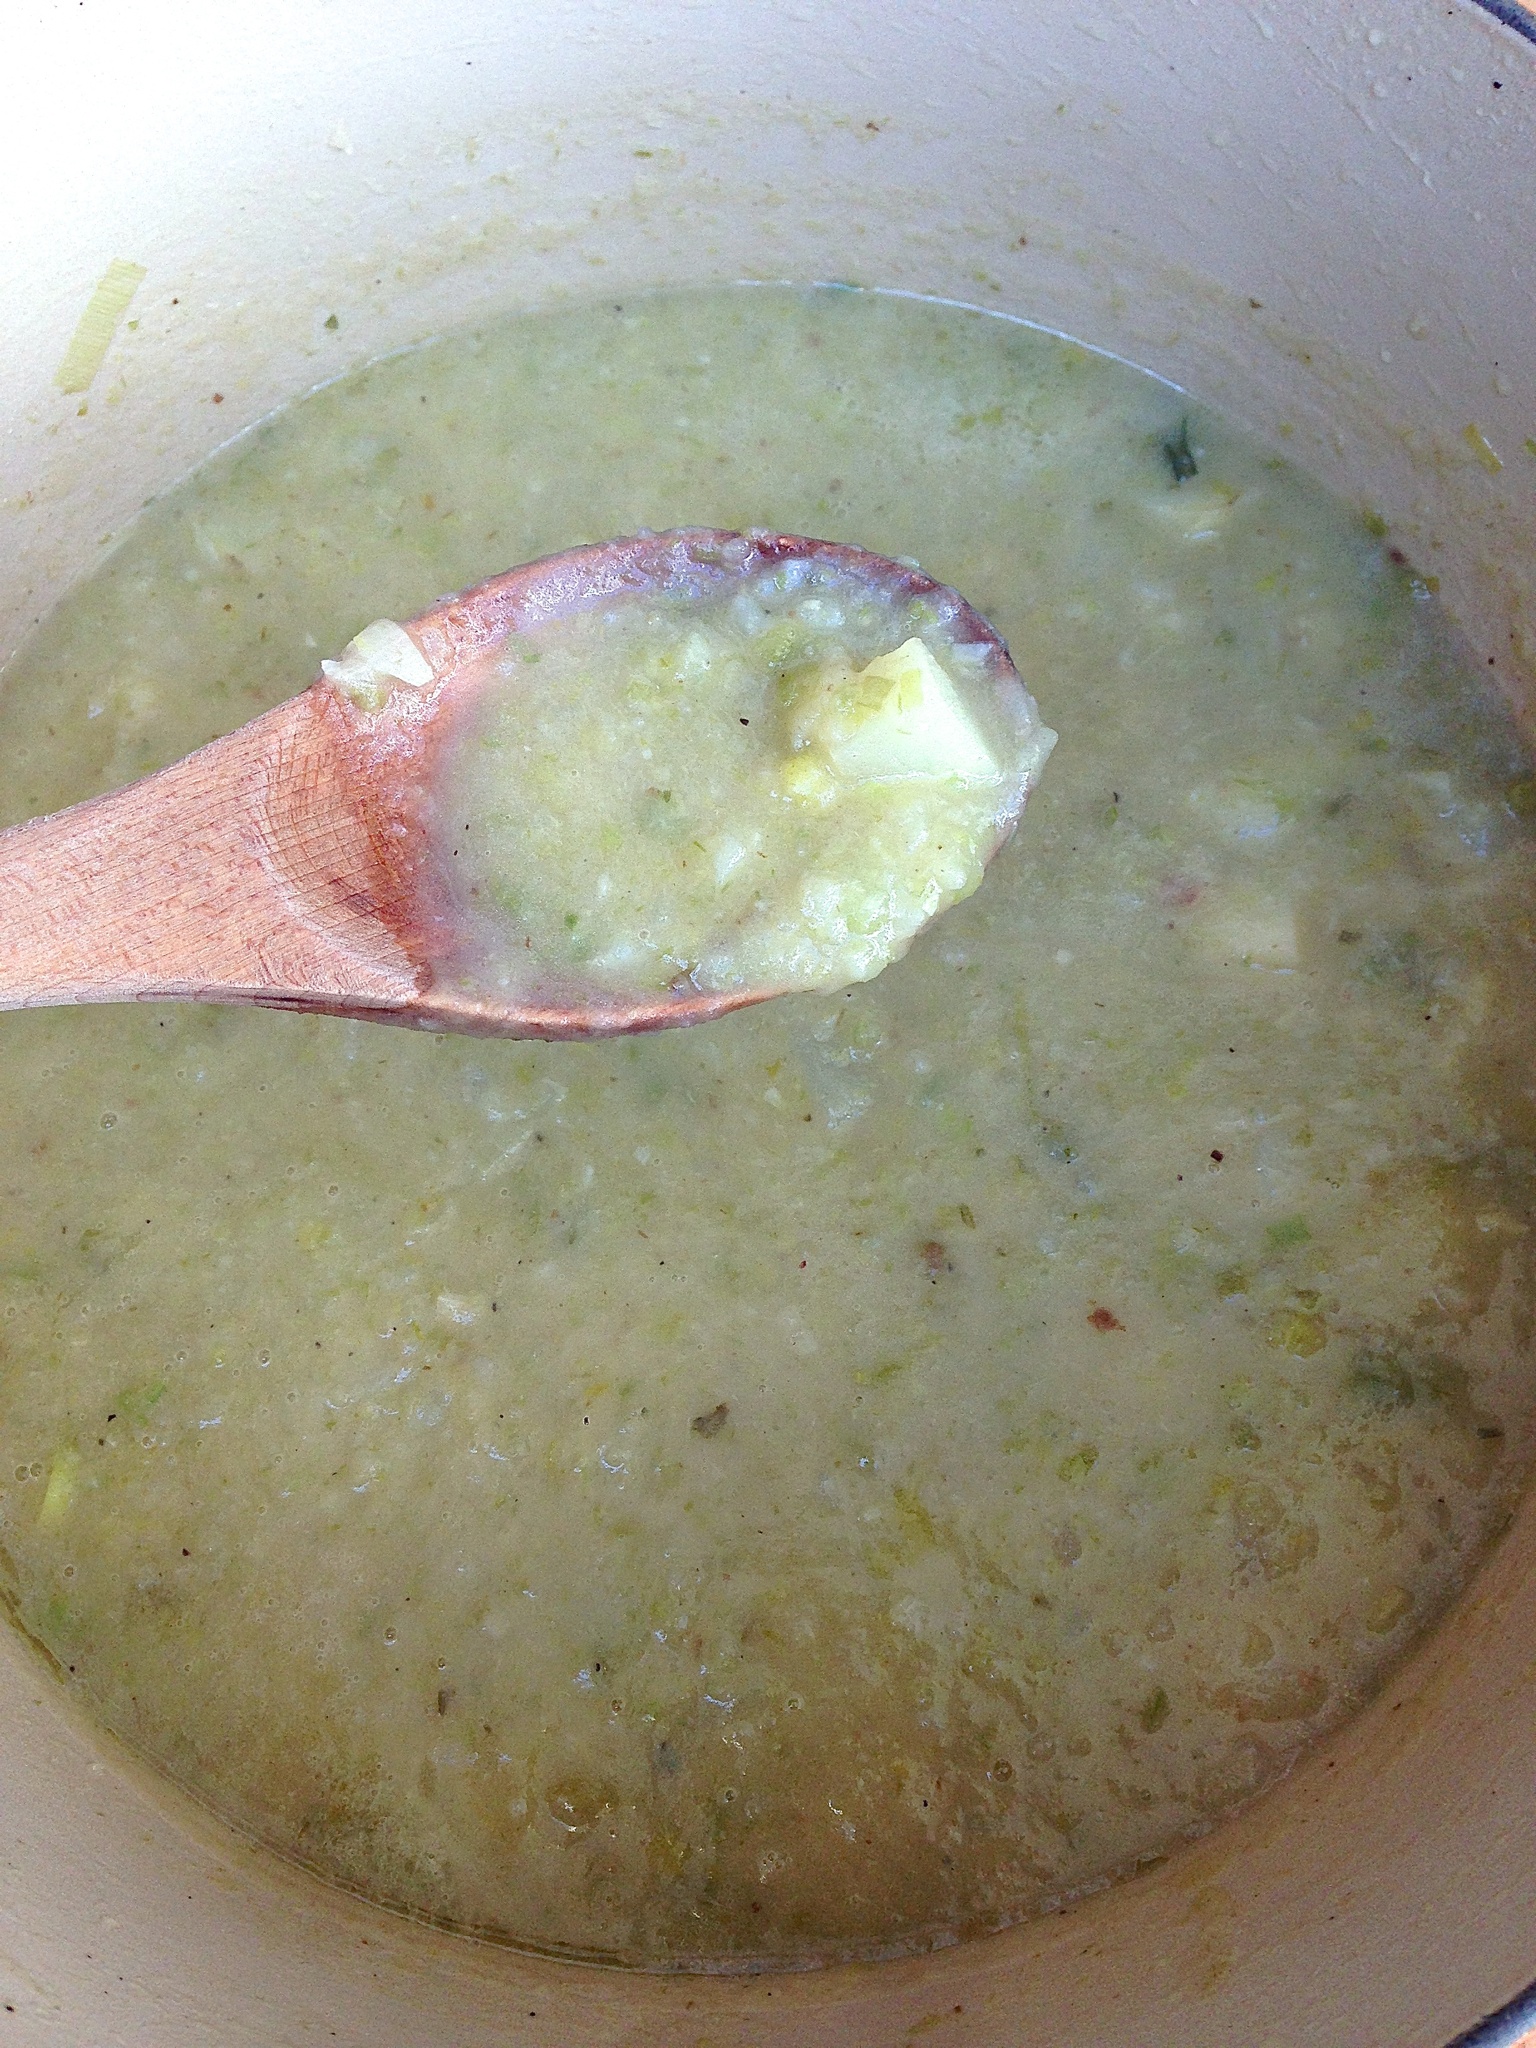
Return to pot and taste for seasoning. Thin with more stock if needed.

Ladle into preheated bowls and garnish with a sprinkle of chopped chives and a drizzle of sour cream (or a sour cream shamrock – see How To below). Serve with dark Irish soda bread, or another hearty bread.

image

How To: 

Making a sour cream shamrock is easier than it looks, here’s how you do it.

1) Thin sour cream with a little milk and stir until smooth.

2) With a small spoon, place 4 dots of sour cream in the middle of the bowl.

image

3) Using a toothpick or bamboo skewer, drag one of the dots into the middle of the circle.

image

4) Follow suit with the other 4 dots, dragging them to the center of the circle, forming the body of the shamrock.

image

image

5) Continue to pull the sour cream downward, creating the stem of the shamrock.

image

And violà!

Chocolate Guinness Layer Cake

Chocolate Guinness Layer Cake

IMG_5231

Well this cake has just about all of my favorite things: chocolate, beer, and espresso – need I give you any more of an introduction than that? I thought not. (Recipe slightly adapted from Bon Appètit)

Chocolate Guinness Layer Cake

Makes 12 servings

Cake:
3 ounces unsweetened chocolate, chopped
2 ¼ cups all purpose flour
2 teaspoons baking powder
½ teaspoon baking soda
½ teaspoon salt
14 tablespoons (1 ¾ sticks) salted butter, room temperature
1 ¼ cups plus 3 tablespoons sugar
3 large eggs, separated
¾ cup Guinness, chocolate stout, regular stout, or porter
2/3 cup freshly brewed strong coffee (I stopped by Starbucks and bought a Grande French Roast, used a bit for the cake, then drank the rest. It’s called being resourceful, people!)

IMG_0434

Frosting:
1 pound bittersweet chocolate (54% to 60% cacao), chopped
2 cups heavy whipping cream
1 teaspoon instant espresso powder

PREPARATION

For cake:
Position rack in center of oven and preheat to 350°F. Butter two 9-inch-diameter cake pans with 1 ½-inch-high sides. Line bottom of each cake pan with parchment paper round; butter and flour parchment and sides. Place chopped chocolate in medium metal bowl. Set bowl over saucepan of barely simmering water and stir until chocolate is melted and smooth. Remove bowl from over water and set aside. (This is not the time to lick your fingers, friends. It looks really melty and delicious, but remember it’s unsweetened, so it still tastes skunky at this point! Wait until the batter’s finished then lick the beaters clean.)

Whisk flour, baking powder, baking soda, and salt in medium bowl to blend. Using electric mixer, beat butter and 1 ¼ cups sugar in large bowl until fluffy and pale yellow, about 2 minutes. (I can’t stress enough how important it is to properly cream the butter and sugar; this is what makes the cake light and fluffy instead of heavy in the middle. Cream it until you think you’re done, then go an extra minute. It should look like this…)

IMG_0435

Add egg yolks 1 at a time, beating until well blended after each addition. Pour ¾ cup of Guinness into a measuring beaker, then drink the rest. In the same measuring beaker, pour 2/3 cup of freshly brewed coffee – if the coffee’s still warm the beer will help cool it down. Beat in lukewarm melted chocolate, then stout and coffee. At this point the batter will look a little strange, like it’s separating or curdling, but that’s normal. Beat flour mixture into chocolate mixture in 2 additions just until incorporated and batter is smooth. Oooh, now we’re getting somewhere!

IMG_0436

Using clean dry beaters, beat egg whites and remaining 3 tablespoons sugar in another medium bowl until stiff but not dry. (They should form stiff peaks when the beaters are lifted from the bowl, like so…)

IMG_0437

Fold ⅓ of egg whites into cake batter to lighten, then fold in remaining egg whites in 2 additions. Divide batter between prepared cake pans (about 3 cups for each); smooth tops. (Now you can lick your fingers!)

Bake cakes until tester inserted into centers comes out clean, about 30-35 minutes. Transfer cakes to racks and cool in pans 20 minutes. Invert cakes onto racks; remove parchment paper and cool completely. DO AHEAD: Can be made 1 day ahead. Cover and store at room temperature.

For frosting:
Place chopped chocolate in medium heatproof bowl. Combine whipping cream and espresso powder in medium saucepan. Bring cream mixture to simmer over medium-high heat, whisking occasionally. Pour cream mixture over chopped chocolate; let stand 1 minute, then whisk until chocolate is melted and mixture is smooth. Chill chocolate frosting until slightly thickened and spreadable, stirring occasionally, about 2 hours (or for quick chilling, place frosting in freezer until thickened and spreadable, stirring occasionally, about 30 minutes).

Using serrated knife, trim rounded tops from both cake layers so that tops are flat.

IMG_5216

You’ll end up with extra-thin slivers of cake. Don’t let these go to waste, they’re perfect for snacking on while you sweat over getting your frosting smooth and your cake looking beautiful.

IMG_0201_2

Place 1 cake layer, trimmed side up, on a cake plate. Drop 1¼ cups frosting by large spoonfuls over top of cake layer; spread frosting evenly to edges with offset spatula or butter knife.

IMG_5218

Top with second cake layer, trimmed side down so that the flat bottom side creates nice sharp edges – this makes it much easier to spread the frosting evenly without getting pesky crumbs in it. Spread remaining frosting evenly over top and sides of cake.

IMG_5220

This recipe yields plenty of frosting, so don’t skimp, really lay it on thick! DO AHEAD: Can be made up to 1 day ahead. Cover with cake dome and refrigerate. Let cake stand at room temperature at least 1 hour and up to 3 hours before serving.

IMG_5225

Beautiful! Now slice it up…

IMG_5230

Oh, yeah!

IMG_5246

Stuff My Kid Eats: Chicken Pot Pie

Stuff My Kid Eats

IMG_4946

You’ve heard me mention before that word “chicken” in response to “what’s for dinner?” can insight a riot from my toddler. That is unless the word “chicken” is followed by the word “pie.”  As you can see from the photo above, the little stinker pulled a steps tool up to the counter and started to dig in before I could get her plate to the table.

Chicken Pot Pie

IMG_0153

There’s a lot of different ways to make chicken pot pie, and a lot of different crusts you can use; the way I’ve always done it is by filling individual ramekins with chicken, vegetables, and gravy, then topping them with a light and buttery sheet of puffed pastry. Feel free to skip the individual dishes and use one large one, or alter on the veggies if you want (for instance I add broccoli, which isn’t traditional), and if puff isn’t your thing, then swap it out for phyllo dough. Just don’t forget to thaw the pastry in the refrigerator the night before, otherwise you’re going to end up with a couple frozen, unusable blocks of dough that have no business near your beautiful chicken – I know this first hand. (To adapt this recipe for vegetarians, see Vegetarian Modifications at the end of the recipe.)

Chicken Pot Pie

Serves 6

  • 1 Tbsp. olive oil
  • 3 Tbsp. unsalted butter
  • 1 shallot, finely diced
  • 3 garlic cloves, minced
  • 2 Tbsp. fresh thyme, minced
  • 3 Tbsp. flour plus more for dusting
  • ½ cup Sherry
  • 2 cups chicken stock (see recipe in Homemade Stocks)
  • 1 cup whole milk
  • 1 cup diced carrots, from about 3-4 carrots
  • 1 cup pearl onions, peeled and cut in half (fresh or frozen)
  • 2 cups russet potatoes, peeled and cut into 1-inch cubes (from about 3-4 potatoes)
  • 1 cup diced celery, from about 3-4 celery stalks
  • 1 cup diced broccoli
  • 1 rotisserie chicken, meat removed from bone and torn or cut into 1-inch cubes
  • 1 cup peas (fresh or frozen)
  • 2 Tbsp. Worcestershire sauce
  • 2 Tbsp. fresh Italian parsley, minced
  • ½ tsp. sugar
  • 1 tsp salt
  • 1 sheet frozen puffed pastry, thawed overnight in the refrigerator
  • 1 egg, beaten

Preheat oven to 400°F.

Heat butter and oil in a large skillet set over medium heat, until butter has melted and begins to brown. Add shallots and thyme and cook until softened, about 3 minutes. Add thyme and garlic and cook until just fragrant, about 1 minute. Add flour and cook until thick and starting to brown. Add sherry, stirring and cooking until liquid has reduced by half, about 2-3 minutes. Add milk and stock and bring to a boil, then reduce to a simmer.

To the simmering liquid, add carrots, pearl onions, and potatoes and cook until crisp-tender, about 5 minutes. Add celery, broccoli, chicken, peas, Worcestershire sauce, parsley, sugar, and salt and stir until combined. Cook for another couple minutes until all the ingredients are covered in gravy.

Scoop chicken mixture into individual oven-safe baking dishes or ramekins, or one large oven-safe baking dish, filling to the top.

IMG_0150

Lightly dust a work surface with flour and roll out puff pastry dough to get rid of the seams. If you’re making individual pot pies, then with a sharp knife, cut rounds slightly larger than the circumference of ramekins. Place a pastry round over each filled dish, crimping the edges a bit and allowing about ½ of dough to hang over the sides. If you’re making one large pot pie, lay the sheet of dough over the baking dish, with a sharp knife, trim the dough to fit, leaving ½-inch overhang, crimp the edges slightly.

Brush dough all over with egg wash and use a sharp knife to make a few small slits in the top for steam to escape. Place baking dish(es) on a baking sheet to catch the drips.

Bake for 20-25 minutes or until the crust is golden brown and the inside is bubbling at the edges.

IMG_0139

VEGETARIAN MODIFICATIONS

  • Omit chicken and replace with 1 additional cup each of carrots and broccoli.
  • Omit chicken broth and replace with vegetable broth.

Dublin Coddle Crockpot Version!

Dublin Coddle Crockpot Version!

image

Hey, everybody! I just did a little online research and found out that you can make yesterday’s Dublin Coddle in your crockpot as well, here’s how:

  • 1 lb. bacon strips
  • 8 good-quality port sausages
  • 4 onion, sliced
  • 1 leek, some green tops included, sliced
  • 2 bay leaves
  • 2 sprigs thyme
  • ¼ cup chopped fresh parsley
  • 2 garlic cloves, chopped
  • 6 starchy potatoes, such as russets, peeled and cut into 2 or 3 large chucks
  • 1 cup chicken stock
  • Fresh cracked black pepper

In a large skillet, cook bacon until just starting to crips. Transfer to a paper towel lined plate. Let cool, then slice in thirds widthwise, set aside.

In the same skillet over medium heat, add the sausages to the bacon fat and cook, turning, for about 15 minutes, until evenly browned. Transfer to a cutting board and cut into thirds, widthwise, set aside.

Also in the same skillet, gently cook the onions for 7-8 minutes, until soft but not colored.

Layer the onions, sausages, and bacon in your crockpot, seasoning each layer with plenty of black pepper. Add the leek, herbs, and garlic, and finish with a layer of potatoes. Season with a little more black pepper, then pour in the stock. cook at high (4 hours) or low setting (8 hours) until done.

Dublin Coddle

Dublin Coddle

image

Dublin Coddle is a traditional Irish comfort food that dates back to the seventeenth century. Because practicing Catholics are prohibited from eating meat on Fridays during Lent, it is thought that this dish came about as a way to cook up leftover meat at the end of the week. The first time I tried it was at an Irish Festival in Weston, MO and I was surprised at how flavorful it was for its simple ingredients – onions, potatoes, sausage, and bacon – but wow, I was impressed! Ever since then Dublin Coddle has singlehandedly replaced Chicken Pot Pie as my all-time favorite Irish meal! (Recipe slightly adapted from The Complete Irish Pub Cookbook)

Serves 4-6

  • 1 lb. bacon strips
  • 8 good-quality port sausages
  • 4 onion, sliced
  • 1 leek, some green tops included, sliced
  • 2 bay leaves
  • 2 sprigs thyme
  • ¼ cup chopped fresh parsley
  • 2 garlic cloves, chopped
  • 6 starchy potatoes, such as russets, peeled and cut into 2 or 3 large chucks
  • 3 cups chicken stock
  • Fresh cracked black pepper

Preheat oven to 300°F. In a large skillet, cook bacon until just starting to crips. Transfer to a paper towel lined plate. Let cool, then slice in thirds widthwise, set aside.

In the same skillet over medium heat, add the sausages to the bacon fat and cook, turning, for about 15 minutes, until evenly browned. Transfer to a cutting board and cut into thirds, widthwise, set aside.

Also in the same skillet, gently cook the onions for 7-8 minutes, until soft but not colored.

Layer the onions, sausages, and bacon in the bottom of an oven/flame proof casserole dish (or Dutch oven) with a lid, seasoning each layer with plenty of black pepper. Add the leek, herbs, and garlic, and finish with a layer of potatoes. Season with a little more black pepper, then pour in the stock.

Cover the casserole dish tightly and bring to a boil on top of the stove. Transfer to the preheated oven and cook for 45 minutes, or until the potatoes are tender.

Sidekicks: Serve with plenty of dark Irish soda bread to mop up the juices and a Guinness.

image

Make-Ahead Breakfast Casserole

Make-Ahead Breakfast Casserole for Daylight-Saving Time

IMG_0165

Ready to spring forward, everybody? Its daylight-saving time again (Surprised? Me, too!), which means that on Sunday we’ll loose and hour of sleep but gain an hour of daylight. Having a toddler in the house means sleep has become a very precious commodity (one we don’t seem to get enough of), so losing an hour makes a big difference. This season I’ve decided to give my husband the day-off from his Sunday Morning Waffles and prepare a savory breakfast casserole on Saturday night instead. This way, when daylight arrives earlier than we’d hoped for, I’ll simply transfer my casserole from the fridge to the oven then, go reclaim an extra hour of sleep while it cooks.

Quick, run out and get these 5 ingredients for your Make-Ahead Breakfast Casserole!

Quick, run out and get these 5 ingredients for your Make-Ahead Breakfast Casserole!

Serves 6

  • ⅓ cup vegetable oil
  • 1 30-oz. package of frozen shredded hash browns
  • 12 oz. ground breakfast sausage
  • 12 eggs
  • 4 oz. diced ham
  • 2 cups shredded cheddar cheese
  • Kosher salt and fresh cracked pepper to taste

Add-Ins (Pick of few of the following to make your casserole more tasty – for this casserole I used leeks, mushrooms, and fresh oregano.)

  • 1 leek, white and light green parts only, diced
  • 1 cup mushrooms, diced
  • 1 red pepper, diced
  • 1 cup broccoli, diced
  • 1 bunch of asparagus, tender parts only, cut into ½-inch pieces
  • 1 Tbsp. fresh chopped herbs (added to eggs)

Lightly mist a 13×9-inch baking dish (2 quart dish) with cooking spray.

Set a large skillet over medium-high heat and heat oil until shimmering. Carefully add hash browns and spread evenly over the bottom of the pan (it helps if you break up any chunks before cooking). Cover and cook, undisturbed, for 4-7 minutes, then uncover and continue cooking, flipping occasionally, until browned, about 10-12 minutes. Season lightly with salt and pepper.

Transfer hash browns to baking dish and spread in an even layer, set aside. In the same skillet over medium-high heat, add ground sausage and any vegetables you’re using, and cook until sausage is brown and vegetables are soft, about 4-6 minutes. Transfer sausage mixture to baking dish and spread in an even layer over hash browns. Allow to cool slightly before proceeding.

Layer the sausage on top of the hash browns.

Layer the sausage on top of the hash browns.

In a large bowl, whisk eggs (and herbs if you’re using) with a dash of salt and pepper until combined. Mix in ham and 1 cup of cheese. Pour egg mixture into the baking dish, covering sausage and hash browns completely. Sprinkle the top with remaining cup of cheese.

See how the eggs drip all the way down to the bottom of the dish? That means you get eggy goodness in every bite!

See how the eggs drip all the way down to the bottom of the dish? That means you get eggy goodness in every bite!

At this point you can either cover and refrigerate overnight, or bake right away.

Preheat oven to 350°F. Place baking dish on a rack set in the center of the oven. Bake for 45-50 minutes or until eggs have set (no longer jiggly in the middle) and the cheese has melted and started to bubble. While it’s baking you can cut the fruit, make some coffee, and pour (or squeeze) a couple glasses of orange juice; or go back to bed for an hour — it’s your choice.

Allow to rest for 5-10 minutes before cutting and serving.

IMG_0166

Don’t forget to set your clocks FORWARD and hour before hitting the pillow Saturday night!

Stuff My Kid Eats: Parmesan Chicken Cutlets

Stuff My Kid Eats

IMG_2475

When I told my toddler that we were having chicken Parmesan for dinner she said, “No, yucky! We’re having soup!” Then I put her plate in front of her and she recanted her statement: “Oh, this chicken! I LOVE this chicken!” If that’s not endorsement enough, I don’t know what is. Her favorite part of the dish is the wedge of lemon that she gets to squeeze over each bite. Each. Individual. Bite. Not over the entire cutlet, mind you, just one squeeze before every forkful. It’s an arduous, try-momm’s-patience way of eating, but she always cleans every bite off her plate. Every freshly-squeezed, 3-minutes-in-the-making, pull-your-hair-out-waiting bite. Oy!

Parmesan Chicken Cutlets

IMG_0694

When I think of chicken Parmesan, I picture a heavily breaded piece of poultry smothered in marinara sauce set under a gooey slice of melted cheese atop a large mound of pasta. This is not that chicken Parmesan; lightly breaded, quickly pan-fried, and served with a squeeze of lemon  it’s much more my speed, and something I don’t mind serving my family a couple times a month. (Recipe by Jenny Rosenstrach of Dinner: A Love Story, by way of Bon Appétit magazine)

Parmesan Chicken Cutlets

Serves 4

¾ cup all-purpose flour
2 large eggs
1½ cups panko (Japanese breadcrumbs)
¼ cup grated Parmesan
1 Tbsp. mustard powder
Kosher salt and fresh ground black pepper
4 small skinless, boneless chicken cutlets (about 1½ lb. total), pounded to ¼” thickness*
8 Tbsp. olive oil, divided
1 lemon, halved

Place flour in a shallow bowl. Beat eggs in a second shallow bowl. Combine panko, Parmesan, and mustard powder in a third shallow bowl and season mixture with salt and pepper

IMG_0717

Pat chicken dry with a paper towel, then season with salt and pepper. Working with one cutlet at a time, dredge in flour, shaking off any excess. Transfer to bowl with beaten egg and turn to coat. Lift from bowl, allowing excess to drip back into bowl. Coat with panko mixture, pressing to adhere. DO AHEAD: Chicken can be breaded 3 months in advance. Place between pieces of waxed paper and freeze in resealable freezer bags. Thaw before continuing.

Heat 6 Tbsp. oil in a large heavy skillet or a cast-iron skillet over medium heat. Working in 2 batches, cook cutlets, adding remaining 2 Tbsp. oil to pan between batches, until golden brown and cooked through, about 4 minutes per side. Transfer cutlets to a paper towel-lined plate and season with salt. Serve with lemon to squeeze over top.

*Note: Still have those chicken tenders patiently waiting in your freezer that I told you to save? This would be the time to use them. (If using chicken tenders, decrease cooking time to 2 minutes per side.)

Sidekicks:

  • Serve with a chilled glass of Sauvignon Blanc or a non-oaky Chardonnay.
  • A simple starch and vegetable medley is all you need to make this a hearty meal (see Winter Squash and Brussels Sprout Bake recipe below).

Winter Squash and Brussels Sprout Bake

IMG_0715

This easy gratin-style bake is an excellent way of introducing (or re-introducing) your family to the most unloved vegetable on the planet: Brussels sprouts. When roasted, Brussels sprouts become sweet and slightly nutty, which nicely compliments the decadent winter squash. Add some chopped herbs and a sprinkle of salty cheese, and you’ve got yourself a winning side dish. (Oh, and cut the Brussels sprouts into small wedges to make them less threatening to any skeptics at your table!)

  • ½ Acorn, Kabocha, or Butternut squash, seeded, cut into 1-inch cubes, rind left on (unless using Butternut squash, then remove the rind)
  • 12-14 small Brussels sprouts, cut into quarters
  • 1 leek, halved and thinly sliced, white and light green parts only
  • 2 Tbsp. fresh oregano, chopped
  • 2 Tbsp. coconut oil
  • Kosher salt and fresh cracked black pepper to taste
  • ¼ cup grated Parmesan cheese

Preheat oven to 350°F. Combine all ingredients except Parmesan in a baking dish. Bake for 30 minutes, or until the Brussels sprouts have browned and the squash is fork tender, tossing halfway through. Sprinkle Parmesan over veggies and return baking dish to the oven for 3-5 minutes, until cheese has melted and has started to bubble.

Cheddar Ale Soup with Dark Irish Soda Bread and Mixed Green Salad

The Luck O’ the Irish to You! 

IMG_0107

March is here and that brings us one day closer to Spring (March 20th for those of you keeping track)! I’m sure everyone’s heard the old adage, “March comes in like a lion and goes out like a lamb,” which means we still have a few more weeks of crumy weather and comfort food to get through before the big (read sunny) payoff. So before you put away your crockpot and comfy pants and start pulling out your capris and old issues of Cooking Light magazine, we must first pay homage to St. Patty’s Day and all of the savory starches that hail from the great green country of Ireland.

Cheddar Ale Soup

This entire meal was incredibly quick and easy to whip up. I’m not exaggerating here; from the moment I started sautéing the veggies to when I had dinner on the table took less time than it did for my toddler to watch Toy Story 3 — her new favorite movie. (Time-Saving Tip: Make the bread first, then start the soup while the loaf is in the oven baking.) This soup can be easily adapted for vegetarians by following the “Vegetarian Modifications” at the end of the recipe.

Serves 6-8

  • 4 slices thick cut bacon
  • ¼ cup butter (½ stick)
  • 1 white onion, diced
  • 1 carrot, peeled and diced
  • 1 stalks celery, diced, tops and leaves included
  • 3 cloves garlic, peeled and finely chopped
  • ¼ cup flour
  • 1½ Tbsp. cornstarch
  • 1 12 oz. bottle lager-style beer
  • 4 cups chicken or vegetable stock (see recipes in Homemade Stocks)
  • 4 cups whole milk
  • 1½ Tbsp. Worcestershire sauce
  • 1 Tbsp. hot sauce (such as Louisiana or Tabasco)
  • ½ tsp. chili powder
  • 1 tsp. Kosher salt, plus more to taste
  • Fresh cracked black pepper to taste
  • 4 cups sharp cheddar cheese, grated
  • ½ tsp. baking soda

In a large Dutch oven or wide-bottom soup pot, cook bacon over medium heat until crispy. Transfer bacon to a paper towel-lined plate, let cool. Dice and set aside for garnish.

Add butter to pot with bacon grease and melt over medium-high heat. Add onion, carrots, and celery and sauté until soft and beginning to brown, about 5-10 minutes. Add garlic and cook until fragrant, about 1 minute.

Add flour and cornstarch to pot and stir until both have dissolved. Continue to cook for about 2 minutes, stirring occasionally, until the flour/butter mixture begins to brown and bubble (this is called a roux). Add beer and stir to combine. Continue cooking until half of the liquid has reduced, about 3-4 minutes.

Add stock, milk, Worcestershire, hot sauce, chili powder, and salt & pepper. Stir to combine and reduce heat to medium-low. Bring soup to a simmer and allow to cook for 15-20 minutes or until starting to thicken. (Time-Saving Tip: While the soup is simmering, prepare the salad and make the dressing.)

With an immersion hand blender, purée soup directly in pot until smooth. Or alternatively, working in 2-3 batches, purée soup in a blender or food processor until smooth. Return to pot.

Add cheese and baking soda to soup and whisk until cheese has melted. The baking soda may cause the soup to foam for a few minutes, but it will return to normal once the cheese has melted. (Time-Saving Tip: If you have a smarty-pants husband like I do, don’t make the mistake of asking what causes baking soda to foam, otherwise you’re in for a 20-minute super boring explanation behind the science of sodium hydrogen carbonate, otherwise known as NaHCO3.) Season with more salt and pepper if necessary.

Ladle soup into preheated bowls and top with a salty mound of diced bacon. (This last part is optional, but really, why would you omit the bacon?! Unless, of course, you’re a vegetarian, in which case you can skip ahead to the Vegetarian Modifications just below the delicious photo of bacon… right here )

IMG_0124

VEGETARIAN MODIFICATIONS 

Omit the bacon and replace with:

  1. 1 Tbsp. olive oil when sautéing the vegetables
  2. ½ tsp. smoked paprika with the stock, milk, Worcestershire, etc.

Sidekicks:

IMG_0112

  • This is kind of a no-brainer, but pair with a thick and creamy Guinness — or if you can find it, an equally creamy but not-so-dark Caffrey’s Irish Ale.
  • Nothing compliments cheese better than bread and apples. Serve this rich soup with dark Irish soda bread and a mixed green salad topped with crispy apple slices and creamy herb dressing.

Dark Irish Soda Bread 

IMG_0097

Irish soda bread is a dense bread that’s slightly sweet — making it perfect to sop up the remaining drops of Cheddar Ale Soup clinging to the sides of your bowl. (Recipe form cookbook author Elinor Klivans.) 

Dark Irish Soda Bread

Makes 1 loaf

  • 2 Tbsp. melted butter, plus 1 Tbsp. softened butter for greasing the baking sheet
  • 1½ whole-wheat flour, plus more for the baking sheet
  • ¾ cup all-purpose white flour
  • 1 Tbsp. dark or light brown sugar
  • 2 tsp. caraway seeds
  • 1 tsp. baking soda
  • ½ tsp. salt
  • 1 Tbsp. molasses
  • 1 cup low-fat buttermilk

Position a rack in the middle of the oven; preheat to 375°F. Lightly grease a rimmed baking sheet with softened butter, then sprinkle lightly with whole-wheat flour; tap to discard any excess flour.

Combine both flours, brown sugar, caraway seeds, baking soda, and salt in the large bowl of a stand mixer or hand-held electric mixer. Mix to combine on low speed; add the melted butter.

Combine the molasses and the buttermilk; then add to the mixer bowl, on low speed; beat for a minute or two, until a soft dough forms. Gather the dough into a ball and roll it around in the palms of your hands to smooth it; the dough will not be perfectly smooth. Form into a 6-inch circle OR an 8-inch long oval and place on the prepared baking sheet. Use a smooth-edge knife to cut an X in top of dough, 1 inch deep (for round loaf), OR a 5-inch long, 1-inch deep slash along the length of the oval loaf.

Bake for 30-35 minutes, until the bread feels firm and crisp and you can see that the bottom has browned when you lift it carefully. Transfer to a wire rack to cool.

Serve with a big hunk of softened butter and a sprinkle of flaky sea salt. Yum!

IMG_0105

Mixed Green Salad with Apples and Creamy Herb Dressing 

IMG_0115

This simple, flavorful salad of mixed greens and crisp apples is a perfect palate cleanser between spoonfuls of rich, cheesy soup.

Mixed Green Salad with Apples and Creamy Herb Dressing

Serves 4

For Salad:

  • 4-6 cups mixed salad greens
  • ½ apple (preferably Pink Lady, Fuji, or Honeycrisp), cored and sliced paper-thin with a mandolin

For dressing:

  • ½ cup Half & Half
  • 2 Tbsp. vinegar (preferably sherry or red wine vinegar)
  • 1 Tbsp. olive oil
  • 1 green onion, white and light green parts only, finely chopped
  • 1 Tbsp. fresh Tarragon, finely chopped
  • 1 tsp. Agave syrup or honey
  • Kosher salt and fresh ground black pepper to taste

Divide salad greens evenly among 4 plates and top with apple slices.

Whisk all dressing ingredients together until combined. Pour over salads.

IMG_0101

Book Club: February 2014

Book Club – February 2014

COOKBOOKS:

Barefoot in Paris and How Easy is That? by Ina Garten                                            www.barefootcontessa.com

IMG_0348

You can’t go wrong with anything in the Barefoot Contessa collection; delicious recipes, beautiful photos, and informative chapter introductions, Ina Garten has nailed the formula for an exceptional, easy to use cookbook. I have everything she’s written, but these two are my favorites.

Recipes to try:
Gougères (Cheese Puffs) – Barefoot in Paris
Herbed-Baked Eggs – Barefoot in Paris
Chicken with Forty Cloves of Garlic – Barefoot in Paris
Vegetable Tian – Barefoot in Paris
Foie Gras with Roasted Apples – How Easy is That?
Baked Fontina – Barefoot in Paris

FOODIE BOOKS:

Not cookbooks, per say, but other books (memoirs, novels, short essays) centered around the joys of cooking and eating.

School of Essential Ingredients by Erica Bauermeister

IMG_0354

This lighthearted piece of non-fiction is a fun vacation read that allows you to turn off your brain for a few hours and disappear into a world of food and romance. Although not a literary masterpiece, it has moments of humor and heart-break, and a chapter that gave me the courage to finally kill my first crustacean! (See my Lobster Bisque post.)