
 On steamy days like these, I absolutely hate slaving over a hot stove — an outdoor grill is fine, but my kitchen stove? No thank you. Lately I’ve been cooking much of our dinners in the mornings when the temperature is still cool, then refrigerating everything and assembling the meal right before we eat. This “cook & cool” method (I just made up that term, do you like it?) works really well for pastas, rice, and other hearty grains because they store well, and taste great chilled. For this Cold Asian Noodle Salad, the pasta only takes a few minutes to simmer, so it’s easy to do right before you leave for work. Just drain the noodles, then cover and refrigerate (and if you’re feeling extra ambitious, chop the veggies and store separately in the fridge). Then when you get home, all you have to do is whip up the dressing, then toss everything together. Voilà! Done! And this easy summer salad can be served alongside grilled chicken, or dished up as a vegetarian entrée. Either way, you’ll thank me tonight when you’re enjoying a cool meal on the patio rather than sweating in the kitchen. Continue reading
Category Archives: Vegetarian
No-Bake Lemon Cheesecake with Cherry Compote
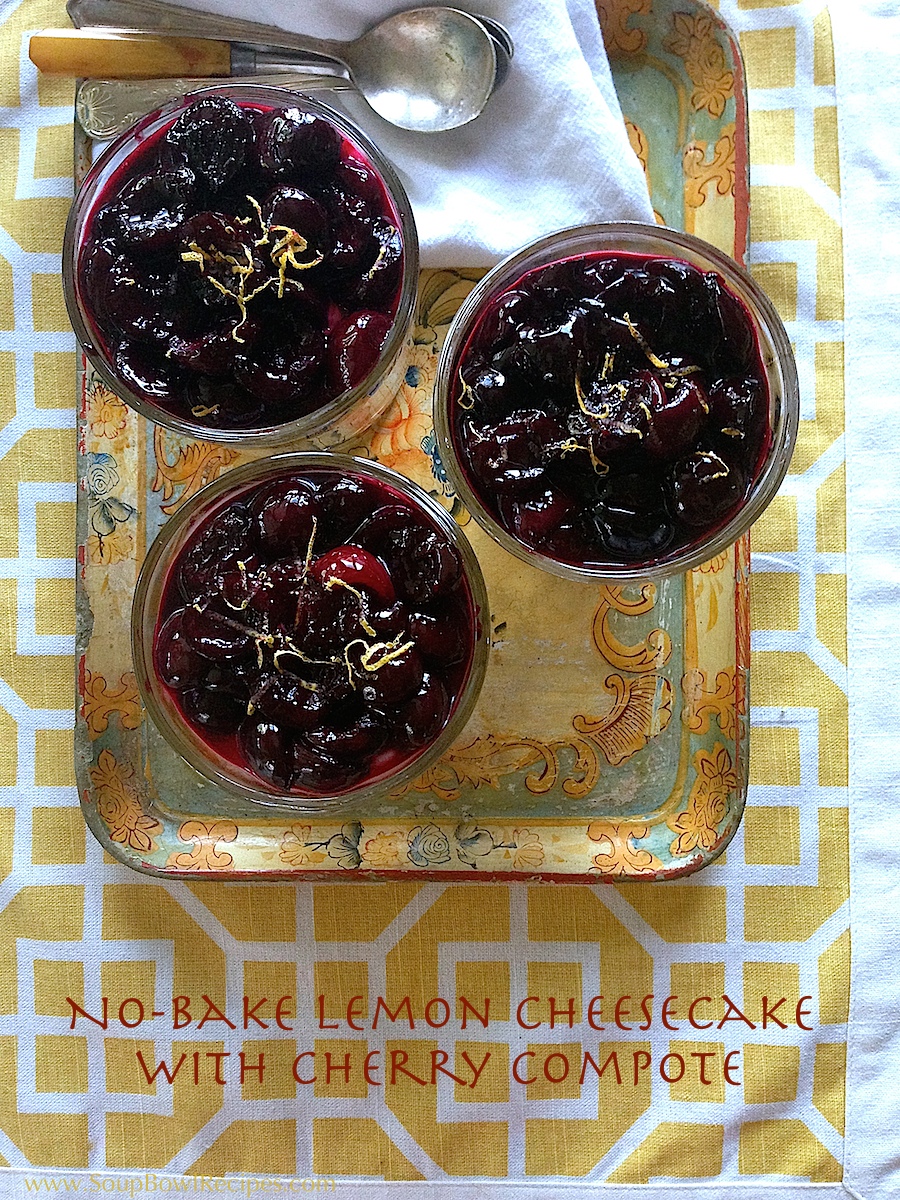
In keeping with last week’s Backyard BBQ theme, I’ve come up with a winning dessert that takes minimal effort to assemble, can be made and refrigerated a day ahead, and doesn’t require you to fire up your oven on these very hot summer days. Oh, and did I mention that it’s seriously good? It is. Make a bunch of individual ones for easy serving, or one big one that you can bring out all fancy-like and impress your friends with your mad baking skills. I won’t tell them it only took 20 minutes to whip up if you don’t. Continue reading
Easy Summer Salads

Alright, friends, have we all agreed to stop buying frozen, grocery store hamburgers and unanimously decided instead to try making our own patties this summer? Have the last couple days of me preaching from my soapbox convinced you that there are better ways to barb-e-que? Yes? Good. Now we can move on to fantastic salads to accompany those delicious burgers! Below are two, super easy salads that pretty much go with any main dish. Continue reading
Spectacular Sides for the 4th of July!
 Tomorrow’s the 4th of July and if you’re anything like me, you’ve waited until the very last minute to make plans. Again. But that doesn’t mean you should let a little procrastination stop you from enjoying a fantastic meal. Which is why I decided to throw together these super easy, incredibly tasty (and, I might add, spectacular looking!) side dishes to jazz up your celebration. As my husband says, If you wait until the last minute, it only takes a minute! So why not whip up these dishes tomorrow before the party gets started — I guarantee you’ll get as many ooh’s and ahh’s as the fireworks do. Continue reading
Stuff My Kid Eats: Beet Risotto
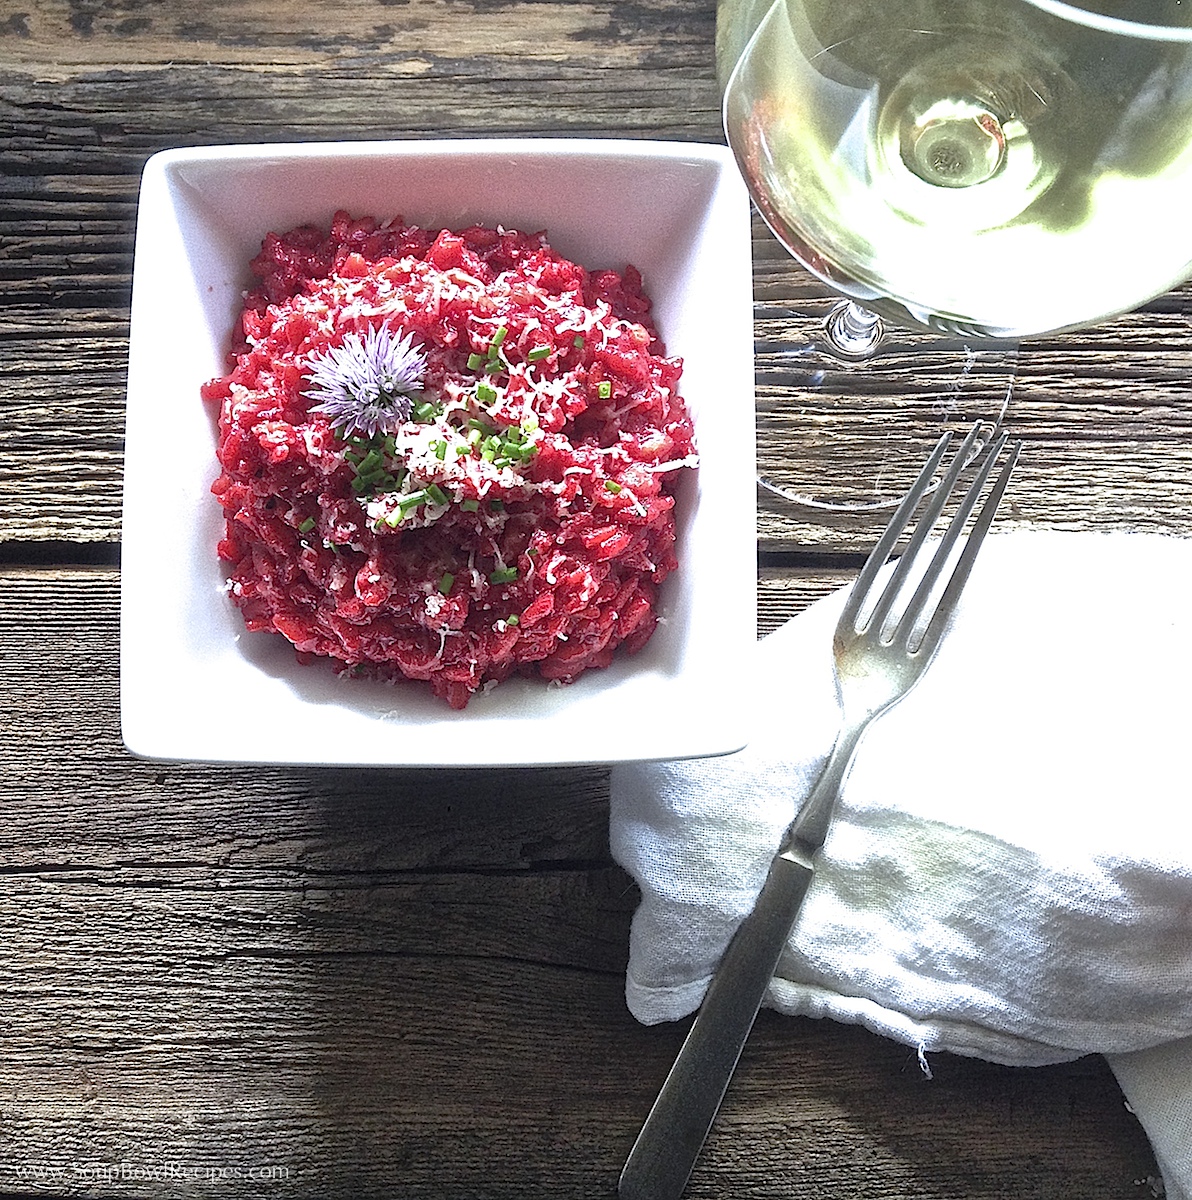
Beets are one of those things that people either love or hate, kind of like boy bands or the Twilight series. I, for one, am definitely in the “Team Beet” camp, and so is my toddler. I don’t know what it is about them, but they just scream summer to me. Maybe it’s because their smell reminds me of cut grass, or their bright color is worthy of a beach ball, but as soon as the weather starts getting warm, I crave them in my salads and pastas. I served this beet risotto to my family last week and when my toddler saw the colorful rice she said, “Oh Mommy, I’m going to eat all of my dinner tonight!” — and she did.
Beet Risotto
Serves 4
- 1 cup uncooked Arborio rice
- 3 Tbsp. olive oil, divided
- 2 Tbsp. unsalted butter
- 1 shallot, minced
- 2 cloves garlic, minced
- 4 cups fish stock, or chicken or vegetable stock (see recipe in Homemade Stocks)
- 1 roasted beet, coarsely chopped (*see How To)
- Kosher salt
- Fresh cracked black pepper
- 4-5 chives sprigs, chopped
- Fresh grated parmesan cheese for serving
In a food processor or blender add beet and 1 Tbsp. oil and blend until smooth, set aside.
In a saucepan, bring stock and wine to a low simmer. Meanwhile, over medium-low heat, melt butter and oil in a large straight-sided skillet until bubbly. Add shallots and cook until tender, about 3-4 minutes. Add risotto and garlic and cook for 1 minute, stirring occasionally.
Using a large soup ladle, pour 1 ladle-full (about ½ cup) of stock into risotto and stir until liquid is absorbed. Gradually stir in remaining broth 1 ladle-full at a time, cooking and stirring until liquid is absorbed before adding the next ladle. Continue this process until all but 1 ladle-full of stock has been used, approximately 25-30 minutes. Add the last ladle of stock with puréed beet, stir, then reduce heat to low and cook for 5 minutes, covered. Uncover and stir until all remaining liquid has evaporated, about 2-3 minutes. Season with salt and pepper, and garnish with a sprinkle of chives and grated parmesan.

*How to Roast a Beet:
Preheat oven to 350°F. Scrub beets clean, then wrap in tin foil. Place in oven and roast for 1 hour, or until easily pierced with a fork. Let cool, then peel with a vegetable peeler. Cut into ¼-inch cubes. Set aside. (I always roast about 3-4 beets at a time, then freeze the extra in a resealable plastic bag to use later, like in my Creamy Roasted Beet Soup.)
Tip: Beets can stain hands, clothing, cutting boards, and light-colored sinks and countertops. To avoid turning everything in your kitchen red, wear cooking gloves while handling beets, and peel over an open plastic bag set in the sink.

Sidekick: Serve with a chilled glass of Riesling, Chablis, Rosé, or Pinot Blanc.
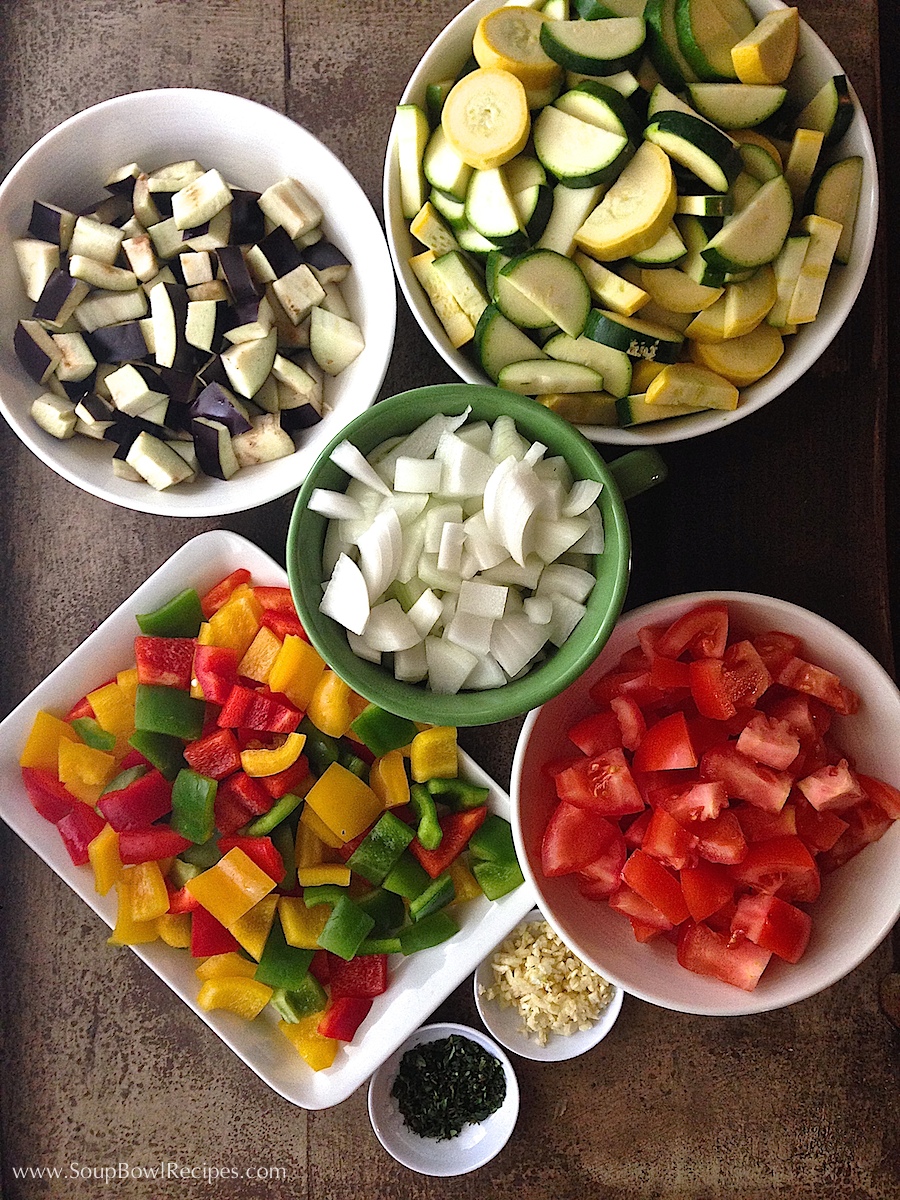
Farmers’ Market Ratatouille

Hi, my name’s Emily and I am a farmers’ market junkie. No really, I have a serious problem. When May arrives and my local farmers’ market reopens for the summer, I visit every week. Sometimes twice. It takes me hours to peruse every stand and talk to every farmer. I usually spend way too much money buying way too much produce - more than my family could possibly eat in one week. When I get home I artfully arrange my trophies in cute little baskets on my countertop, and because I’m a total geek, I take pictures of my displays and text them to my husband with cheesy notes that say: “Look what’s cookin’ tonight!” or “Got Produce?” His replies go something like, “Um, that’s a lot of peppers, honey.” By the end of the week I’ve only used about half of what I bought, and I’m left with extremely ripe, eat-me-right-now veggies that are in threat of going to waste. Which is how I found my other addiction: ratatouille. This super healthy, one-pan meal uses up all my leftover odds-and-ends-produce, freeing up my counter for another visit to the market.
Farmers’ Market Ratatouille

This vitamin-rich dish can serve as a vegetarian entrée (say on Meatless Monday), an accompaniment to grilled meat, or an easy sauce when thrown into a pot of cooked pasta. Sometimes I even spoon it over a slice of toasted baguette for a quick lunch.
Farmers’ Market Ratatouille
Serves 4 as an entrée or 6-8 as a side dish
- 2 Tbsp. olive oil
- 1 yellow onion, diced
- 1 red bell pepper, diced
- 1 green bell pepper, diced
- 1 yellow bell pepper, diced
- 2 zucchini squash, diced
- 2 yellow summer squash, diced
- 1 small eggplant, skin on, diced
- 4 tomatoes, seeded
- 3 cloves garlic, minced
- 4 sprigs fresh thyme, minced (or another fresh herb such as oregano, basil, or parsley)
- Kosher salt
- Fresh crack black pepper
In a large straight-sided skillet set over medium-high, heat oil until shimmering. Add onions and peppers and cook, stirring occasionally, until they begin to soften. Add the garlic and cook until just fragrant, about 1 minute.
Add remaining ingredients to the pot, stirring and cooking for about 5 minutes. Turn the heat to low, cover pot, and cook, stirring occasionally, until everything has softened, about 30-40 minutes. Season with salt and pepper and serve with crusty bread to sop up all those lovely juices.
Local Farmers’ Markets
These days almost ever town in America has a weekly farmers’ market (typically open May through October). My local market runs twice a week during the summer, which is a great way to feed my addiction, but come December I start itching for a fix again. Thankfully, I’ve always lived within a stone’s throw of a major city that has a year-round farmers’ market. Usually housed in an permanent structure, these markets are just like the townie ones only on steroids. In addition to selling produce, farm-fresh eggs, and meats, many of these larger markets will offer an array of other attractions such as local cuisine, homemade soaps and lotions, art, flee market items, and rides & games for the kids. I’ve visited quite a few over the years, but my favorites are Pike Place Market in Seattle, Union Square Greenmarket in NYC, and City Market in Kansas City, MO, which I’ve visited a few times this season already…


*To find a farmers’ market in your area, click here.
Baked Coconut French Toast for Mother’s Day
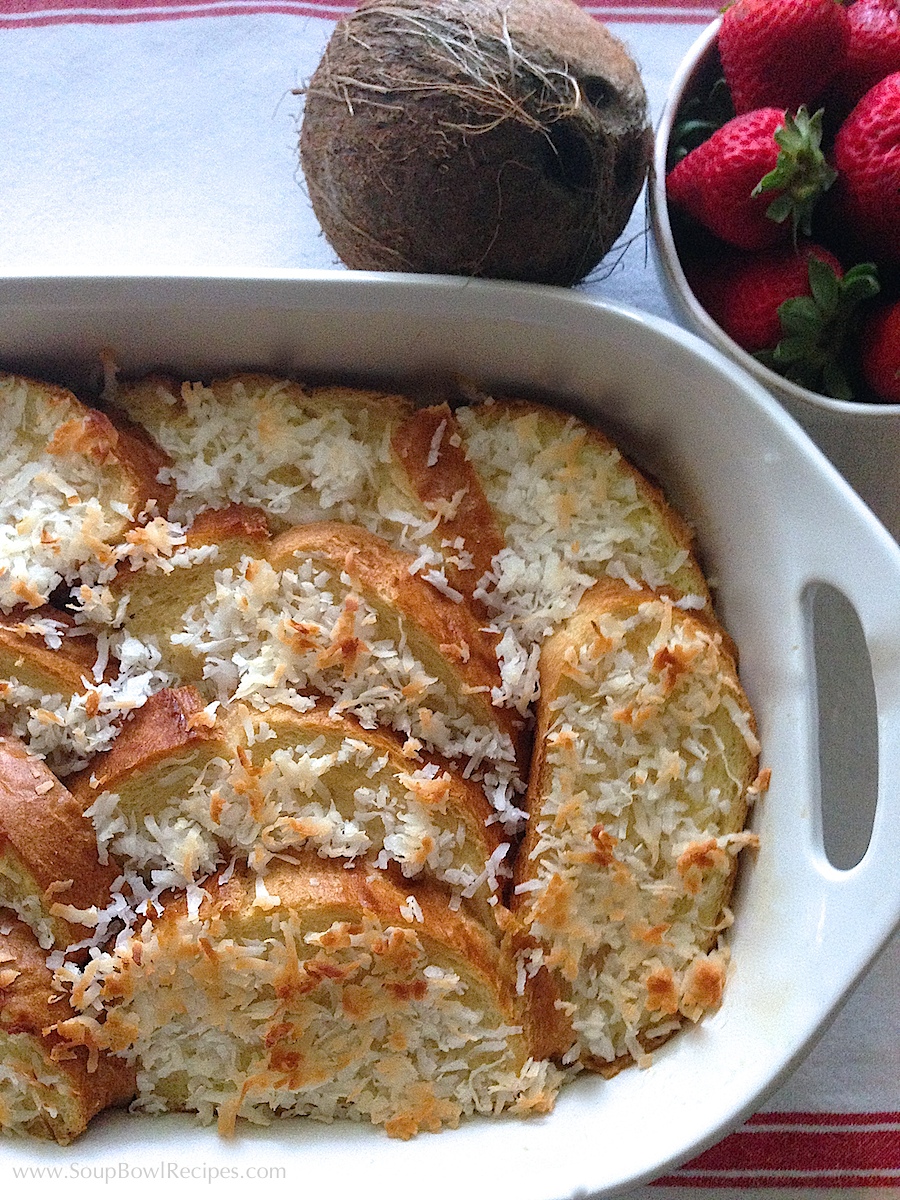
My husband is great at a lot of things, but surprising me for Mother’s Day isn’t one of them. I get flowers, of course, and a card, but after a few years experience I’ve given up the hope that he’ll make me Poached Salmon Eggs Benedict, or have the foresight to call ahead for 11am brunch reservations at my favorite restaurant (sorry, honey). That’s why this year I decided to take matters into my own hands and come up with a French toast recipe that I can make the night before then pop in the oven the next morning. So this Mother’s Day when my husband wakes up at the annoying hour of 6am (which he does every morning), I will roll over and lovingly whisper in his ear, “350° for 20 minutes,” and know that when I get out of bed, my perfectly crafted French toast will be hot and ready.
Baked Coconut French Toast
Serves 6
- 12 thick slices of French bread
- 1 can coconut milk
- 3 eggs
- ¼ cup sugar
- 2 cups shredded, sweetened coconut
Butter the bottom and sides of a 13×9-inch baking dish. Line bottom of dish with bread, overlapping pieces slightly so that bread fits to the edges of the dish.
In a medium bowl, whisk together coconut milk, eggs, and sugar. Pour egg mixture over bread and use a spoon to help distribute the liquid pressing down on the bread so that it fully absorbs liquid. Allow to set for 15 minutes or up to 12 hours, covered in the refrigerator. (If refrigerating overnight, bring dish out and set on the counter for an hour before baking to allow to come to room temperature.) Sprinkle the shredded coconut over the bread and press down slightly with your hand so that it sticks to the top.
Bake at 350°F for 20-25 minutes or until egg mixture has set and coconut is golden brown (the bottom of the dish will be custardy). Allow to rest for 5 minutes before cutting and serving.

More Ice Cream Muffins

This weekend I changed up the ice cream muffins that I posted last week by trying a new flavor – and they were even better than the first. Check it out!
Ice Cream Muffins
Makes 12-14
- 2 pints ice cream, softened* (I used Häagen-Dazs Pineapple Coconut for these muffins, but any flavor will do)
- 3 cups self rising flour (not to be confused with all-purpose flour which won’t work in this recipe at all!)
Preheat oven to 375°F. Lightly mist muffin tins with cooking spray, then wipe away residue with a clean paper towel, or, alternatively, line tins with paper muffin cups.
In a medium bowl, beat ice cream and flour until combined. Using a spoon, drop muffin batter into cups, dividing evenly. Top each muffin with with a sprinkle of sweetened shredded coconut and a banana chip, or just Sugar In The Raw.

Chocolate Covered Pretzel Cookies

The other day when I was jogging (which almost never happens), I was trying to decide how I would reward myself for my sudden burst of exercise — you see, that’s how I work, I run so that I can eat. Maybe I’ll stop for a doughnut, I thought, as I passed our local doughnut shop, Or I could get a bag of chips, I contemplated as I turned the corner by the mini-mart. Hmm, what do I crave, savory or sweet? And then around mile 2 I realized that I didn’t have any money on me, so I started rummaging through my mental inventory of snacks in my pantry. What could I do with the pittance I have in my cupboard? Let’s see, I have chocolate chips, pretzels, stuff to make cookies…wait, hang on a sec! At that moment I turned around and sprinted home to make my new favorite cookies, and they were exactly what I needed to satisfy every craving I’ve had since birth. Seriously, that’s how good they are. But I’ll warn you, don’t (DO NOT!) make these cookies unless you have a fresh gallon of milk in the fridge, because you will need it! These rich and salty beauties deserve a big, cold, creamy glass of milk to properly wash them down.
Chocolate Covered Pretzel Cookies
Makes 2-3 dozen
- 1¼ cups unsalted butter, softened
- ¾ cup white sugar
- ¾ brown sugar
- 2 eggs
- 1 tsp. vanilla
- 2 cups all-purpose flour
- ¾ cup coco powder
- 1 tsp. baking soda
- ¼ tsp. Kosher salt
- 2 cups semi-sweet chocolate chips
- 1½ cups crushed pretzel sticks (preferably Snyder’s of Hanover Old Fashioned Dipping Sticks), plus 1-2 dozen pretzel sticks snapped into thirds for topping

Preheat oven to 375°F.
In a large bowl, cream butter and sugars until light and fluffy, about 2 minutes. Add eggs and vanilla and beat until combined.
In a separate bowl, sift together flour, coco powder, baking soda, and salt. Working in two batches, add the flour mixture to egg mixture, mixing until just combined after each incorporation.
Fold in chocolate chips and pretzels. Using a spoon, scoop out 2 Tbsp. of cookie batter and roll into thick balls, place on a cookie sheet. Take a piece of pretzel and press into the top of each cookie, slightly flattening out the ball, like this…

See, this way you’re guaranteed a crunchy, salty pretzel in every chocolatey bite — and it just looks cool.
Bake for 9-11 minutes, until just cooked through (I recommend cooking for 9 minutes, then letting sit on the hot cookie sheet for another 1-2 minutes before transferring to a cooling rack). Serve with milk. Lots and lots of milk.

Deviled Easter Eggs

Since the time I was young, I have always had a hard time letting go of holidays. The anticipation leading up to Christmas, or Easter, or my birthday was so great, that once the date had come and gone, I would go into what my family called a “post-party depression.” I was the kid that would stand in the front yard weeping as my dad hauled our dried-up Christmas tree out to the curb, and the one who would leave Valentine’s Day cards taped to my wall well into summer, and the one that wouldn’t eat my carefully dyed Easter eggs, instead hiding them in my room until they began to smell. Now that I’m older (and only slightly wiser), I’ve gotten better at boxing up our holidays and storing them away until the next year, but I can see that my daughter has inherited my sentimentality. Our Christmas tree (which we never got around to disposing of – oops) is stashed in a corner of our backyard behind the tool shed. Every so often when she’s playing outside, my toddler will wander over to “visit” the tree and offer some encouraging words about its possible return to the living room where it once stood proud. So as Easter approaches, it dawned on me that I may have some difficulty getting her to relinquish the eggs she so happily dyed and decorated last week. Being 2½, she has absolutely no reason. There’s not a snowball’s chance that I’ll be able to explain the concept of “rotting eggs” in a way that she will either a) understand, or b) give a crap about. Again, she’s 2½. So that’s when I put my thinking cap on. How could I preserve her eggs a little longer without sacrificing a dozen perfectly good hardboiled-beauties and still keep my sanity? The answer was so obvious it almost smacked me in the face; deviled eggs! But not just any deviled eggs, dyed deviled eggs. And so yesterday morning when my toddler woke up, she found that not only did the Easter Bunny leave her a fun basket of gifts, he magically transformed her Easter eggs into a colorful lunchtime treat! (I’m hoping this trick works for a couple more years, but probably not!) Anyway, here’s how I did it…
Deviled Easter Eggs
Makes 12
- 6 eggs
- ¼ cup mayonnaise
- 1 teaspoon white vinegar
- 1 teaspoon yellow mustard
- 1/8 teaspoon salt
- food coloring (red, blue, green)
In a medium saucepan set over high heat, place eggs in a single layer and cover with 2 inches of water. Once water begins to boil, set a timer for 10 minutes. After 10 minutes, remove saucepan from heat and place in the sink. Run cold water over the eggs for 1-2 minutes.
Crack egg shells and carefully peel under cool running water. Gently dry with paper towels. Slice the eggs in half lengthwise, removing yolks and placing in a medium bowl. Place the whites on a serving platter. Mash the yolks into a fine crumble using a fork. Add mayonnaise, vinegar, mustard, salt, and mix well. If the mixture is lumpy, use a hand blender to beat the chunks out.
Divide mixture into 5 separate bowls. To the first bowl add 1 drop of red food coloring and mix well, this will be your pink filling. To the second bowl add 2 drops of blue food coloring, and to the third bowl add 1 drop of green food coloring (these will be your blue and green fillings, obviously). The fourth bowl is a little trickier because purple is a hard color to make when you’re starting with a yellow base. I recommend using 1 drop of blue and 1 drop of red, mixing, then adding more of whichever color you need to make it look purple (which will inevitably look grayish, but oh well). Don’t do anything to the fifth bowl because that will be your yellow filling.
Evenly divide the five fillings into egg whites, alternating colors. An easy way to do this is to fill a small sandwich bag with a couple spoonfuls of filling, then cut the tip off one corner of the bag and squeeze the filling into the whites – kind of like you would icing from a pastry bag.
Bonus: thess deviled eggs are so colorful that they don’t need a garnish! Serve eggs immediately, or refrigerate (covered) for up to 1 day.

