Staying Warm: Spicy Mexican Hot Chocolate

Staying Warm

IMG_0672

This week brought us 10 inches of snow, a mad hunt for our snow shovel, and a sub-zero trek to the park on a sledding expedition (which was only semi-successful with a toddler). Upon returning to the warmth of our home, and after shedding piles of wet clothing in the hall, I was bombarded with requests for hot chocolate. As I pulled the Swiss Miss box out of the cupboard, I was alarmed at how light it felt. Alarm quickly turned to panic as I realized the box was empty. The first snowstorm of the year and we were out of hot chocolate. Total rookie-mom mistake!  Frantically, I started digging and digging, and thankfully discovered that we had all the fixings for homemade hot chocolate — even better! So if this month has you shoveling snow and dreaming of a more tropical climate, than wrap your hands around a steaming mug of chocolate, tuck in with the ones you love, and smile as you weather the storm together.

Spicy Mexican Hot Chocolate

IMG_0668

The chiles in this recipe add just enough of a kick to get your blood circulating — and the orange? It just serves a little reminder that warmer days are soon to come.

Spicy Mexican Hot Chocolate

Serves 2

  • 3 cups milk
  • 4 oz. dark chocolate, coarsely chopped
  • 2 cinnamon sticks
  • 4 whole cloves
  • 2 dried chile peppers (such as Chiles de Arbol), cut in half
  • 1 3-4″ long strip of orange rind

IMG_0669

Divide chocolate among two mugs. Set aside.

In a saucepan over low heat, bring milk, cinnamon, cloves, peppers, and orange rind to a gentle simmer, continue simmering on low for 2-3 minutes, stirring. With a fine-mesh sieve, strain milk into a large measuring cup or bowl. Pour half of milk into each mug and whisk until chocolate has melted. Serve topped with marshmallows or whipped cream. (My toddler prefers mini marshmallows; “Ten for my hot chocolate and one my mouth,” as she says.)

IMG_0671

Stuff My Kid Eats – Pan-Seared Sausage with Lady Apples and Watercress

Stuff My Kid Eats

IMG_0593

Has there ever been a more beautiful union than that of sweet and savory? The unlikely marriage of salt and confection has inspired many food favorites: chocolate covered pretzels, peanut butter and jelly sandwiches, Rocky Road ice cream, corn dogs, fruit and cheese, pineapple pizza (my toddler’s pick) — the list goes on and on. So with Valentine’s Day hot on everybodys’ minds, why not put away your ideas of “what works” and go with your gut! After all, it worked with my toddler and her cat.*

Pan-Seared Sausage with Lady Apples and Watercress 

IMG_0505

Aside from pineapple pizza, this is my toddler’s favorite meal. The ultimate sweet and savory matrimony: Italian sausage, caramelized apples, and watercress — this dish has all the makings for a family favorite! (Recipe slightly adapted from Bon Appétit)

Serves 4

1 Tbsp. olive oil
1 lb. lady apples, halved through stem ends (if unavailable, use pink lady or fuji apples)
1 ½ lb. sweet Italian sausage
½ cup dry white wine
4 Tbsp. white wine vinegar
1 bunch watercress, trimmed (about 6 cups)
Kosher salt
Fresh ground black pepper

Heat oil in a large cast-iron or other heavy skillet over medium-high heat. Add apples, cut side down, and cook, turning occasionally until golden brown, 5-8 minutes.

Prick sausages with a fork, add to skillet with apples, and cook, turning occasionally, until browned. 10-12 minutes. Add wine and vinegar to skillet. Bring to a boil, reduce heat, and simmer until thickened (liquid should coat a spoon), about 4 minutes. Add watercress and toss to coat, season with salt and pepper.

Serve with pan juices spooned over.

Sidekicks:

  • A fruity Zinfandel and an off-dry German Riesling pair well with the sweet apples.
  • Crispy oven potatoes are an excellent starch to help soak up the delicious pan juices you don’t want to go to waste (recipe below).

Crispy Oven Potatoes

IMG_0510

I make these potatoes a few times a month and always change up the seasonings to match the flavor of the meal. For this dish, I like smoked paprika and dried oregano, which off-set the sweetness of the Italian sausage and lady apples, but you can use thyme and fennel, rosemary and parsley — or whatever else suits your fancy. 

Serves 4

  • 8-10 Yukon Gold potatoes, quartered
  • 2 Tbsp. olive oil
  • 1 tsp. herbs d’provence
  • ½ tsp. smoked paprika
  • Kosher salt and fresh cracked black pepper to taste

Preheat oven to 375°F. Lightly mist a baking sheet with cooking spray. In a bowl, mix all ingredients until combined. Spread seasoned potatoes evenly on sheet and bake for 20-25 minutes, tossing half way through.

* Photo: True Love: The Toddler and The Cat

IMG_3903

Creamy Roasted Beet Soup

Plan Ahead for Valentine’s Day

IMG_2523

Ah, Valentine’s Day; a day of love and romance, of cupids and hearts, of chocolates and roses. It’s also a day of frantically searching your closet for something red to wear, of purchasing last minute cards and gifts, and stressing about restaurant reservations that are almost impossible to snag unless you’ve planned 6 months in advance. So why not forget about all that craziness and enjoy a romantic evening at home with the one you love. Set the table, light some candles, and serve up a delicious, heart-warming meal.

Creamy Roasted Beet Soup

IMG_0604

You don’t have to like beets to appreciate this soup. No really. My husband isn’t a fan of beets, and he loved it! So did my toddler, in fact, her comments were, “It’s pink! And pretty! And sweet!” This colorful soup is bound to get your heart-beet going! (Sorry, I couldn’t resist the pun.) 

Creamy Roasted Beet Soup

  •  2 Tbsp. olive oil
  • 2 medium sized beets
  • 1 sweet yellow onion, diced
  • 4 medium carrots, peeled and diced
  • 2 celery stalks, diced
  • 3 cloves garlic, peeled and coarsely chopped
  • ½ inch fresh ginger root, peeled coarsely chopped
  • 6 cups chicken or vegetable stock (see recipe in Homemade Stocks)
  • 1 tsp. allspice
  • 1 bay leaf
  • 2 tsp. apple cider vinegar (red or white wine vinegar would work, too)
  • 1 cup heavy cream
  • 4-6 Tbsp, sour cream for serving (optional)
  • Kosher salt and fresh ground black pepper to taste

Serves 4-6

Preheat oven to 350°F. Scrub beets clean, then wrap in tin foil. Place in oven and roast for 1 hour, or until easily pierced with a fork. Let cool, then peel with a vegetable peeler. Cut into ¼-inch cubes. Set aside. (See Tips*)

In a large soup pot, heat oil over medium-high heat. Sauté onions, carrots, and celery until soft and beginning to brown, about 10 minutes. Add garlic and ginger root and cook for an additional 4-5 minutes.

Add stock, beets, allspice, and bay leaf. Bring to a boil, then immediately reduce to a simmer. Partially cover and continue simmering for 30 minutes. Vegetables should be very soft. Add vinegar and salt & pepper and cook for another few minutes. Remove bay leaf.

Purée soup with an immersion hand-blender right in the pot; or in two batches, purée soup in a food processor or blender until smooth. Return soup to pot.

Add heavy cream and heat, stirring until soup is creamy. Ladle into pre-warmed bowls, and top with a dollop of sour cream. Serve hot. (See How To* for instructions on making sour cream hearts.)

*Tips: Beets can stain hands, clothing, cutting boards, and light-colored sinks and countertops. To avoid turning everything in your kitchen red, wear kitchen gloves while handling beets, and peel over an open plastic bag set in the sink.

*How To: To make sour cream hearts, whisk sour cream in a small bowl until runny (you may need to thin with a drop or two of water). Gently place a drop of sour cream on the surface of the soup, either in the middle or in a series of small drops along the edge. Starting about a ¼-inch above the drop, slowly drag a bamboo skewer or toothpick through the center of the drop, swooping away, creating a tail.

IMG_3654

Sidekicks:

  • Serve this elegant and slightly sweet soup with a glass of sparkling Rosé; my favorite is Veuve Clicquot Rosé (pictured below).
  • A spinach salad with strawberries, almonds, and pomegranate vinaigrette not only looks stunning next to this soup, but the bitter greens and tangy dressing also offset the sweetness of the beets (recipe follows).

IMG_1834 Vueve Clicquot Rosé

Spinach Salad with Strawberries, Almonds, and Pomegranate Vinaigrette

IMG_3599

To make strawberry hearts, use a sharp knife or strawberry huller to carefully remove stem and hull from strawberry. Cut strawberry lengthwise in ¼-inch slices, then use knife to round tops, creating a heart.

Spinach Salad with Strawberries, Almonds, and Pomegranate Vinaigrette

Salad:

  • 8 cups spinach
  • 2 cups hulled and sliced strawberries, about 6-8 strawberries
  • ½ cup slivered almonds

Vinaigrette:

  • 2 Tbsp. olive oil
  • 1 Tbsp. vegetable oil
  • 1 Tbsp. white balsamic vinegar or rice wine vinegar
  • 1 tsp. agave syrup or honey
  • ¼ cup pomegranate juice (preferably Pom Wonderful)
  • ¼ tsp. ground coriander
  • Kosher salt and fresh ground black pepper to taste

Serves 4

Wash spinach and pat dry, and place in a large salad bowl.

In a separate bowl, whisk together vinaigrette ingredients until emulsified.

Dress spinach with vinaigrette and divide evenly onto serving plates. Place strawberries on each salad, then top with slivered almonds (dividing evenly).

Sunday Morning Waffles

Sunday Morning Waffles

IMG_0635

Sunday morning waffles are a family tradition in our home, dating back to when my husband was kid. His father used to get up early and make them for his family, and now my husband makes them for ours. You have to understand, though, that by no stretch of the imagination is my husband a good cook. He has a couple crockpot recipes that he’s comfortable with, and he’s mastered the grill, but other than that, he stays out of the kitchen. Except on Sundays. Waffle Sundays — which he takes very seriously, mind you. When our daughter was born, he decided that this was going to be his “thing,” so he researched waffle recipes, tried them out, critiqued them, took notes, made changes, altered the cooking time, decreased the temperature of the waffle iron, and finally (FINALLY!) settled on a recipe that he could be proud of. My toddler and I love his waffles, but we love him even more for making them every single weekend. Thanks, honey!

Sunday Morning Waffles

Makes approximately 8 waffles

  • 2 cups flour
  • 1 tsp. Kosher salt
  • 4 tsp. baking powder
  • 4 Tbsp. sugar
  • 2 eggs
  • 1½ cups milk, warmed in the microwave for 30-45 seconds
  • ⅓ cup butter, melted
  • 1 tsp. vanilla

Preheat oven to 200°F. Heat waffle iron. In a large bowl, whisk eggs, milk, melted butter, and vanilla, set aside. In a separate bowl, mix together flour, salt, baking powder and sugar. Slowly combine dry ingredients into wet ingredients and stir until smooth.

Pour approximately ½ cup* of batter onto the bottom of a heated waffle iron, close top and cook per manufacturer’s instructions. Place finished waffles directly on the rack of a preheated oven to keep warm. Serve with butter, fresh fruit, and maple syrup.

*Note: Waffle iron sizes vary, so be sure to check your instruction manual to determine how much batter is recommended for your waffle iron.

Game Day Winning Waffles. Go Hawks!

IMG_0634

To achieve this look, divide batter into two separate bowls. Add 4-5 drops of preferred food coloring to each bowl and mix thoroughly until you’ve reached the desired hue. We like to serve these colorful waffles on special occasions. For Valentine’s Day we’ll be making pink and purple ones! (For pink you only need 1-2 drops of red, and for purple you need equal parts red & blue food coloring).

*Note: The exterior color of the waffles will fade under the heat of cooking, but the inside of the waffles will stay vibrant!

Soup’er Bowl Splurges

Soup’er Bowl Splurges

Julia Child once said, “Fat gives things flavor,” and I wholeheartedly agree. But, unless you’re a triathlete, you can’t eat whatever you want whenever you want. Most people, myself included, need to sustain a healthy balance between fit and fun. With that being said, I’m not going to pretend that the following recipes are in the least bit healthy. Because they aren’t. I mean, not even a little bit. But they’re good. Really good. And that’s what “splurges” are for, right? Eating good food that’s bad for you. So forget about the healthy snacks on Sunday and indulge in one of these crowd-pleasing favorites. Come Monday you can always stuff yourself with salad and spend an extra hour on the treadmill.

Baked Hawaiian Roll Ham Sandwiches

IMG_3676

This is a great lunchtime treat that you can make a day ahead, put in the fridge, then pop into the oven right before halftime. — You can halve the recipe for a smaller group, but I guarantee you’ll want leftovers! (Recipe slightly adapted from King’s Hawaiian)

Baked Hawaiian Roll Ham Sandwich

Serves 12

2 – 12 pack King’s Hawaiian Bread Rolls
1 lb. paper thin shaved ham
8 oz. Swiss cheese slices (about 10 slices)

Glaze:
¾ cup butter, melted
2 tsp. Dijon mustard
1 ½ tsp. Worcestershire sauce
2 Tbsp. dried onions
2 tsp poppy seeds

Melt butter, then whisk together with all the other glaze ingredients, set aside.

Slice the entire pack of rolls in half, horizontally, keeping rolls in tact.

IMG_0624

Lightly mist 2 – 9×13 inch baking dishes with cooking spray. Lay bottom half of rolls in the first dish.

Evenly distribute half of ham over bread.

IMG_0621

Layer cheese on top of ham.

IMG_0622

Place tops of rolls over the ham and cheese, then drizzle half of the glaze evenly over sandwiches. Using a spoon, scoop glaze from bottom of dish back over the tops of the rolls until evenly covered, lightly pressing on the tops to help them absorb the glaze. Repeat with second package of rolls and remaining ham, cheese, and glaze.

IMG_0623

Cover and refrigerate overnight. (*Note, this is an important step as it allows the glaze to fully saturate the buns).

Before baking, let the sandwiches come to room temperature for 1 hour. Cover with tin foil and bake at 350°F for 15 minutes, then remove foil and bake for another 2-3 minutes until tops begin to brown.

Cut sandwiches along the seams and dish out with a spatula.

IMG_0614

Bacon & Cheese Ranch Pull-Apart Bread

IMG_0610

This fun appetizer is always a hit when I serve it — each bite-sized cube packs a mouthful of cheesy-bacony-Ranchy goodness.

Bacon & Cheese Ranch Pull-Apart Bread

1 large, round sourdough bread loaf
1 cup shredded cheddar cheese
2-3 oz. real bacon bits
1 package Ranch dressing mix
1 cup milk (whole or 2% works best)
1 cup mayonnaise

Preheat oven to 350°F.

In a bowl, whisk the contents of 1 Ranch dressing package together with milk and mayo. Place in refrigerator for 15 minutes to thicken.

Meanwhile, with a sharp bread knife, slice sourdough loaf lengthwise into 1-inch strips, cutting down to the bottom crust, but not all the way through. Turn the loaf and cut 1-inch strips in the other direction, creating cubes.

Carefully separate the bread cubes and sprinkle half of cheese and bacon into the seams, distributing evenly. Pour Ranch dressing over the loaf and into the seams (if you don’t use all of the dressing, reserve it for dipping later). Sprinkle remaining cheese and bacon evenly over the top of loaf.

Place on a baking sheet and bake for 15-18 minutes, or until cheese is melted and starting to bubble.

Serve on a large platter with extra Ranch dressing for dipping.

And, here’s a close-up…

IMG_0613

Stuff My Kid Eats – Soup’er Bowl Food

Stuff My Kid Eats – Soup’er Bowl Food

IMG_0418

(Photo: My toddler at 17 months trying her first squid.)

I hail from the great Pacific Northwest and cut my teeth on a variety of seafoods, ranging from the typical salmon and shrimp to the not-so-typical geoduck and octopus. When my toddler was old enough to start on solids, it was important to me that she appreciate seafood as much as I do, so I made sure to introduce her to fish right away. One of the first things I tried was coconut shrimp. I ordered it in a restaurant and gave her one to taste. She held it upright by the tail, eating it like some do a corn dog: slowly nibbling away at the crunchy coating, then devouring the inside in a matter of seconds. She reached for another, and another, until she had stuffed herself and finished nearly half of my meal. Now, when I make this recipe at home, she’ll cozy up to the counter, wag her finger at the platter of shrimp and whisper, “I will eat you, little shrimpies!” So…if you’re a family of seafood-lovers like us, these healthy baked coconut shrimp will be a hit! And if you’re not, it’s an excellent way to warm up your tastebuds to our delicious friends under the sea.

Baked Coconut Shrimp

IMG_0563

Regardless of where you plan on watching the Big Game, at home or with friends, football fans work up an appetite, so be prepared with some easy finger-food. Impress your fellow tailgaters with a basket of coconut shrimp and a trio of dipping sauces — I promise they won’t even realize it’s healthy! (Recipe slightly adapted from Clean Eating) #GoHawks!

Serves 4-6

Olive oil cooking spray
½ cup white whole-wheat flour (regular AP white flour will work, too)
2 large eggs
6 Tbsp. panko bread crumbs
½ cup shredded unsweetened coconut
¼ tsp. sea salt
⅛ tsp. fresh ground black pepper
24 uncooked shrimp, peeled and deveined, tails on
⅓ cup unsweetened apricot jam
2 Tbsp. fresh squeezed lime juice
1½ tsp. fish sauce
½ prepared teriyaki sauce for serving
½ prepared sweet honey mustard for serving
Ground cayenne pepper to taste

Preheat oven to 375°F. Line 2 large, rimmed baking sheets with foil and mist with cooking spray. Place 3 wide, shallow bowls on a work surface. To first bowl, add flour; to second bowl, add eggs and beat lightly; to third bowl, add panko, coconut, salt and pepper and stir to combine.

Pat shrimp dry with paper towels. Holding 1 shrimp by the tail, dip in flour, shaking off excess. Quickly dip in egg, then in coconut mixture, coating thoroughly. Place on baking sheet and repeat with remaining shrimp. Bake for 12-14 minutes, rotating pans halfway through and flipping shrimp, until they are firm to the touch, lightly brown on the outside with bright pink tails.

Meanwhile, in a small saucepan on low heat, combine jam, lime juice, fish sauce, and cayenne pepper and cook, stirring constantly, until sauce is fluid and warmed through (*note: do not bring to a simmer).

Serve shrimp with apricot-lime dipping sauce, teriyaki sauce, and honey mustard.

Sidekicks:

  • Serve with a glass of buttery Chardonnay (avoid oaked), an off-dry Riesling, or a nice cold Pilsner.
  • To upgrade these shrimp from an appetizer to full-fledged meal, serve alongside jasmine rice topped with stir-fried vegetables (recipes below).

Vegetable Stir Fry

IMG_0596

This recipe can be adapted to use any vegetables of your choice; just remember to add the longer-cooking veggies to the pan first, followed by the softer, quick-cooking vegetables.

2 Tbsp. sesame oil (or other high heat oil, such as safflower or canola)
1 head of broccoli, florets and stems cut into 2-inch pieces
1 red bell pepper, thinly sliced
2 carrots, julienned
1 cup or mushrooms, thinly sliced
2 green onions, sliced in half lengthwise, then cut into 1-inch pieces
1 1-inch piece of fresh ginger, peeled and sliced paper-thin
1 garlic clove, peeled and sliced paper thin
2-3 Tbsp. low-sodium soy sauce
1-2 Tbsp. rice wine vinegar
Kosher salt and fresh ground black pepper to taste

In a wok or large skillet with tall sides, heat oil over medium-high heat until shimmering. Carefully swirl oil around in pan to coat sides. Add ginger and garlic and cook until fragrant, about 1 minute. Transfer to a plate. Add broccoli and bell peppers and sear, undisturbed, for 2 minutes, then toss and continue to cook for an additional minute.

Push the broccoli and peppers up the sides of the wok or to the outer edge of the skillet, creating a open space in the center. Add carrots and mushroom to the center of the pan, and cook, undisturbed, for 1 minute. Toss and cook for an additional minute. Add green onions, reserved ginger and garlic, 2 Tbsp. soy sauce, and 1 Tbsp. vinegar to pan. Toss all vegetables together, cooking until softened, about 1-2 minutes. Taste and add more soy sauce and/or vinegar if needed. Season with salt and pepper and serve over cooked rice.

Jasmine Rice

Using coconut water in place of tap water gives the rice a slight sweetness and provides a nice base for the savory vegetable stir-fry.

1 cup uncooked jasmine rice
1 ¾ cup coconut water
pinch of Kosher salt

In a sauce pan, bring coconut water and salt to a boil. Add rice, and stir for 1 minute. Reduce heat to a simmer, cover, and cook for 18-20 minutes or until rice is soft. Remove from heat and fluff with a fork. Serve hot.

Soup’er Bowl Food – Cincinnati Style Chili

Soup’er Bowl Foods

With Super Bowl XLVIII quickly approaching, I wanted today’s soup to be something hearty enough to sustain you while you’re cheering for your favorite team. Even if you aren’t a football fan, as I am not, you may likely find yourself either attending or hosting a party this Sunday. With that in mind, I’m dedicating this week’s recipes to dishes that can be enjoyed by Seattle and Denver fans alike. Go Hawks! (My husband made me add that last part.)

IMG_3298

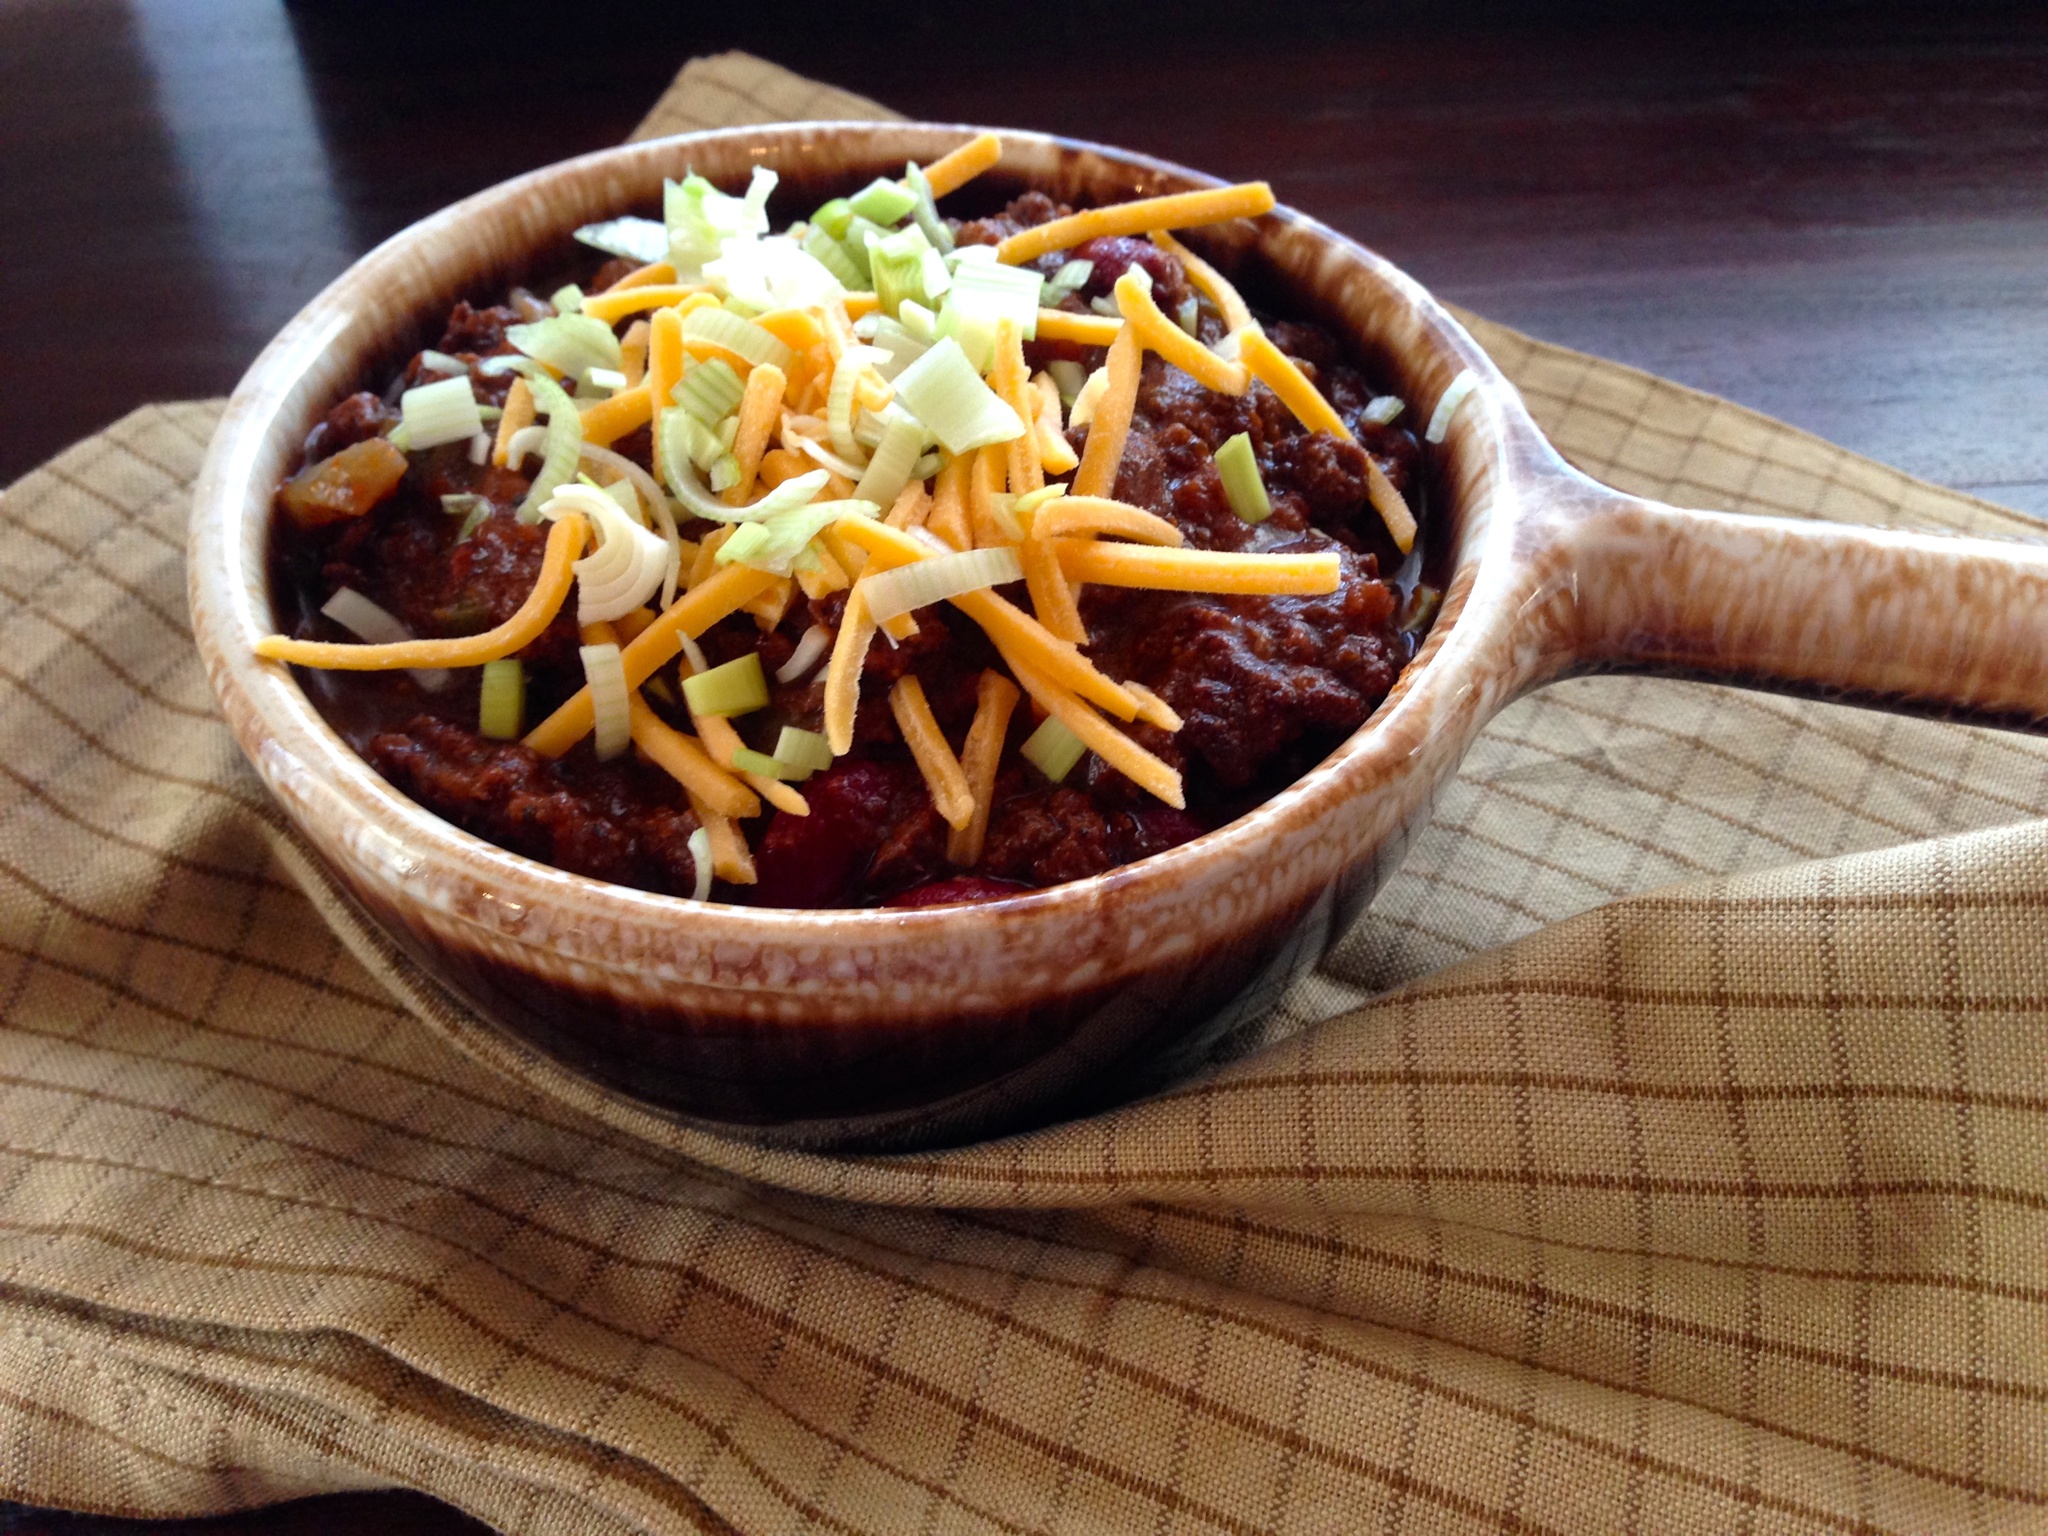
Moving around the country as much as we do, I’ve been able to taste a wide variety of chilies. It seems that everyone has their own unique recipe with a “secret” ingredient they’ve vowed never to share, not even under the threat of torture. I am one of those people. When I was writing this blog, I did a lot of soul searching as to whether or not I wanted to post my chili recipe. There are very few recipes that I don’t share, and this is one. I considered including an abbreviated version, leaving out a few key ingredients, but alas, my conscience got the better of me. So here it is, folks, the full, unadulterated version of my Cincinnati Style Chili.

Cincinnati Style Chili

Serves 8

  • 1½ lbs. ground Beef (20% fat)
    1 lb. ground hot Italian sausage
    1 Tbsp. olive oil
    1 white onion, chopped
    2 green peppers, chopped
    3 celery stalks, chopped
    2 garlic cloves, peeled and minced
    1 15 oz. can diced tomatoes
    1 6 oz. can pesto/basil tomato paste
    2 bay leaves
    1 can of light beer, preferably a lager
    2 Tbsp. dark molasses
    4 cups homemade beef stock (see recipe in Homemade Stocks)
    2 cans dark red kidney beans, drained and rinsed
    1 Tbsp. flour
    3 Tbsp. water
    Chili Spice Blend (recipe below)
    Kosher salt and fresh cracked black pepper to taste

In a heavy skillet set over medium-high heat, brown the ground meats in two separate batches. Drain and set aside.

In a large stock pot, sauté onion, peppers, and celery in olive oil until tender, about 8-10 minutes. Add diced tomatoes (breaking apart with hands) and juice, tomato paste, minced garlic, bay leaves, and molasses. Add ¼ cup Chili Spice Blend. Stir and cook until the juices from the tomatoes thicken and become bubbly, about 5-8 minutes.

Add beer and cook until liquid reduces by half, about 3-5 minutes. Stir in beef stock and reserved meat and bring to a boil, then immediately reduce to a simmer. In a separate bowl or shaker cup, mix flour and water to create a “slurry” — you’ll want to whisk or shake the mixture until flour has dissolved and the slurry is smooth with no clumps remaining. Add to chili. Taste and season with salt & pepper and more Chili Spice Blend as needed.

STOVETOP INSTRUCTIONS:
Partially cover and simmer for 6-8 hours, stirring occasionally. 15 minutes before removing from heat, add drained beans and continue to cook.

CROCKPOT INSTRUCTIONS:
Pour chili into crockpot and stir in dried kidney beans, cover, and set on LOW heat for 8 hours.

*This chili is best when made a day ahead, as time in the refrigerator allows the flavors to marry and the chili to thicken.* Pour chili into a storage container and chill, uncovered, until cool. Cover and continue to chill overnight.

Reheat slowly over medium heat, stirring often so that chili doesn’t burn to the bottom of pot. Remove bay leaves. Taste and season with salt & pepper and more Chili Spice Blend if needed.
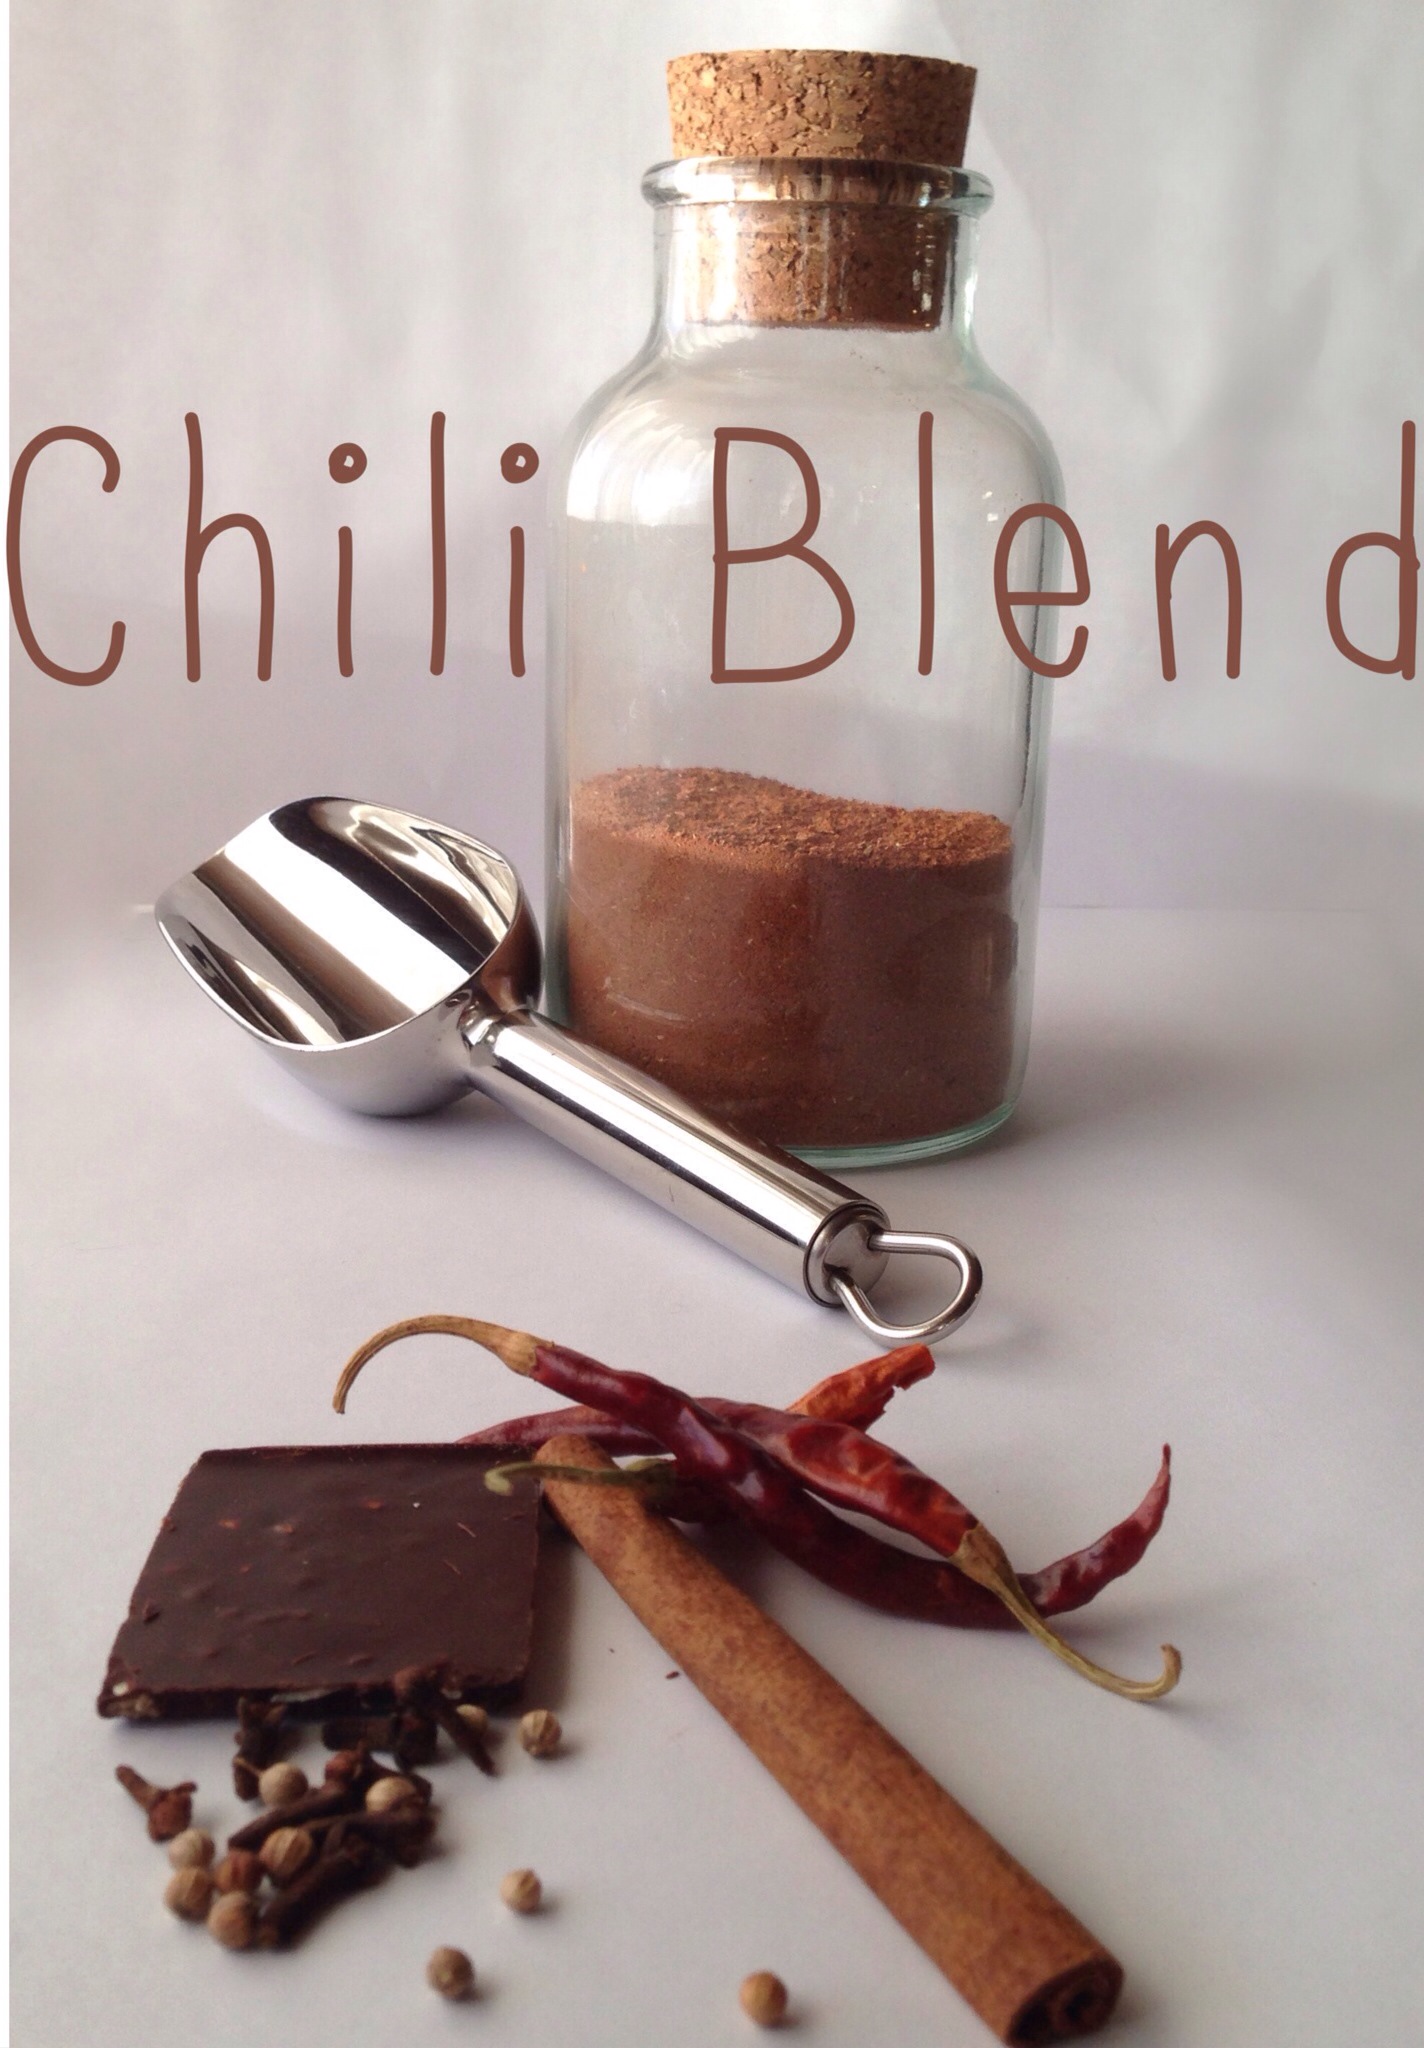
Chili Spice Blend

IMG_0504

This recipe makes about ¾ cup of seasoning. I use the entire ¾ cup in my chili, but start by adding ¼ cup at a time, then add more as you see fit. 

In a bowl or small jar, mix the following ingredients:

2 Tbsp. each of:
brown sugar
cinnamon
coco powder
cumin

1 Tbsp. each of:
chili powder
dried oregano

1tsp. each of:
allspice
cayenne pepper
coriander
garlic powder

½ tsp. each of:
cardamom
ginger
nutmeg
red-pepper flakes

Sidekicks:

  • You’re gonna want a beer with this chili! Not only is it a Super Bowl tradition, but beer will cut the heat you’re likely feeling after a few bites. Try a German hefeweizen, who’s banana notes pair well with the sweeter spices, or another light beer, such as a lager or pilsner. If you’re not a beer drinker, uncork a bottle of zinfandel instead.
  • Also, cornbread. But not the overly sweet stuff you get from a box-mix. The recipe below is quick and easy, and can hold up against the weight of this chili.

Savory Skillet Cornbread

IMG_0490

The addition of red bell peppers, leeks, and savory spices makes a nice accompaniment to this hearty chili. If you don’t have a cast-iron skillet, use a 9-inch square baking pan. (This recipe has been adapted from Everyday Food)

4 Tbsp. butter
2 cups stone-ground yellow cornmeal
3 Tbsp. brown sugar
1 tsp. baking soda
1 ½ tsp. salt
1 tsp. herbs d’provence (dried rosemary or thyme can be substituted)
2 large eggs
2 cups low-fat buttermilk
½ red bell pepper, diced
½ leek, white and light green parts only, diced
fresh cracked black pepper

Preheat oven to 425°. Put butter, peppers, and leeks in a 9-inch cast-iron skillet; place in oven until butter is melted and peppers and leeks are soft, about 5-8 minutes.

IMG_3304

Meanwhile, in a medium bowl, whisk cornmeal, sugar, baking soda, herbs d’provence, black pepper, and salt. In a large bowl, whisk together eggs and buttermilk.

Carefully remove hot skillet from oven; immediately pour butter, red peppers, and leeks into the buttermilk mixture, and whisk to combine. Using a pastry brush, coat bottom and sides with remaining butter.

Stir cornmeal mixture into buttermilk mixture until just moistened. Scrape batter into hot skillet; bake until golden, about 25 minutes. Let cool at least 10 minutes before slicing and serving.

Stuff My Kid Eats – Chicken Paillards with Squash and Spinach and Red Quinoa

Stuff My Kid Eats

IMG_3288

Food is huge part of daily life in our household. We eat it. We discuss it. We take pictures of it. We blog about it. So, it’s no surprise that as soon as my toddler wakes up in the morning, she wants to know what’s for breakfast. And not 20 minutes after breakfast, she wants to know what’s for lunch. Breakfast and lunch are her favorite meals — she usually gets to choose her main course (within reason), then is subjected to my side-dish-of-discrestion (vegetables). Now, here’s where our day falls apart: dinner. Inevitably, somewhere between lunch and our afternoon activities, she will ask, “What’s for dinner, Mommy?” Ugh! I dread this questions. I have nightmares about this question. I usually sugarcoat the answer to avoid a meltdown, and I always lead with the starch: “Rice with super yummy sausage and beans!” or “Risotto with pretty pink shrimp!” This works about 50% of the time. But, for whatever reason, if my answer contains the word chicken, she falls to the floor in tears, wailing, “Nooo, not chicken!” I don’t understand this. She loves chicken. She can eat her weight in chicken. It’s the single most popular food item that she will clear off her plate every time I serve it. EVERY. TIME.

Below is a dish, that when spoken aloud, sends my child into another universe with despair, but always inducts her into the “clean plate” club. It’s simple. It’s delicious. But it could probably use a better name; maybe “Sweet Squash with Spinach Pinwheels and (spoken softly)…chicken.” Again, good luck! I know you’ll enjoy it, hopefully your kids will, too.

Chicken Paillards with Squash and Spinach

Chicken Paillards with Squash & Spinach

This recipe comes to you by way of my former employer, Martha Stewart, and is an easy way to prepare deliciously tender chicken breasts. You can put your own personal touch on this versatile recipe by experimenting with other toppings such as oven-dried tomatoes, chopped Kalamata olives, and feta cheese; or fresh diced tomatoes & avocados with cilantro leaves and a squeeze of lime. (Recipe from Martha Stewart Living)

Serves 4

½ small kabocha squash, unpeeled, seeded and cut lengthwise into ¾-inch slices (see Tips*)
1 small red onion, cut into wedges, root end attached
2 Tbsp. extra-virgin olive oil
2 skinless, boneless chicken-breasts, halved (see How To*)
Kosher salt
Red-pepper flakes to taste
1 Tbsp. unsalted butter
6 fresh sage leaves (from about 4 sprigs)
1 cup baby spinach leaves

You will also need:
Plastic wrap
Meat mallet

Preheat oven to 425°. Distribute squash and onion evenly on 2 rimmed baking sheets. Drizzle with 1 Tbsp. oil, season with salt, and toss to coat. Spread in a single layer and roast until squash is tender, about 15-20 minutes.

Meanwhile, pound chicken to a ⅛-to-¼-inch thickness. Season on both sides with salt and red-pepper flakes (see Tips*). Heat a large skillet to medium-high heat. Swirl in remaining Tbsp. oil, then butter. Fry sage until just crisp, about 30 seconds to 1 minute; let drain on a paper towel.

Working in 2 batches, add chicken to pan and cook until golden and cooked through, about 2 minutes per each side. Divide chicken among 4 plates and top with spinach, squash, onion, and sage.

*Tips:

  • Cooking red-pepper flakes mellows their heat, but if you prefer, replace with fresh cracked black pepper instead. (I use red-pepper flakes, then before I cut and serve my toddler’s chicken, I scrape off the larger pieces so that she still gets the flavor without the fire.)
  • If kabocha squash (pictured below) is unavailable in your supermarket, substitute acorn squash — both can be eaten with the rind, just remember to remove the stem and end piece.

Kabocha Squash

*How To Halve a Chicken Breast:

To halve a chicken breast, lay the breast flat on a cutting board with the smooth side down. Using a sharp knife, cut away the small piece of meat that’s attached to the larger breast, called the “tender.” Set tender aside and freeze for another use (hint, hint…I’ll be posting a recipe for chicken tenders soon).

Butterflying a chicken 1

Turn breast over. With your knife, begin slicing the breast in half horizontally, all the way through. Repeat with second breast.

Butterflying a chicken 2

Butterflying a chicken 3

Lay 4 breast halves on a piece of plastic wrap and top with a second piece of plastic wrap. Using a meat mallet, pound chicken all over until you’ve reached an even thickness of about ⅛-inch.

Butterflying a chicken 4

Sidekicks:

  • This dish pairs well with a Dry Riesling, which counters the slight heat from the red-pepper flakes.
  • Serve chicken with red quinoa (pictured): Cook 1 cup dry red quinoa per package instructions, but replace water with chicken stock. Once cooked, mix in ¼ cup slivered almonds.

Red Quinoa with Slivered Almonds

Taking Stock: A Review of Store-Bought Stocks

Taking Stock: A Review of Store-Bought Stocks

Store-bought stocks

Nothing makes me feel like more of a cook and health-conscious mom than standing over a steaming pot of homemade stock, stirring the meat and vegetables that I cut that morning. BUT, and this is a big but, there are many days when I just don’t have the time or the desire to commit four hours to the task. To make my life easier, I always ensure that I have a few cans of stock stored away in my cupboards for just those moments. So, when a recipe calls for homemade stock and you just don’t have the time, store-bought stock is a quick and easy alternative.

When shopping for stocks, I usually pick what’s on sale, but that’s not always the healthiest or tastiest option — and the restults have been hit or miss. So, over the course of a weekend, I forced my husband to put down his Playstation controller and taste-test over a dozen different meats and vegetable broths, and two seafood stocks (thanks, Honey, I owe you for this one!). We rated each stock based on taste, aroma, and appearance, and also took into account nutritional value and price point. Here’s what we found…

CHICKEN STOCK

Store-bought stocks

Chicken stock is arguably the most commonly used stock for cooking, which is why grocers tend to carry a greater variety of it. In my search of four local markets, I was able to find about 8-10 brands, and reviewed six of the most commonly reoccurring ones. As you can see from the photo above, the colors were surprisingly diverse, spanning the “chicken spectrum” from a poached to deep fried. Even more surprising was the difference in taste and smell. Among the six stocks, there was a definite top three and bottom three, with a clear winner that pulled above the rest. (Note: every stock we rated contained zero fat and less than 20 calories per serving, therefore, I only noted the sodium content for each brand.)

Butterball (pictured top left): With no surprise, Butterball, a name synonymous with poultry, had the best overall taste, smell, and appearance. It was sufficiently chicken-y, without being either overly salty or overly bland. The price was appealing, too, at $0.49 for a 14.5 oz. can. Of course, good flavor comes at a cost, and with Butterball, it’s the cost of high blood pressure; 820g of sodium per serving.

Swanson (bottom left): Swanson brand was by far the easiest to find, as it appeared in the soup isle of every grocery store I visited. It was our second pick for flavor and price at $1.50 for a 32 oz. carton. The aroma and color were a bit off-putting, but if added to a dish with other aromatics, could easily be countered. Slightly better for the heart, Swanson contains 510g of sodium per serving.

College Inn (top middle): Fairly easy to find, comparable in price to the other two, and even less sodium per serving (450g), College Inn was the final in our top three picks. An excellent aroma of roast chicken, with a subtle (if not slightly bland) chicken flavor.

Here’s a brief rundown of the bottom three picks in the order we rated them:

Kitchen Basics (bottom right): This brand was easier to find than College Inn, but much more expensive than the rest with a price of $2.69/32 oz. carton. It had the second lowest sodium count at 210g per serving, and although it had a nice smell of grilled chicken, there was too strong of a vegetable flavor — which would be excellent for vegetable broth, but not for chicken stock.

Emeril’s (top right) and Rachael Ray (bottom middle): We found that neither of these stocks were worth the price ($2.62 and $1.98 respectively for a 32 oz. carton). Emeril’s was very salty and left an oily finish on the tongue, with a high sodium count of 590g per serving. Rachael Ray’s Low Sodium Stock-in-a-Box obviously had the least amount of sodium per serving (135g), but also had the least amount of flavor.

When buying pre-made stock, I want to spend my money on something that tastes good, but is also healthy. Although Butterball had the best overall flavor, I plan on using College Inn for my “chicken stock emergencies.” The smell was fantastic, the lower sodium count was appealing, and the somewhat thin flavor can easily be punched up with the addition of other vegetables and spices. Next week…beef stock!

Zesty Tomato Soup with Balsamic Reduction, Fried Sage; Open-Face Tuna Melt

Zesty Tomato Soup with Balsamic Reduction and Fried Sage Leaf
Served with Tuna Melt Toast and Arugula Salad

Zesty Tomato Soup with Balsamic Reduction and Fried Sage

This is one of my all-time favorite soup recipes. My mom used to serve a version of this every Christmas, and after a while, the family started referring to it as, “Christmas Soup.” The recipe has evolved over the years with the addition of orange zest and balsamic vinegar, and is now no longer relegated to being served exclusively on December 25th. (Note: the recipe can easily be adapted to suit a vegetarian by substituting vegetable broth for the chicken stock.)

Serves 6

1 Tbsp. olive oil
2 Tbsp. butter, cut into cubes
1 white onion, coarsely chopped
2 celery stalks, coarsely chopped
2 carrots, peeled and coarsely chopped
4 cloves garlic, peeled and slightly crushed
3 fresh sage leaves finely chopped
28 oz. can peeled whole tomatoes, drained, liquid reserved
1 ½ tsp. freshly grated orange zest (about 1 large orange)
2 bay leaves
4 cups chicken or vegetable stock (see recipe in Homemade Stocks)
6 oz. can tomato paste
8 whole cloves
2 Tbsp. brown sugar
1 Tbsp. balsamic vinegar
1 ¼ cup whole milk
2 tsp. Kosher salt, plus more to taste
Fresh ground black pepper to taste

Preheat oven to 325°. In a large glass baking dish, combine onion, celery, carrots, garlic, orange zest, chopped sage leaves, bay leaves, drained tomatoes, and olive oil. Season with 1 tsp. salt and dot the top with butter cubes (Figure 1). Bake for 75 minutes, stirring half way through.

Figure 1 – Slow roasting tomatoes and vegetables

Slow roasted tomatoes

Remove baking dish from oven and let cool slightly. Find bay leaves and set aside. Pour tomato/vegetable mixture into a soup pot with ¼ cup reserved tomato juice, and using a hand blender, purée until smooth (or working in two batches, purée tomato/vegetable mixture and ¼ cup reserved tomato juice in a blender or food processor until smooth, then pour into soup pot). Use more tomato juice to thin if necessary.

Add tomato paste, chicken stock, balsamic vinegar, brown sugar, 1 tsp. salt, fresh cracked pepper, whole cloves, and reserved bay leaves to tomato/vegetable purée. Simmer for 1 hour partially covered, stirring occasionally, until soup thickens. Add milk and simmer for an additional 15 minutes. With a slotted spoon, remove bay leaves and whole cloves, discard. Season with more salt and pepper if desired.

When ready to serve, ladle soup into pre-warmed bowls, drizzle with balsamic reduction and top with a fried sage leaf.

Balsamic Reduction:

1 cup balsamic vinegar
1 tsp. honey
1 garlic clove, peeled
1 sage leaf
2 whole cloves

In a heavy sauce pan, bring all ingredients to a boil, then immediately reduce to a simmer. Continue to simmer, watching closely, until liquid is reduced to ¼ cup, about 30-40 minutes. Pour reduction through a fine-mesh sieve and allow to cool before using.

Fried Sage Leaves:

Fried Sage Leaves

6-8 fresh sage leaves
¼ cup olive oil
Flaky sea salt, such as Maldon

In a heavy skillet over medium-high heat, heat oil until shimmering. Gently place sage leaves in oil and fry until leaves stop bubbling and are crispy but not burned, about 8-10 seconds. Transfer leaves to a paper towel. Sprinkle with salt.

Sidekicks: 

  • Consider serving a cup of Zesty Tomato Soup with an Open-Face Tuna Melt: Slice French bread on the diagonal. Drain a 12 oz. can of tunafish and combine in a bowl with ¼ cup mayonnaise, 2 Tbsp. dijon mustard, 1 tsp. soy sauce, 1 tsp. worcestershire sauce, and 1 finely chopped shallot. Season with salt and pepper. Spread a heaping spoonful of tuna mixture on the bread, and cover with a slice of sharp cheddar cheese. Place slices on a cookie sheet and broil until cheese has melted and is bubbly at the edges. Top with a handful of arugula dressed with equal parts olive oil and white wine vinegar, season with salt and pepper and enjoy!
  • This soup pairs well with a chilled glass of Sauvignon Blanc or Chardonnay.

Shortcuts:

  • Substitute store-bought stock for homemade stock.
  • Instead of roasting tomatoes and vegetables in the oven, replace 28 oz. can of whole peeled tomatoes with a 28 oz. can of fire roasted whole peeled tomatoes. Start by sautéing the onion, carrots, celery, and garlic in butter and oil directly in your soup pot. Once vegetables are soft and starting to brown, about 10-15 minutes, add the drained tomatoes, orange zest, and herbs. Cook for 15 minutes, then allow to cool slightly before following the instructions on puréeing.